Ga door naar hoofdinhoud
Word lid van de reparatiegemeenschap - Account aanmaken

Logitech M100 Switch Replacement

Wat je nodig hebt

    1. Logitech M100 Switch Replacement, Switches: stap 1, afbeelding 1 van 1
      • Disconnect the mouse from any devices before attempting to remove any parts or starting the repair.

      • Flip your mouse over so the bottom is facing up.

      Vraag FixBot

      Voeg opmerking toe

    2. Logitech M100 Switch Replacement: stap 2, afbeelding 1 van 1
      • Use a small Phillips #00 screwdriver to remove the single screw at the bottom of the mouse.

      Vraag FixBot

      Voeg opmerking toe

    3. Logitech M100 Switch Replacement: stap 3, afbeelding 1 van 2 Logitech M100 Switch Replacement: stap 3, afbeelding 2 van 2
      • Turn your mouse over so it is facing right side up.

      • Use a spudger or your hands to carefully separate the top from the bottom housing.

      • It's important to remove the top housing while leaving the bottom in place, as the scroll wheel and other internal components may fall out otherwise.

      Vraag FixBot

      Voeg opmerking toe

    4. Logitech M100 Switch Replacement: stap 4, afbeelding 1 van 1
      • Remove the external cable from the slot at the front of the mouse.

      Vraag FixBot

      Voeg opmerking toe

    5. Logitech M100 Switch Replacement: stap 5, afbeelding 1 van 3 Logitech M100 Switch Replacement: stap 5, afbeelding 2 van 3 Logitech M100 Switch Replacement: stap 5, afbeelding 3 van 3
      • Remove the circuit board from the mouse by pushing down at the back and lifting up at the front.

      Vraag FixBot

      Voeg opmerking toe

    6. Logitech M100 Switch Replacement: stap 6, afbeelding 1 van 2 Logitech M100 Switch Replacement: stap 6, afbeelding 2 van 2
      • Lift the scroll wheel from the board.

      • There should be a total of four parts that make up the scroll wheel.

      Vraag FixBot

      Voeg opmerking toe

    7. Logitech M100 Switch Replacement: stap 7, afbeelding 1 van 1
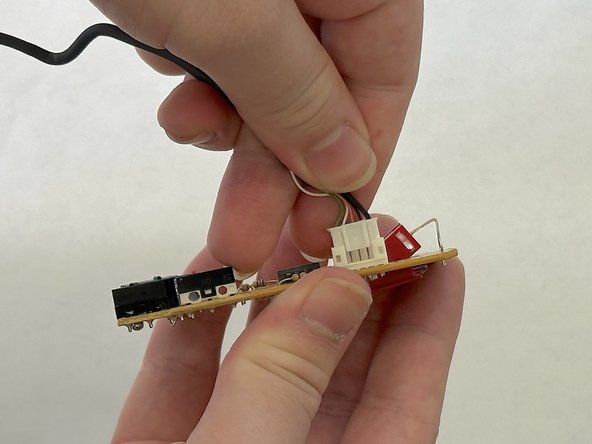
      • Pull the USB cable away from the connector in the same direction as the individual wires to remove it from the motherboard.

      • This step may prove difficult with just your hands. Use a spudger if you need to.

      • Pull evenly on the full width of the cable so that no individual wires are overly strained.

      Vraag FixBot

      Voeg opmerking toe

    8. Logitech M100 Switch Replacement: stap 8, afbeelding 1 van 1
      • Find a suitable method to hold the circuit board in place so you don't have to hold it in your hands.

      • Use a small vice to keep it in place or helping hands for this next step.

      Vraag FixBot

      Voeg opmerking toe

    9. Logitech M100 Switch Replacement: stap 9, afbeelding 1 van 3 Logitech M100 Switch Replacement: stap 9, afbeelding 2 van 3 Logitech M100 Switch Replacement: stap 9, afbeelding 3 van 3
      • Use a soldering iron to heat the solder points securing both switches, and remove the switches using tweezers.

      • The soldering iron and the solder holding the switch in place will be very hot and can burn you.

      Vraag FixBot

      Voeg opmerking toe

    10. Logitech M100 Switch Replacement: stap 10, afbeelding 1 van 3 Logitech M100 Switch Replacement: stap 10, afbeelding 2 van 3 Logitech M100 Switch Replacement: stap 10, afbeelding 3 van 3
      • Replace each switch and solder it to the circuit board.

      • The soldering wire may conduct heat up to the hand holding it.

      • Be sure to work in a well ventilated space as the solder may emit smoke.

      • You can use tape to hold the switch in place while soldering.

      Vraag FixBot

      Voeg opmerking toe

    11. Logitech M100 Switch Replacement: stap 11, afbeelding 1 van 2 Logitech M100 Switch Replacement: stap 11, afbeelding 2 van 2
      • Reassemble the mouse by following steps 2-7 in reverse order.

      Vraag FixBot

      Voeg opmerking toe

Conclusie

Congratulations, you have now replaced the clickers on your mouse and can continue using it!

Annuleren: ik heb deze handleiding niet afgemaakt.

2 andere personen hebben deze handleiding voltooid.

Diego De La Fuente

Lid sinds: 03/05/24

211 Reputatie

1 Handleiding geschreven

Team

CSU Los Angeles, Team 7-2, Grodsky Spring 2024 Lid van CSU Los Angeles, Team 7-2, Grodsky Spring 2024

CSULA-GRODSKY-S24S7G2

3 Leden

5 handleidingen geschreven

0Gids Commentaar

Voeg opmerking toe

Weergavestatistieken:

Afgelopen 24 uren: 0

Afgelopen 7 dagen: 15

Afgelopen 30 dagen: 59

Altijd: 1,175