Ga door naar hoofdinhoud
Lenovo ThinkPad T470 SSD Replacement

Lenovo ThinkPad T470 SSD Replacement

Kristen Gismondi

Kristen Gismondi en 3 andere bijdragers

Voor het laatst geüpdatet op May 23, 2024

20 - 25 minuten
Eenvoudig

Use this guide to replace the SSD in your Lenovo ThinkPad T470 laptop.

An SSD (short for “solid-state drive”) is a storage component in a computer. SSDs use flash memory, as opposed to the spinning disks and moveable parts used in an HDD (hard disk drive). As a result, SSDs are much quieter and operate more quickly than HDDs. Signs your SSD may be faulty include corrupted data, read-only errors, frequent crashes, or blue screen of death.

If you are able to recover any data saved to your SSD, be sure to back up your files before beginning this guide. Also, make sure to disable the internal battery, power down your device, and disconnect from any external power sources before you begin.

Wat je nodig hebt

Reparatiesets

Deze sets bevatten alle onderdelen en tools om deze handleiding te voltooien.

Onderdelen

Gereedschap

  • Phillips #1 Screwdriver
    Phillips #1 Screwdriver
  • Spudger
    Spudger

Toon meer…

  1. Lenovo ThinkPad T470 SSD Replacement, External Battery: stap 1, afbeelding 1 van 3 Lenovo ThinkPad T470 SSD Replacement, External Battery: stap 1, afbeelding 2 van 3 Lenovo ThinkPad T470 SSD Replacement, External Battery: stap 1, afbeelding 3 van 3
    • Before you begin this guide, make sure to disable the internal battery, power down your device, and disconnect from any external power sources.

    • Place the laptop so that the bottom is facing upwards.

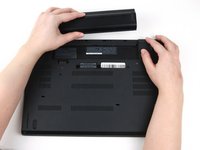
    • Slide the latch on the left side of the battery to the left until it clicks in place.

  2. Lenovo ThinkPad T470 SSD Replacement: stap 2, afbeelding 1 van 3 Lenovo ThinkPad T470 SSD Replacement: stap 2, afbeelding 2 van 3 Lenovo ThinkPad T470 SSD Replacement: stap 2, afbeelding 3 van 3
    • Slide the latch on the right side of the battery to the right and hold it in place with your thumb.

    • Use your other hand to slide the battery towards the back of the laptop.

    • Lift the battery up and away from the laptop.

  3. Lenovo ThinkPad T470 SSD Replacement, Bottom Cover: stap 3, afbeelding 1 van 2 Lenovo ThinkPad T470 SSD Replacement, Bottom Cover: stap 3, afbeelding 2 van 2
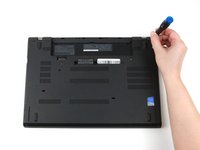
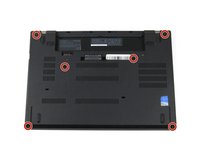
    • Use a Phillips #1 screwdriver to loosen the six captive screws on the bottom cover of the laptop.

  4. Lenovo ThinkPad T470 SSD Replacement: stap 4, afbeelding 1 van 3 Lenovo ThinkPad T470 SSD Replacement: stap 4, afbeelding 2 van 3 Lenovo ThinkPad T470 SSD Replacement: stap 4, afbeelding 3 van 3
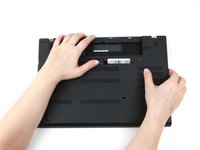
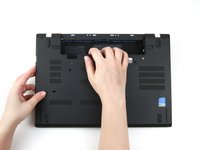
    • Use your hands to pull up on the back cover and release the plastic clips starting on the bottom side of the battery compartment.

    • Potential for device damage: Be sure to detach the plastic clips in this area first. You risk cracking the bottom cover if you attempt to detach it from around the edges of the laptop first.

    • Use your hands to pull up on the right side of the bottom cover to release the plastic clips.

    • Use your hands to pull up on the left side of the bottom cover to release the plastic clips.

  5. Lenovo ThinkPad T470 SSD Replacement: stap 5, afbeelding 1 van 1
    • Remove the bottom cover from the laptop.

    • Disconnect the battery from the board before continuing.

  6. Lenovo ThinkPad T470 SSD Replacement, SSD Assembly: stap 6, afbeelding 1 van 2 Lenovo ThinkPad T470 SSD Replacement, SSD Assembly: stap 6, afbeelding 2 van 2
    • Use the flat end of a spudger to flip up the metal clip securing the SSD connector to the motherboard.

  7. Lenovo ThinkPad T470 SSD Replacement: stap 7, afbeelding 1 van 2 Lenovo ThinkPad T470 SSD Replacement: stap 7, afbeelding 2 van 2
    • Use the flat end of a spudger to separate the connector from its socket.

  8. Lenovo ThinkPad T470 SSD Replacement: stap 8, afbeelding 1 van 3 Lenovo ThinkPad T470 SSD Replacement: stap 8, afbeelding 2 van 3 Lenovo ThinkPad T470 SSD Replacement: stap 8, afbeelding 3 van 3
    • Grab the tab on the left side of the SSD assembly, and pull up to remove it from the laptop.

  9. Lenovo ThinkPad T470 SSD Replacement, SSD: stap 9, afbeelding 1 van 3 Lenovo ThinkPad T470 SSD Replacement, SSD: stap 9, afbeelding 2 van 3 Lenovo ThinkPad T470 SSD Replacement, SSD: stap 9, afbeelding 3 van 3
    • Use your fingers to detach the plastic bracket from the SSD assembly.

  10. Lenovo ThinkPad T470 SSD Replacement: stap 10, afbeelding 1 van 2 Lenovo ThinkPad T470 SSD Replacement: stap 10, afbeelding 2 van 2
    • Flip the SSD assembly over so that the green connector board is visible.

  11. Lenovo ThinkPad T470 SSD Replacement: stap 11, afbeelding 1 van 2 Lenovo ThinkPad T470 SSD Replacement: stap 11, afbeelding 2 van 2
    • Use a Phillips #1 screwdriver to remove the two 4 mm screws from the metal bracket.

  12. Lenovo ThinkPad T470 SSD Replacement: stap 12, afbeelding 1 van 3 Lenovo ThinkPad T470 SSD Replacement: stap 12, afbeelding 2 van 3 Lenovo ThinkPad T470 SSD Replacement: stap 12, afbeelding 3 van 3
    • Use your hands to lift the metal bracket up and away from the SSD assembly.

    • There may be some adhesive attaching the metal bracket to the SSD.

  13. Lenovo ThinkPad T470 SSD Replacement: stap 13, afbeelding 1 van 1
    • Remove the single 4 mm screw using a Phillips #1 screwdriver.

  14. Lenovo ThinkPad T470 SSD Replacement: stap 14, afbeelding 1 van 2 Lenovo ThinkPad T470 SSD Replacement: stap 14, afbeelding 2 van 2
    • Use the flat end of a spudger to pry the SSD up slightly and pull it out of the slot with your other hand.

  15. Lenovo ThinkPad T470 SSD Replacement: stap 15, afbeelding 1 van 2 Lenovo ThinkPad T470 SSD Replacement: stap 15, afbeelding 2 van 2
    • Remove the two 4 mm screws from the SSD connector board using a Phillips #1 screwdriver.

  16. Lenovo ThinkPad T470 SSD Replacement: stap 16, afbeelding 1 van 2 Lenovo ThinkPad T470 SSD Replacement: stap 16, afbeelding 2 van 2
    • Use your hand to remove the SSD connector board from the metal enclosure.

Conclusie

To reassemble your device, follow these instructions in reverse order.

Take your e-waste to an R2 or e-Stewards certified recycler.

Repair didn’t go as planned? Try some basic troubleshooting, or ask our Answers community for help.

Één andere persoon heeft deze handleiding voltooid.

Kristen Gismondi

Lid sinds: 11/12/14

92.087 Reputatie

241 handleidingen geschreven

Team

iFixit Lid van iFixit

Staff

118 Leden

19.455 handleidingen geschreven

0 opmerkingen

Voeg opmerking toe

Weergavestatistieken:

Afgelopen 24 uren: 21

Afgelopen 7 dagen: 125

Afgelopen 30 dagen: 436

Altijd: 21,272