Inleiding
The battery is one of the most fundamental components to the JAMBOX MINI. It is used to power the device. Replacing it is very difficult and should only be attempted it absolutely necessary.
Wat je nodig hebt
-
-
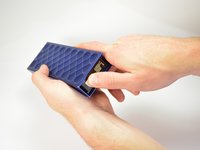
Using the standard metal spudger, begin by prying at the bottom of the plain rubber end cap (the end without the USB or auxiliary input).
 Vraag FixBot
-
-
-
Continue prying around the end panel, prying at different points until the entire panel is out of its seating.
-
Carefully remove the end panel.
-
-
-
Using a T6 bit, remove the flat topped 5mm screw located on the bottom of the casing, underneath the rubber foot.
-
-
-
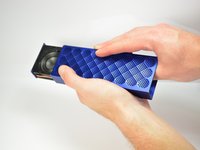
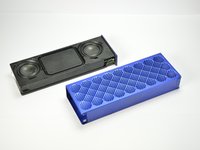
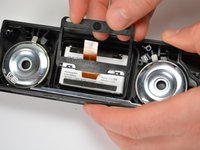
Push against the side without end cap to slide the internal components out of the case.
-
While holding the metal outset casing with one hand, press on the black inner plastic casing with your thumb.
-
-
-
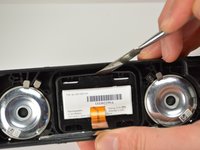
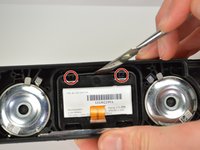
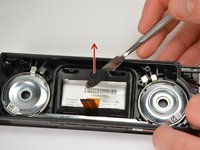
Remove all connecting ribbons from the motherboard.
-
One ZIF or "zero insertion force" ribbon connecting at the side.
-
One standard ribbon connector in the middle (Note: this ZIF ribbon is lightly glued to the surface).
-
-
-
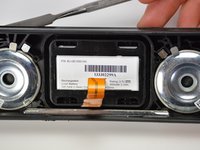
Unscrew all four 5mm T6 screws holding the motherboard to the plastic case.
-
-
-
-
Desolder the grounding plug from the motherboard.
-
Make sure your soldering iron is tinned and carefully touch the tip of your iron to the grounding lug. Allow the the solder to liquify. While liquified, lift the motherboard off the grounding lug.
-
-
-
Once the motherboard has been removed, insert a standard metal spudger in between the outer and inner casing of the battery housing.
-
-
-
With the metal spudger in place, pry the inner plastic housing away from the outer housing.
-
Four tabs lock the sides into place, but only two need to be unhinged to remove the battery housing.
-
-
-
After undoing the tabs on one side, pull up and away from the side that is still locked in place. This will remove the battery housing.
-
Once all of the tabs have been undone, the inner housing will pop out and the battery will be accessible.
-
-
-
There is a sticky adhesive on the bottom of the battery that keeps it in place. Insert a metal spudger under the side of the battery and gently begin to pry the battery away from the base.
-
-
-
Once the battery has been removed, it can be replaced.
-
Once the new battery is in place, snap the inner housing back into its locked position.
-
-
-
See also What to get a replacement battery?
-
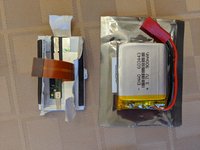
I did not find a direct replacement identical battery on the market. I bought a battery for $6 on eBay.
-
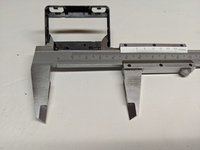
My considerations: The voltage is 3.7V. The storage is at least 900mAh. The mechanical dimensions have to fit inside the compartment. And I selected a two-wire battery because I'm not understanding what the third wire is for so I'm keeping the old power control board and ribbon cable.
-
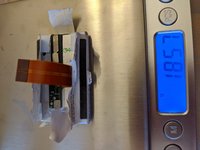
There is also a consideration of mass, that needs to match also. I found my new battery with larger dimensions was actually lighter. I will show how to add mass.
-
-
-
Unwrap and conserve the (hopefully functioning) power controller board from the old battery by cutting the tabs. The tabs are thin and soft and cut easily with a razor. Disconnect the positive terminal first. I used a voltmeter to find that the battery case is positive.
-
I trimmed the tabs about 1/8" from the board, just enough remaining so that I could later fold them over the wires of the new battery.
-
-
-
Cut the connector off of the new battery, ONE WIRE AT A TIME so that you do not short-circuit the battery.
-
Position the power board approximately and route and trim the wires to length.
-
Strip and tin the wire ends on the new battery.
-
Connect the red wire of the new battery to the positive terminal of the board, and the black wire to the negative terminal. You may fold the tab over the wire to hold it while you solder.
-
-
-
Verify the new battery fits in the compartment. I had to omit the battery clip, and exercise care how I routed the wires. Verify the ribbon cable does not need to twist or strain. I had to tuck the power controller well beneath the mother board. Exercise care not to short-circuit the power controller board to the mother board.
-
Observe that Jawbone did not follow the engineering principle of separation of functions. Jawbone used the battery as the mass in a mass-spring acoustic resonator. So the mass needs to be close to the original. I added a couple of dimes to make up for my new battery being light and discarding the battery clip.
-
-
-
Select a lightweight adhesive. I used tacky glue.
-
Glue the battery into the compartment
-
Glue the battery controller board to the battery and position so that the ribbon cable is aligned with the connector. I used a large rubber band (or sponge) between the power controller board and the mother board to temporarily hold position while the glue dried.
-
Glue the extra mass to the battery
-
Reconnect the battery cable to the mother board. Tilt the black lever up, slide the cable in, and tilt down firmly.
-
If you have succeeded, you'll be able to charge the battery while the glue dries.
-


To reassemble your device, replace the battery and snap the inner casing back into place. Then do the remaining steps in reverse order.
Annuleren: ik heb deze handleiding niet afgemaakt.
6 andere personen hebben deze handleiding voltooid.
Team

Cal Poly, Team 12-1, Lancaster Spring 2015 Lid van Cal Poly, Team 12-1, Lancaster Spring 2015
CPSU-LANCASTER-S15S12G1
5 Leden
11 handleidingen geschreven
2Gids Commentaar
Where can you order the replacement battery?
Thanks for the post. I was able to replace my battery and the speaker is functioning fine. I did not desolder the motherboard and didn’t have much trouble getting the old battery out. I did manage to find a battery on Amazon the exact same dimensions and rating and was able to use the factory battery clip. Hardest part of the job is getting the old battery out. Take note where the adhesive tape is when you are doing this job.