Inleiding
The real-time clock (RTC) battery maintains the computer time in the HP Z2 Mini G3 (Model No. 1LE81UP#ABA). In case of malfunction or damage, this guide can direct end users to steps required to replace this battery.
Before starting this replacement, check out our troubleshooting guide to ensure the component actually needs replaced.
Be sure to turn off the device and disconnect the A/C power cord when working on the interior components.
Components inside the device are also subject to static damage, so try and work on a hard surface to reduce this risk.
-
-
Turn the device so the back-side of the device is facing you.
 Vraag FixBot
-
-
-
Slide and hold the latch in the direction of the engraved arrow (to the right).
-
-
-
-
While holding the latch, lift the access panel upwards and towards yourself and set it aside upside-down.
-
-
-
Rotate the device so the back-side is facing you and locate the RTC battery.
-
-
-
Press the battery down and away to free it of the latches.
-
Use your hand to grab and lift the battery out of the socket.
-



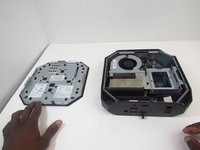


To reassemble your device, follow these instructions in reverse order.

Team

Embry-Riddle Aeronautical University, Team S16-G4, Branham Spring 2020 Lid van Embry-Riddle Aeronautical University, Team S16-G4, Branham Spring 2020
ERAU-BRANHAM-S20S16G4
3 Leden
6 handleidingen geschreven
