Ga door naar hoofdinhoud
HP Split x2 Screen Replacement

HP Split x2 Screen Replacement

Ricky Huitema

Ricky Huitema en 8 andere bijdragers

Voor het laatst geüpdatet op May 7, 2024

30 minuten
Gemiddeld
Uitgelichte studenten-handleiding

Did you accidentally drop your device and shatter the screen? This guide will instruct you how to replace your broken screen. The first five steps tell you how to remove the rear cover of the case. The remaining six steps explain how to replace the screen.

Wat je nodig hebt

Onderdelen

Gereedschap

Toon meer…

  1. HP Split x2 Screen Replacement, Rear Cover: stap 1, afbeelding 1 van 1
    • Opening the device voids the manufacturer warranty.

    • Power down the HP Split x2 before beginning the repair

    • Separate the tablet from the keyboard by pushing the slider to the left and lifting the tablet from the keyboard.

  2. HP Split x2 Screen Replacement: stap 2, afbeelding 1 van 3 HP Split x2 Screen Replacement: stap 2, afbeelding 2 van 3 HP Split x2 Screen Replacement: stap 2, afbeelding 3 van 3
    • Remove the four white caps on the bottom edge of the tablet.

    • Use a tweezer to grasp white caps.

    • The white caps are easily lost. Store them in a secure place.

  3. HP Split x2 Screen Replacement: stap 3, afbeelding 1 van 1
    • Use a Phillips #000 screwdriver to remove the four 3mm screws.

  4. HP Split x2 Screen Replacement: stap 4, afbeelding 1 van 2 HP Split x2 Screen Replacement: stap 4, afbeelding 2 van 2
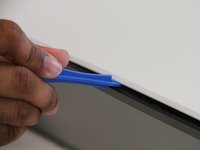
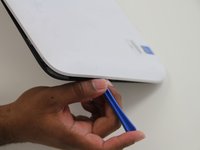
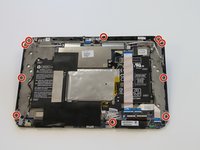
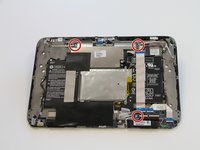
    • Use a plastic opening tool to pry the tabs on the top, left and right sides of the tablet.

    • Only the top and sides have tabs. Remove all tabs before lifting screen.

  5. HP Split x2 Screen Replacement: stap 5, afbeelding 1 van 2 HP Split x2 Screen Replacement: stap 5, afbeelding 2 van 2
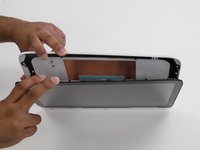
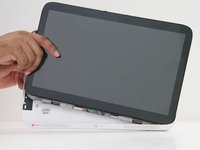
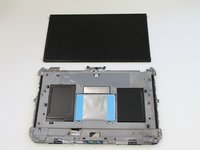
    • Separate the cover and the screen.

    • Gently lift the screen out of the cover.

  6. HP Split x2 Screen Replacement, Screen: stap 6, afbeelding 1 van 2 HP Split x2 Screen Replacement, Screen: stap 6, afbeelding 2 van 2
    • Use a J0 screwdriver to remove the ten 4mm Phillips screws.

  7. HP Split x2 Screen Replacement: stap 7, afbeelding 1 van 2 HP Split x2 Screen Replacement: stap 7, afbeelding 2 van 2
    • Peel back the large black tape.

    • Remove the 4mm Phillips screw.

  8. HP Split x2 Screen Replacement: stap 8, afbeelding 1 van 3 HP Split x2 Screen Replacement: stap 8, afbeelding 2 van 3 HP Split x2 Screen Replacement: stap 8, afbeelding 3 van 3
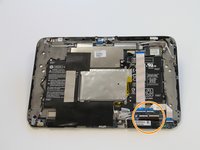
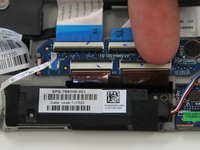
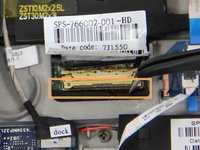
    • Remove three 2 mm zero insertion force (ZIF) connectors. Lift the black tab in front and then remove the ribbon from the rear.

    • Remove two larger zero insertion force (ZIF) connectors. Lift the black tab in front and then remove the ribbon from the rear.

  9. HP Split x2 Screen Replacement: stap 9, afbeelding 1 van 3 HP Split x2 Screen Replacement: stap 9, afbeelding 2 van 3 HP Split x2 Screen Replacement: stap 9, afbeelding 3 van 3
    Gereedschap gebruikt in deze stap:
    Tweezers
    $4.99
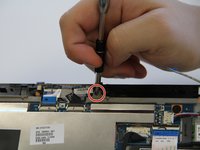
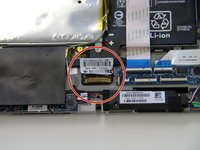
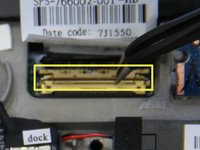
    • The last attachment to the screen is the bronze colored display cable connector.

    • Use a pair of tweezers to lift the metal bar and swing it to the other side on top of the cable.

    • Pull in the direction of the cable to remove the connector.

  10. HP Split x2 Screen Replacement: stap 10, afbeelding 1 van 1
    • Glue is holding the device together along the edges. The glue is can be very strong. A heat gun may be required to loosen the glue for removal of the digitizer to prevent damage to the screen.

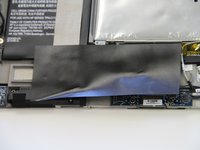
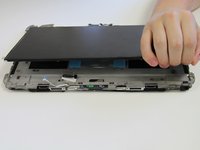
    • Apply pressure to to the sides of the tablet.

    • Separate the digitizer from the the body of the tablet.

  11. HP Split x2 Screen Replacement: stap 11, afbeelding 1 van 2 HP Split x2 Screen Replacement: stap 11, afbeelding 2 van 2
    • Glue is holding the screen on at the four corners.

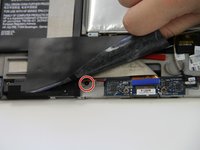
    • Lift the screen up, breaking any adhesion forced by the glue.

    • Replace the old screen with a new one.

Conclusie

To reassemble your device, follow these instructions in reverse order.

11 andere personen hebben deze handleiding voltooid.

Ricky Huitema

Lid sinds: 09/24/15

464 Reputatie

2 handleidingen geschreven

Team

Texas Tech, Team 22-5, Rauch Fall 2015 Lid van Texas Tech, Team 22-5, Rauch Fall 2015

TTU-RAUCH-F15S22G5

3 Leden

2 handleidingen geschreven

5 opmerkingen

This is not helpful because the one I am working on has no screws.

Matt Brown - Antwoord

I also have a Split x2 with no screws

dbmacaulay -

I want change my screen because My screen is broken but I do not know , where I can buy my screen

Nohora Chitiva - Antwoord

ebay or amazon

Andrei Isari -

Is HP Touch Screen Digitizer Glass for HP Split X2 The same as the screen being replaced here?? I need to know

Nwatu Chineme Edger - Antwoord

Voeg opmerking toe

Weergavestatistieken:

Afgelopen 24 uren: 0

Afgelopen 7 dagen: 2

Afgelopen 30 dagen: 21

Altijd: 13,361