Ga door naar hoofdinhoud

HP EliteBook 835 G7 SSD Replacement

Wat je nodig hebt

  1. HP EliteBook 835 G7 SSD Replacement, Remove the Phillips screws: stap 1, afbeelding 1 van 2 HP EliteBook 835 G7 SSD Replacement, Remove the Phillips screws: stap 1, afbeelding 2 van 2
    • Completely power off and unplug your EliteBook before you start. Close the display and flip the entire laptop upside-down.

    • Use a Phillips screwdriver to loosen the five captive screws from the lower case.

  2. HP EliteBook 835 G7 SSD Replacement, Release the case's right clips: stap 2, afbeelding 1 van 3 HP EliteBook 835 G7 SSD Replacement, Release the case's right clips: stap 2, afbeelding 2 van 3 HP EliteBook 835 G7 SSD Replacement, Release the case's right clips: stap 2, afbeelding 3 van 3
    • Insert an opening pick between the lower case and the chassis along the hinge edge.

    • Slide the opening pick around the right corner and halfway up the side of the EliteBook to release the clips securing the lower case.

  3. HP EliteBook 835 G7 SSD Replacement, Release the case's left clips: stap 3, afbeelding 1 van 3 HP EliteBook 835 G7 SSD Replacement, Release the case's left clips: stap 3, afbeelding 2 van 3 HP EliteBook 835 G7 SSD Replacement, Release the case's left clips: stap 3, afbeelding 3 van 3
    • Repeat the previous step on the left side of the case to release the clips.

  4. HP EliteBook 835 G7 SSD Replacement, Remove the lower case: stap 4, afbeelding 1 van 3 HP EliteBook 835 G7 SSD Replacement, Remove the lower case: stap 4, afbeelding 2 van 3 HP EliteBook 835 G7 SSD Replacement, Remove the lower case: stap 4, afbeelding 3 van 3
    • Lift the lower case up and away from the EliteBook and remove it.

  5. HP EliteBook 835 G7 SSD Replacement, Move the pull tab: stap 5, afbeelding 1 van 3 HP EliteBook 835 G7 SSD Replacement, Move the pull tab: stap 5, afbeelding 2 van 3 HP EliteBook 835 G7 SSD Replacement, Move the pull tab: stap 5, afbeelding 3 van 3
    • Move the pull tab that covers the battery connector out of the way.

    • You can use a piece of tape to hold the pull tab out of the way.

  6. HP EliteBook 835 G7 SSD Replacement, Disconnect the battery: stap 6, afbeelding 1 van 3 HP EliteBook 835 G7 SSD Replacement, Disconnect the battery: stap 6, afbeelding 2 van 3 HP EliteBook 835 G7 SSD Replacement, Disconnect the battery: stap 6, afbeelding 3 van 3
    • Use the pointed end of a spudger to push each side of the battery connector until it comes out of the socket.

  7. HP EliteBook 835 G7 SSD Replacement, Remove the tape: stap 7, afbeelding 1 van 3 HP EliteBook 835 G7 SSD Replacement, Remove the tape: stap 7, afbeelding 2 van 3 HP EliteBook 835 G7 SSD Replacement, Remove the tape: stap 7, afbeelding 3 van 3
    • Insert the pointed end of a spudger underneath the silver conductive tape that's adhered to the SSD cover.

    • Gently lift up to loosen the tape.

    • Work slowly as the tape rips easily.

    • Repeat this process on the other side of the tape.

    • Remove the tape and set it aside for reassembly.

  8. HP EliteBook 835 G7 SSD Replacement, Remove SSD cover: stap 8, afbeelding 1 van 2 HP EliteBook 835 G7 SSD Replacement, Remove SSD cover: stap 8, afbeelding 2 van 2
    • Use the pull tab to lift and remove the SSD cover from the motherboard.

    • During reassembly, there are clips that fasten the SSD cover to the motherboard. Line up the edges of the SSD cover with the clips and push down on the cover to secure it.

  9. HP EliteBook 835 G7 SSD Replacement, Remove the SSD screw: stap 9, afbeelding 1 van 2 HP EliteBook 835 G7 SSD Replacement, Remove the SSD screw: stap 9, afbeelding 2 van 2
    • Use a Phillips screwdriver to remove the 2.5 mm screw securing the SSD.

  10. HP EliteBook 835 G7 SSD Replacement, Remove the SSD: stap 10, afbeelding 1 van 3 HP EliteBook 835 G7 SSD Replacement, Remove the SSD: stap 10, afbeelding 2 van 3 HP EliteBook 835 G7 SSD Replacement, Remove the SSD: stap 10, afbeelding 3 van 3
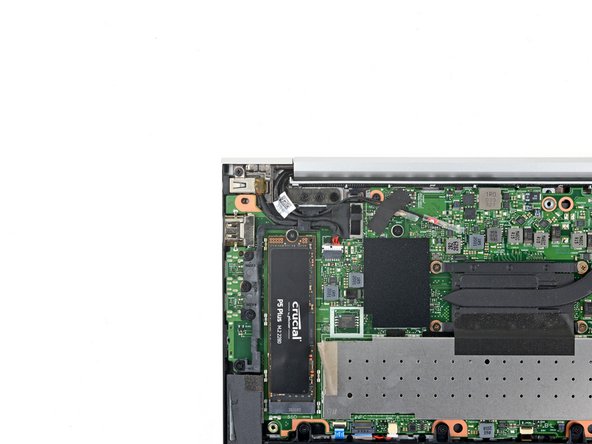
    • Pull the SSD out of its socket and remove it. Keep the SSD as parallel to the motherboard as possible when pulling on it.

    • Do not pull up at a sharp angle as this could damage the SSD and the socket.

Conclusie

To reassemble your device, follow these instructions in reverse order.

Take your e-waste to an R2 or e-stewards certified recycler.

Repair didn't go as planned? Try some basic troubleshooting, or ask our HP Elitebook answers community for help.

Spencer Day

Lid sinds: 09/14/22

55.203 Reputatie

408 handleidingen geschreven

Team

iFixit Lid van iFixit

Staff

136 Leden

17.430 handleidingen geschreven

Één opmerking

Thanks, simple and effective.

I wasn't sure and you helped me.

Manuel Mondesir - Antwoord

Voeg opmerking toe

Weergavestatistieken:

Afgelopen 24 uren: 0

Afgelopen 7 dagen: 4

Afgelopen 30 dagen: 21

Altijd: 512