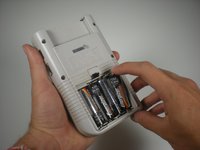
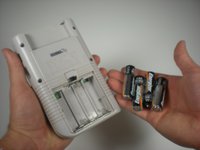
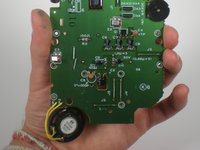
Ga door naar hoofdinhoud

Game Boy Speaker Replacement

Wat je nodig hebt

Video overzicht

  1. Game Boy Speaker Replacement, Batteries: stap 1, afbeelding 1 van 2 Game Boy Speaker Replacement, Batteries: stap 1, afbeelding 2 van 2
    • Switch your Game Boy off and remove the cartridge.

  2. Game Boy Speaker Replacement: stap 2, afbeelding 1 van 3 Game Boy Speaker Replacement: stap 2, afbeelding 2 van 3 Game Boy Speaker Replacement: stap 2, afbeelding 3 van 3
    • Use a fingernail (or small coin) to push down on the battery door latch and remove the battery door.

    • The release latch is a plastic spring clip. If your Game Boy is getting on in years, be careful as the plastic may be brittle.

    • When you're replacing the cover, be sure to get its two plastic tabs into the slots in the bottom of the battery compartment before pushing the cover back in place.

  3. Game Boy Speaker Replacement: stap 3, afbeelding 1 van 2 Game Boy Speaker Replacement: stap 3, afbeelding 2 van 2
    • Use a fingernail to pry each battery outward from the positive (+) terminal to remove them.

    • Dispose of used batteries properly!

    • Remove the batteries from your Game Boy before storing it for more than a month or so.

  4. Game Boy Speaker Replacement, Outer Case: stap 4, afbeelding 1 van 1
    • Remove the six Triwing screws from the back of the device.

  5. Game Boy Speaker Replacement: stap 5, afbeelding 1 van 1
    • Gently separate the device's front casing from the back casing after you remove the screws.

    • Be careful not to completely separate the casing halves, as they are still joined by a large ribbon cable that may be damaged.

  6. Game Boy Speaker Replacement: stap 6, afbeelding 1 van 1
    • Slide the front side of the casing down to expose the ribbon cable connector.

  7. Game Boy Speaker Replacement: stap 7, afbeelding 1 van 1
    • Grip the ribbon connector with your thumb and forefinger. Pull down gently until the connector, not the ribbon itself, comes out of its socket.

    • Separate the front and back casings.

  8. Game Boy Speaker Replacement, Speaker: stap 8, afbeelding 1 van 1
    • Remove the 10 Phillips #00 screws from the motherboard.

  9. Game Boy Speaker Replacement: stap 9, afbeelding 1 van 2 Game Boy Speaker Replacement: stap 9, afbeelding 2 van 2
    • Use a plastic opening tool to gently lift the motherboard up and remove it from the front plastic case.

    • Use caution when lifting the board since the speaker is attached.

  10. Game Boy Speaker Replacement: stap 10, afbeelding 1 van 3 Game Boy Speaker Replacement: stap 10, afbeelding 2 van 3 Game Boy Speaker Replacement: stap 10, afbeelding 3 van 3
    • Desolder the two wires connecting the speaker to the motherboard.

    • Remove the speaker.

    • If you're new to soldering, refer to this guide for tips that will help with desoldering the speaker wires and/or soldering the new ones in place.

Conclusie

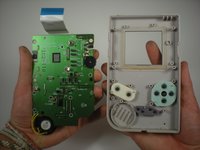
To reassemble your device, follow these instructions in reverse order.

16 andere personen hebben deze handleiding voltooid.

Andrew Tramposch

Lid sinds: 06/24/10

2.225 Reputatie

6 handleidingen geschreven

Team

Cal Poly, Team 3-2, Johann Summer 2010 Lid van Cal Poly, Team 3-2, Johann Summer 2010

CPSU-JOHANN-R10S3G2

3 Leden

34 handleidingen geschreven

2 opmerkingen

This is just a guide to remove the speaker not replacing it so change the title as it is misleading as people that following this will want know how to replace not remove only

Paul - Antwoord

As stated in the conclusion, you simply follow the steps in reverse to install your replacement speaker.

Jeff Suovanen -

Voeg opmerking toe

Weergavestatistieken:

Afgelopen 24 uren: 14

Afgelopen 7 dagen: 86

Afgelopen 30 dagen: 257

Altijd: 32,084