Ga door naar hoofdinhoud

Contixo V9 Motherboard Replacement

Wat je nodig hebt

  1. Contixo V9 Motherboard Replacement, Motherboard: stap 1, afbeelding 1 van 2 Contixo V9 Motherboard Replacement, Motherboard: stap 1, afbeelding 2 van 2
    • Find the separation line between the front and back side of the device on the outer edge of the tablet.

    • Use the plastic opening tool to pry apart the tablet, lifting the face off.

  2. Contixo V9 Motherboard Replacement: stap 2, afbeelding 1 van 3 Contixo V9 Motherboard Replacement: stap 2, afbeelding 2 van 3 Contixo V9 Motherboard Replacement: stap 2, afbeelding 3 van 3
    • Remove the three screws along the perimeter of the motherboard using the Phillips #000 screwdriver to unscrew.

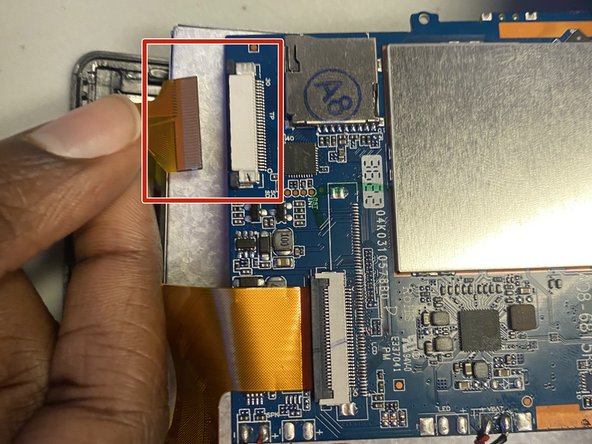
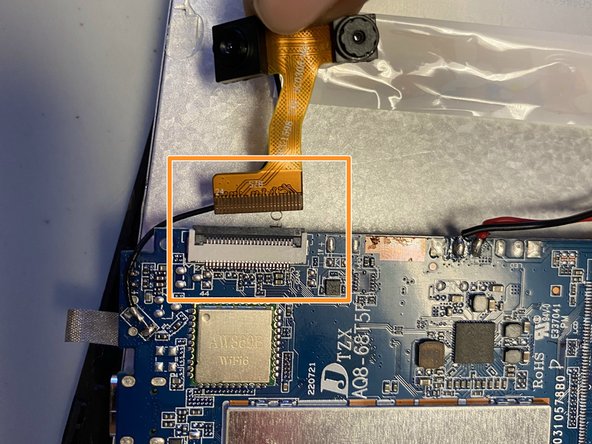
  3. Contixo V9 Motherboard Replacement: stap 3, afbeelding 1 van 3 Contixo V9 Motherboard Replacement: stap 3, afbeelding 2 van 3 Contixo V9 Motherboard Replacement: stap 3, afbeelding 3 van 3
    • Locate the three golden ribbons along the perimeter of the motherboard.

    • There are two dark tabs; pull each away from the cream connection port. Once tabs are in open position remove the gold ribbon.

    • Flip up the dark tab and pull the gold ribbon away.

    • Do not pull the the cables harshly as it could rip the ribbon.

    • Reference this guide for more help with attaching or detaching cables.

  4. Contixo V9 Motherboard Replacement: stap 4, afbeelding 1 van 3 Contixo V9 Motherboard Replacement: stap 4, afbeelding 2 van 3 Contixo V9 Motherboard Replacement: stap 4, afbeelding 3 van 3
    • Locate the battery on the opened tablet.

    • Use the spudger or one of the blue iFixit tools to lift the battery from the base of the tablet.

    • It is possible to use your hand to pry the battery away from the base of the tablet but not recommended.

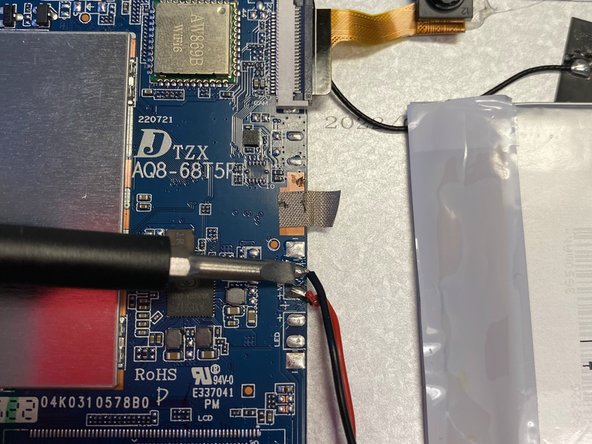
  5. Contixo V9 Motherboard Replacement: stap 5, afbeelding 1 van 3 Contixo V9 Motherboard Replacement: stap 5, afbeelding 2 van 3 Contixo V9 Motherboard Replacement: stap 5, afbeelding 3 van 3
    • Detach the motherboard from the battery by pressing the soldering tip tool to each of the three connection points.

    • Exercise caution when desoldering the battery.

    • The tool located in the pictures is not the soldering tip tool but rather used for reference of where to detach.

    • Reference this guide for more help with soldering and desoldering the connections.

  6. Contixo V9 Motherboard Replacement: stap 6, afbeelding 1 van 1
    • Remove the motherboard from the base of the device. Switch with replacement.

Conclusie

To reassemble your device, follow these instructions in reverse order.

Janiya M.

Lid sinds: 09/12/23

133 Reputatie

1 Handleiding geschreven

0 opmerkingen

Voeg opmerking toe

Weergavestatistieken:

Afgelopen 24 uren: 1

Afgelopen 7 dagen: 1

Afgelopen 30 dagen: 7

Altijd: 87