Ga door naar hoofdinhoud
Word lid van de reparatiegemeenschap - Account aanmaken

Canon EOS 30 Remote Control Socket Replacement

Wat je nodig hebt

  1. Canon EOS 30 Remote Control Socket Replacement, Front Panel: stap 1, afbeelding 1 van 1
    • Remove the two 4.8 mm black screws above the lens on the front of the camera.

    Vraag FixBot

    Voeg opmerking toe

  2. Canon EOS 30 Remote Control Socket Replacement: stap 2, afbeelding 1 van 1
    • Remove the 4.3 mm black screw under the lens ring, and the 4.8 mm black screw under the camera.

    Vraag FixBot

    Voeg opmerking toe

  3. Canon EOS 30 Remote Control Socket Replacement: stap 3, afbeelding 1 van 1
    • Remove the 4.8 mm black screw on the left side of the camera.

    Vraag FixBot

    Voeg opmerking toe

  4. Canon EOS 30 Remote Control Socket Replacement: stap 4, afbeelding 1 van 1
    • Remove the front panel by lifting it away from the camera's body.

    Vraag FixBot

    Voeg opmerking toe

  5. Canon EOS 30 Remote Control Socket Replacement, Bottom Panel: stap 5, afbeelding 1 van 1
    • Remove seven 4.25 mm black screws on the bottom panel.

    Vraag FixBot

    Voeg opmerking toe

  6. Canon EOS 30 Remote Control Socket Replacement: stap 6, afbeelding 1 van 1
    • Remove the bottom panel.

    Vraag FixBot

    Voeg opmerking toe

  7. Canon EOS 30 Remote Control Socket Replacement, Side Panel With Remote Control Socket: stap 7, afbeelding 1 van 1
    • Remove two 6.5 mm black screws from the panel.

    Vraag FixBot

    Voeg opmerking toe

  8. Canon EOS 30 Remote Control Socket Replacement: stap 8, afbeelding 1 van 1
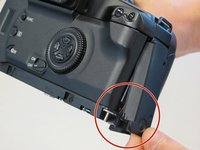
    • Remove the plastic remote control socket cap by pulling it straight out.

    Vraag FixBot

    Voeg opmerking toe

  9. Canon EOS 30 Remote Control Socket Replacement: stap 9, afbeelding 1 van 2 Canon EOS 30 Remote Control Socket Replacement: stap 9, afbeelding 2 van 2
    • Slide the panel toward the bottom of the camera to remove.

    Vraag FixBot

    Voeg opmerking toe

  10. Canon EOS 30 Remote Control Socket Replacement: stap 10, afbeelding 1 van 1
    • Remove the single 4.8 silver screw from the control socket.

    Vraag FixBot

    Voeg opmerking toe

  11. Canon EOS 30 Remote Control Socket Replacement: stap 11, afbeelding 1 van 2 Canon EOS 30 Remote Control Socket Replacement: stap 11, afbeelding 2 van 2
    • The control socket is now secure by three wires.

    • Desolder connections to replace the remote control socket.

    Vraag FixBot

    Voeg opmerking toe

  12. Canon EOS 30 Remote Control Socket Replacement, Remote Control Socket: stap 12, afbeelding 1 van 1
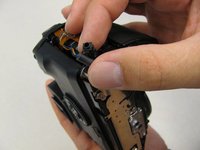
    • Remove one 4.8 mm silver screw securing Remote Control Socket to camera.

    Vraag FixBot

    Voeg opmerking toe

  13. Canon EOS 30 Remote Control Socket Replacement: stap 13, afbeelding 1 van 2 Canon EOS 30 Remote Control Socket Replacement: stap 13, afbeelding 2 van 2
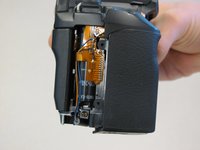
    • Remote Control Socket is now secured by 3 wires.

    • Desolder connections to replace Remote Control Socket.

    Vraag FixBot

    Voeg opmerking toe

Conclusie

To reassemble your device, follow these instructions in reverse order.

Annuleren: ik heb deze handleiding niet afgemaakt.

2 andere personen hebben deze handleiding voltooid.

Antonia

Lid sinds: 04/17/11

124 Reputatie

2 handleidingen geschreven

Team

Cal Poly, Team 8-8, Regan Spring 2011 Lid van Cal Poly, Team 8-8, Regan Spring 2011

CPSU-REGAN-S11S8G8

5 Leden

22 handleidingen geschreven

0Gids Commentaar

Voeg opmerking toe

Weergavestatistieken:

Afgelopen 24 uren: 1

Afgelopen 7 dagen: 18

Afgelopen 30 dagen: 72

Altijd: 3,376