Ga door naar hoofdinhoud

Sostituzione batteria nel MacBook Pro 15" Retina Display versione fine 2013

Waarschuwing: Je bewerkt een vooraf vereiste handleiding. Alle wijzigingen die je hierin maakt, beïnvloeden alle 2 handleidingen die deze stap bevatten.

Stap 22 vertalen

Stap 22
MacBook Pro 15" Retina Display Late 2013 Battery Replacement: stap 0, afbeelding 1 van 2 MacBook Pro 15" Retina Display Late 2013 Battery Replacement: stap 0, afbeelding 2 van 2
  • Lift and remove the battery.

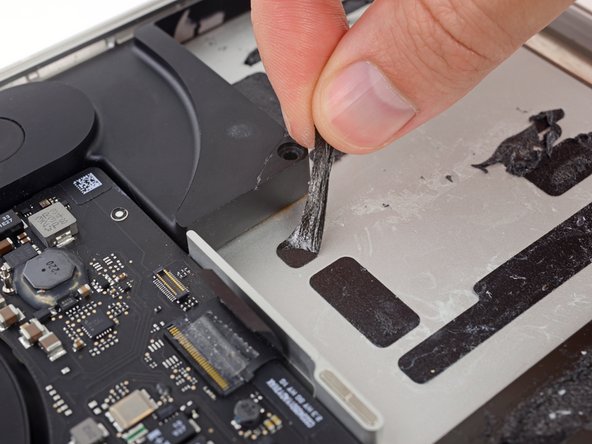
  • Before installing your new battery, remove all the old adhesive from the MacBook Pro's case.

  • With a little luck, you can slowly pull out each strip of adhesive with your fingers.

  • Otherwise, soak each strip of adhesive with a bit of adhesive remover for 2-3 minutes, and then scrape it out with a plastic tool. This can take quite a bit of work, so be patient. While scraping, take care not to damage the trackpad cable.

  • Mop up any remaining adhesive remover and give your MacBook Pro a few minutes to air dry.

  • The replacement battery included in your iFixit kit comes with adhesive pre-installed. Test the battery's fit and alignment carefully before peeling off the film covering the adhesive, and then press each cell firmly into place. If any additional films/liners are present that weren't on your original battery, remove them now.

  • Calibrate your newly installed battery: charge it to 100%, and keep charging it for at least 2 more hours. Unplug and use it normally to drain the battery. When you see the low battery warning, save your work, and keep your laptop on until it goes to sleep due to low battery. Wait at least 5 hours, then charge your laptop uninterrupted to 100%.

  • If you notice any unusual behavior or problems after installing your new battery, you may need to reset your MacBook Pro's SMC.

Solleva e rimuovi la batteria.

Prima di installare la nuova batteria, rimuovi tutto il vecchio adesivo rimasto sul case del MacBook Pro.

Con un po' di fortuna, dovresti riuscire a tirar via tutte le strisce adesive usando semplicemente le dita.

In caso contrario, bagna ogni striscia di adesivo con un po' di antiadesivo per 2-3 minuti e poi grattala via con uno strumento di plastica. Può essere richiesto abbastanza lavoro, quindi cerca di avere pazienza. Mentre gratti, assicurati di non danneggiare il cavo del trackpad.

Elimina ogni traccia dell'adesivo rimanente e lascia asciugare all'aria il tuo MacBook Pro per qualche minuto.

La batteria sostitutiva inclusa nel tuo kit iFixit è dotata di adesivo preinstallato. Controlla bene la posizione e l'allineamento della batteria prima di staccare la pellicola che copre l'adesivo; quindi premi con decisione ogni cella. Se ci fossero ulteriori pellicole o nastri che non erano presenti sulla tua batteria originale, rimuovili ora.

Calibra la nuova batteria appena installata: carica al 100% e tieni in carica almeno altre 2 ore. Stacca il cavo e usa il laptop per farlo scaricare. All'avviso di batteria in esaurimento, salva il lavoro corrente e tieni acceso il MacBook finché non si iberna perché scarico. Aspetta almeno altre 5 ore, poi carica senza interruzioni fino al 100%.

Se noti qualsiasi comportamento insolito o problemi dopo aver installato la tua batteria nuova, potrebbe essere necessario resettare l'SMC (System Management Controller) del tuo MacBook Pro.

Je bijdragen zijn gelicentieerd onder de open source Creative Commons-licentie.