Inleiding
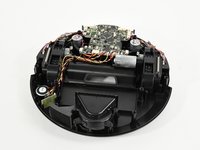
The top shell (hard plastic cover or frame) houses the power button and bumper, while the bottom shell (ionvac body) houses the interior logic board, motor wheels, wires, and a host of other essential parts. In order to access these parts for replacement, you must remove the top shell (frame) of your ionvac SmartClean V2. This guide will show you how to remove the top shell without causing any damage.
This is a quick and easy prerequisite for our other replacement guides, and you will need a Phillips #2 (PH2) screwdriver and a Jimmy tool (or another prying tool) to complete it. Remember to remove and reinstall all parts gently.
Wat je nodig hebt
-
-
-
Flip your ionvac right-side up, turning it so that the front filter vents are facing forward and the power button is furthest from you.
 Vraag FixBot
-
-
-
Use a Phillips screwdriver to remove the 8 screws indicated in red holding the base together.
-
Use the same screwdriver to remove the 8 screws indicated in orange which hold the rims (bumper arms).
-
Remove the rims from your ionvac and set them aside.
-
-
-
-
Flip your ionvac right-side up and tilt it upwards at a 45 degree angle.
-
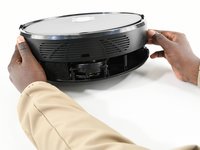
Use a Jimmy or prying tool to wedge the sharp end through the bottom crevice (below the sensors).
-
Continue prying the outside rim of your ionvac open. You will feel the top shell (frame or cover) loosen.
-
-


To reassemble your device, follow these instructions in reverse order.

Team

University of Colorado Denver, Team 1-1, Campeau Fall 2023 Lid van University of Colorado Denver, Team 1-1, Campeau Fall 2023
UCDENVER-CAMPEAU-F23S1G1
7 Leden
25 handleidingen geschreven
