Deze versie kan foutieve bewerkingen bevatten. Schakel over naar de recentste gecontroleerde momentopname.
Wat je nodig hebt
-
-
Schakel je iPhone uit voordat je deze uit elkaar gaat halen.
-
Verwijder de twee 3.6 mm lange P2 Pentalobe schroeven aan beide kanten van de Lightning-connector.
-
-
-
Trek de blauwe hendel naar achteren zodat de anti-klem vrij kan bewegen. (Op deze manier deactiveer je de openingsstand van de anti-klem.)
-
Schuif de armen over de linker- of rechterzijde van je iPhone.
-
Plaats de zuignappen dichtbij de onderkant van de telefoon—één op de voorkant en één aan de achterkant.
-
Druk beide zuignappen aan, om zuigkracht uit te oefenen op de gewenste plek.
-
-
-
Trek het blauwe handvat naar voren om de armen van de anti-klem te vergrendelen.
-
Draai het handvat 360 graden met de klok mee of tot de zuignappen uit beginnen te rekken.
-
Zodra de anti-klem een opening heeft weten te creëren die groot genoeg is, steek je een openingsplectrum in de opening.
-
Sla de volgende drie stappen over.
-
-
-
Als je geen anti-klem hebt, kunt je een enkele zuignap gebruiken om het voorste paneel uit de telefoon te tillen:
-
Druk een zuignap op het scherm, net boven de thuisknop.
-
-
-
Trek, terwijl je de iPhone met een hand stevig vasthoudt, aan de zuignap om de voorste paneelmodule een stukje van de achterste behuizing te scheiden.
-
Maak gebruik van een plasticen openingstool om de achterste behuizing naar beneden te duwen, weg van de schermmodule, terwijl je aan de zuignap blijft trekken.
-
-
-
Open de iPhone door de onderkant van de schermmodule (waar de thuisknop zich bevindt) naar boven en weg van de achterste behuizing te kantelen, waarbij je de bovenkant van de telefoon als scharnier gebruikt.
-
-
-
Open het scherm in een hoek van ongeveer 90º en laat deze tegen iets leunen waardoor het rechtop blijft staan terwijl jij aan de telefoon werkt.
-
Gebruik indien nodig ook een elastiek om het scherm vast te maken aan het object waar het tegenaan leunt. Dit voorkomt ook dat er teveel druk op de schermkabels komt te staan.
-
-
-
Verwijder de volgende Phillips schroeven van het plaatje op de batterijaansluiting:
-
Eén 2.2 mm lange schroef
-
Eén 3.2 mm lange schroef
-
-
-
Gebruik een plastic openingstool om de batterijaansluiting op subtiele wijze uit het contact op het logic board omhoog te duwen.
-
-
-
Verwijder de volgende vijf Phillips schroeven die het plaatje over de voorste paneelmodulekabel bevestigen:
-
Drie 1.2 mm lange schroeven
-
Eén 1.7 mm lange schroef
-
Eén 3.1 mm lange schroef
-
-
-
Verwijder de voorste paneelmodule van de achterste behuizing.
-
-
Deze stap is niet vertaald. Help het te vertalen
-
Insert a SIM card eject tool or a paperclip into the small hole in the SIM card tray.
-
Press to eject the tray.
-
-
-
Deze stap is niet vertaald. Help het te vertalen
-
Use the flat end of a spudger to disconnect the Lightning connector assembly cable and fold it out of the way of the speaker.
-
-
Deze stap is niet vertaald. Help het te vertalen
-
Use the point of a spudger to lift the antenna cable connector up off of its socket on the logic board.
-
-
Deze stap is niet vertaald. Help het te vertalen
-
Remove the following Phillips screws from the upper cable bracket:
-
One 2.9 mm screw
-
One 2.2 mm screw
-
-
Deze stap is niet vertaald. Help het te vertalen
-
Use the flat end of a spudger to lift the power button and flash assembly cable connector up off of its socket.
-
Lift the volume control cable connector up out of its socket on the logic board.
-
-
Deze stap is niet vertaald. Help het te vertalen
-
Remove the following four Phillips screws from the Wi-Fi antenna:
-
One 1.5 mm screw
-
One 1.4 mm screw
-
Two 2.1 mm screws
-
-
Deze stap is niet vertaald. Help het te vertalen
-
Remove the two 1.6 mm Phillips screws from the grounding bracket.
-
-
Deze stap is niet vertaald. Help het te vertalen
-
Remove the following Phillips screws securing the angled logic board bracket.
-
One 2.6 mm screw
-
One 1.3 mm screw, located horizontally in the upper sidewall of the iPhone.
-
-
Deze stap is niet vertaald. Help het te vertalen
-
Remove the single 1.2 mm Phillips screw securing the antenna interconnect cable to the logic board.
-
-
Deze stap is niet vertaald. Help het te vertalen
-
Use the point of a spudger to fold the antenna interconnect cable up out of the way of the logic board.
-
-
Deze stap is niet vertaald. Help het te vertalen
-
Use the flat end of a spudger to lift the camera cable connector straight up out of its socket on the logic board.
-
Fold the camera cable up out of the way of the logic board.
-
-
Deze stap is niet vertaald. Help het te vertalen
-
Remove the following screws securing the logic board to the rear case:
-
Two 1.9 mm Phillips screws
-
One 2.3 mm standoff screw
-
-
Deze stap is niet vertaald. Help het te vertalen
-
Use the flat end of a spudger to lift the battery connector end of the logic board up slightly, just enough to grab with your fingers.
-
-
Deze stap is niet vertaald. Help het te vertalen
-
Lift the battery connector end of the logic board and pull it up and out of the rear case.
-
-
Deze stap is niet vertaald. Help het te vertalen
-
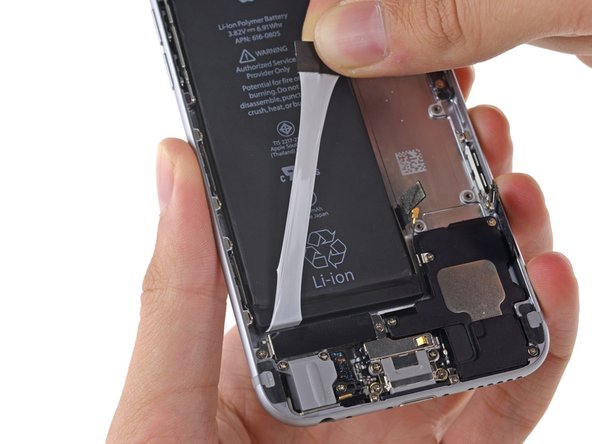
Peel back the first battery adhesive tab from the bottom right edge of the battery.
-
-
Deze stap is niet vertaald. Help het te vertalen
-
Gently pull the battery adhesive tab away from the battery, toward the bottom of the iPhone.
-
Try not to pull against the battery or the lower components, or you may rip the adhesive strip.
-
Continue pulling, allowing the strip to slowly slip out from between the battery and the rear case. When you feel increased resistance from the strip, stop pulling and continue with the next step.
-
-
Deze stap is niet vertaald. Help het te vertalen
-
When you feel increased resistance from the adhesive strip, pull it gently around the lower right corner of the battery.
-
Continue pulling the adhesive tab upward and away from the right edge of the battery, allowing it to slowly slide out from between the battery and the rear case, until the strip comes free from the iPhone.
-
-
Deze stap is niet vertaald. Help het te vertalen
-
Peel back the second battery adhesive tab from the bottom left edge of the battery.
-
Again, gently pull the battery adhesive tab upward and away from the battery, allowing the adhesive strip to slowly slide out from between the battery and the rear case.
-
Continue pulling the adhesive tab until you feel increased resistance, and then stop.
-
-
Deze stap is niet vertaald. Help het te vertalen
-
When you feel increased resistance from the adhesive strip, pull it gently around the lower left corner of the battery.
-
Continue pulling the adhesive tab upward and away from the left edge of the battery, allowing it to slowly slide out from between the battery and the rear case, until the strip comes free from the iPhone.
-
If you removed both adhesive strips successfully, skip the next two steps and continue on Step 46.
-
If either of the adhesive strips broke off underneath the battery and could not be retrieved, continue with the next step below.
-
-
Deze stap is niet vertaald. Help het te vertalen
-
If any of the adhesive strips broke off and the battery remains stuck to the rear case, prepare an iOpener or use a hair dryer to heat the rear case directly behind the battery.
-
-
Deze stap is niet vertaald. Help het te vertalen
-
Insert a plastic card under the logic board edge of the battery.
-
Press the card in at several points if necessary to break up the adhesive behind the battery.
-
-
Deze stap is niet vertaald. Help het te vertalen
-
After peeling or prying out all adhesive, remove the battery from the iPhone.
-
-
Deze stap is niet vertaald. Help het te vertalen
-
Remove any tape covering the upper left rear-facing camera screw.
-
-
Deze stap is niet vertaald. Help het te vertalen
-
Remove the following Phillips #00 screws from the rear-facing camera bracket:
-
One 1.5 mm screw
-
One 2.1 mm screw
-
-
Deze stap is niet vertaald. Help het te vertalen
-
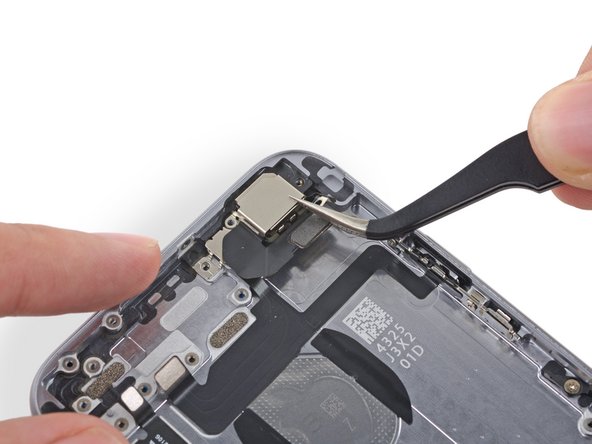
Carefully remove the antenna interconnect cable from the rear case.
-
-
Deze stap is niet vertaald. Help het te vertalen
-
Remove the single 1.2 mm Phillips #00 screw securing the flash bracket.
-
-
Deze stap is niet vertaald. Help het te vertalen
-
Remove the two 2.2 mm Phillips #00 screws from the power button bracket.
-
-
Deze stap is niet vertaald. Help het te vertalen
-
Use the point of a spudger to gently push the flash and microphone modules up out of their respective holes in the rear case.
-
-
Deze stap is niet vertaald. Help het te vertalen
-
Begin to peel the flash/microphone/power button assembly cable up from the rear case starting from the connector end.
-
Continue to peel the cable up, being particularly careful of the narrow component ends of the cable.
-
Remove the flash/microphone/power button assembly cable from the phone.
-
-
Deze stap is niet vertaald. Help het te vertalen
-
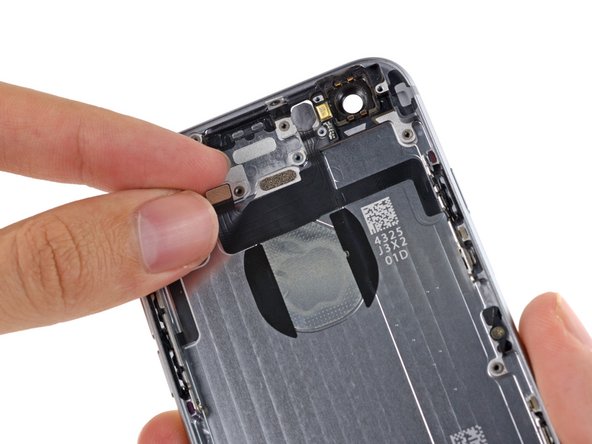
Grip the power button by the metal bar to pull it free from the rear case.
-
The power button is held to the case with an adhesive gasket, pull carefully to prevent ripping the membrane.
-


Annuleren: ik heb deze handleiding niet afgemaakt.
90 andere personen hebben deze handleiding voltooid.


13 opmerkingen
Ive recently done a full housing change on my iphone 6 plus to a black one since doing it the power button doesnt work its rock solid i used original power button (space gray) and original flex cable once istalled it just wont press
The only way it works is if i leave the power button screws slightly loose which is a pain becasue the button loosens itself anyone had anything similar or is it the way its been installed ?? All other buttons work correctly mute switch and volume buttons
Hello marcusdean2009 this problem occurs because the new carcass have the power button screw hole a little bit long than the original one. And yes, you will have to let the power button screws slightly loose to make the power button work
My power button is a little bit loose. There's still clicking sound but not same as the other normal button,the button also seems 'into' or 'concave ' compare to normal button.while the power button with long shape also seems just have a clicking sound when I press the middle part of button but not the upper and lower part of button.when I press the upper and lower part,it is soft and without clicking sound and springing feel. I used to replace the flex cable, but it still loose,is it the matter of the quality for the flex cable or the improperly attach of rubber gasket or the scuffed of little metal tip of the power button? Please reply me.
Great job on this guide. What could have been a pain in the butt has been an easy fix/replacement thanks to this guide. Thank you for taking the time to do this. Just plain awesome.