Ga door naar hoofdinhoud

iPhone 4 Verizon Dock Connector Replacement

Wat je nodig hebt

  1. iPhone 4 Verizon Dock Connector Replacement, Rear Panel: stap 1, afbeelding 1 van 1
    • Before you begin, discharge your iPhone battery below 25%. A charged lithium-ion battery can catch fire and/or explode if accidentally punctured.

    • Power off your iPhone before beginning disassembly.

    • Your phone's rear cover may have two #000 Phillips screws or Apple's 5-Point "Pentalobe" screws. Check which screws you have, and ensure you also have the correct screwdriver in order to remove them.

    • Remove the two 3.6 mm Pentalobe or Phillips #000 screws next to the dock connector.

  2. iPhone 4 Verizon Dock Connector Replacement: stap 2, afbeelding 1 van 2 iPhone 4 Verizon Dock Connector Replacement: stap 2, afbeelding 2 van 2
    • Push the rear panel toward the top edge of the iPhone.

    • The panel will move about 2 mm.

  3. iPhone 4 Verizon Dock Connector Replacement: stap 3, afbeelding 1 van 1
    • Pinch the rear panel with your fingers, and lift it away from the iPhone. Alternatively, use a Small Suction Cup .

    • Be careful not to damage the plastic clips attached to the rear panel.

  4. iPhone 4 Verizon Dock Connector Replacement, Battery: stap 4, afbeelding 1 van 1
    • Remove the single 1.5 mm Phillips screw securing the battery connector to the logic board (if present).

  5. iPhone 4 Verizon Dock Connector Replacement: stap 5, afbeelding 1 van 1
    • Use the edge of a plastic opening tool to gently pry the battery connector up from its socket on the logic board.

    • Be very careful to only pry up on the battery connector and not the socket on the logic board. If you pry up on the logic board socket, you may break it entirely.

    • Remove the metal clip covering the antenna connector.

  6. iPhone 4 Verizon Dock Connector Replacement: stap 6, afbeelding 1 van 2 iPhone 4 Verizon Dock Connector Replacement: stap 6, afbeelding 2 van 2
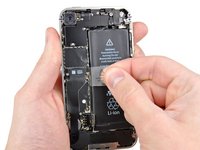
    • Pull up on the exposed clear plastic tab to peel the battery off the adhesive securing it to the iPhone.

    • If the tab breaks before the battery is freed, apply a few drops of high concentration (over 90%) isopropyl alcohol under the edge of the battery. Wait about one minute for the alcohol solution to weaken the adhesive. Carefully slide a spudger under the battery tab to release the adhesive.

    • Prying in other places may cause damage. Don't try to forcefully lever the battery out. If needed, apply a few more drops of alcohol to further weaken the adhesive. Never deform or puncture the battery with your pry tool.

    • If there's any alcohol solution remaining in the phone, carefully wipe it off or allow it to air dry before installing your new battery.
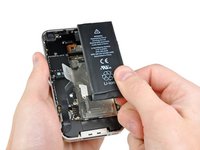
    • Remove the battery.

    • If your replacement battery came in a plastic sleeve, remove it before installation by pulling it away from the the ribbon cable.

    • Before reassembly, clean metal-to-metal contact points with a de-greaser such as windex. The oils from your fingers have the potential to cause wireless interference issues.

    • Perform a hard reset after reassembly. This can prevent several issues and simplify troubleshooting.

  7. iPhone 4 Verizon Dock Connector Replacement, Speaker Enclosure Assembly: stap 7, afbeelding 1 van 2 iPhone 4 Verizon Dock Connector Replacement, Speaker Enclosure Assembly: stap 7, afbeelding 2 van 2
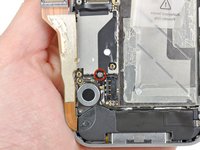
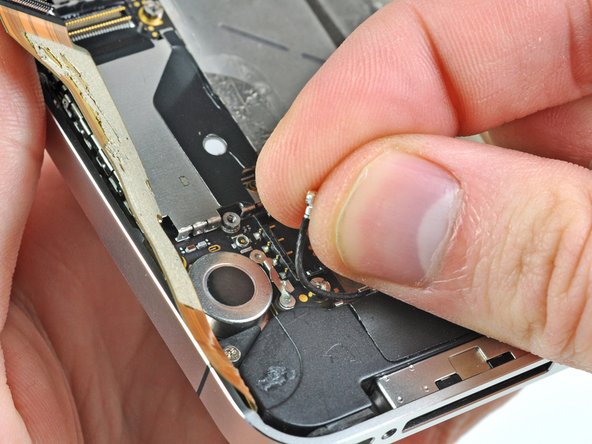
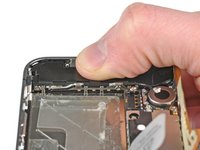
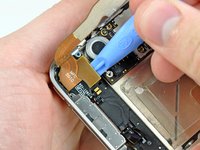
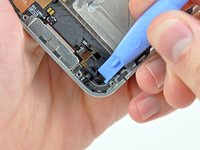
    • Remove the two 1.8 mm Phillips screws securing the dock connector cable cover to the logic board.

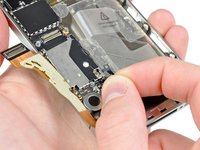
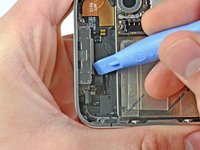
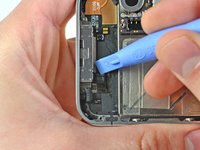
    • Remove the metal dock connector cable cover.

  8. iPhone 4 Verizon Dock Connector Replacement: stap 8, afbeelding 1 van 1
    • Use the edge of a plastic opening tool to pry the dock cable up from its socket on the logic board.

  9. iPhone 4 Verizon Dock Connector Replacement: stap 9, afbeelding 1 van 1
    • Peel the dock connector cable off the adhesive securing it to the logic board and the side of the speaker enclosure.

  10. iPhone 4 Verizon Dock Connector Replacement: stap 10, afbeelding 1 van 2 iPhone 4 Verizon Dock Connector Replacement: stap 10, afbeelding 2 van 2
    • Remove the 1.6 mm Phillips screw securing the pressure contact to the logic board near the vibrator.

    • Remove the pressure contact.

    • When reinstalling the pressure contact, be sure to clean it with a degreaser such as windex or isopropyl alcohol. The oils on your fingers have the potential to create wireless interference.

  11. iPhone 4 Verizon Dock Connector Replacement: stap 11, afbeelding 1 van 2 iPhone 4 Verizon Dock Connector Replacement: stap 11, afbeelding 2 van 2
    • Use the edge of a plastic opening tool to pry the Wi-Fi antenna cable up from its socket on the logic board.

    • De-route the Wi-Fi antenna cable out from under the metal fingers attached to the logic board.

  12. iPhone 4 Verizon Dock Connector Replacement: stap 12, afbeelding 1 van 1
    • Remove the two 2.4 mm Phillips screws securing the speaker enclosure assembly to the outer case.

  13. iPhone 4 Verizon Dock Connector Replacement: stap 13, afbeelding 1 van 1
    • Remove the small black spacer that was under the Phillips screw near the vibrator.

  14. iPhone 4 Verizon Dock Connector Replacement: stap 14, afbeelding 1 van 3 iPhone 4 Verizon Dock Connector Replacement: stap 14, afbeelding 2 van 3 iPhone 4 Verizon Dock Connector Replacement: stap 14, afbeelding 3 van 3
    • Use a plastic opening tool to lift the speaker enclosure assembly out of the case, being sure not to damage the EMI fingers on the attached Wi-Fi antenna.

    • Remove the speaker enclosure assembly.

    • Before reinstalling the speaker enclosure assembly's screws, be sure the Wi-Fi grounding fingers are installed below the lip in the iPhone's metal case as seen in the third picture.

    • Before reassembly, be sure to clean all metal-to-metal contact points between the grounding fingers of the Wi-Fi antenna and the case of the iPhone with a de-greaser such as windex or isopropyl alcohol. The oils on your fingers have the potential to cause wireless interference issues.

  15. iPhone 4 Verizon Dock Connector Replacement, Dock Connector: stap 15, afbeelding 1 van 1
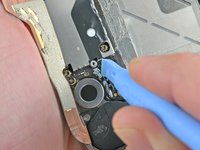
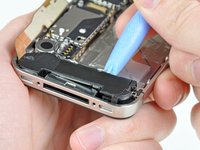
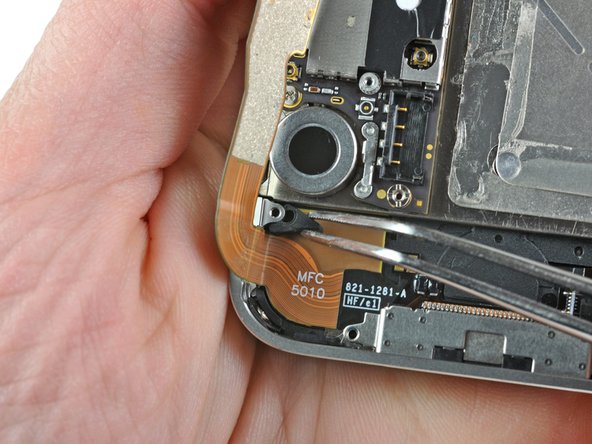
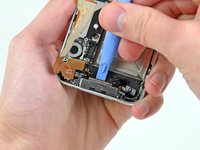
    • If present, remove the small strip of tape covering one of the dock connector screws.

  16. iPhone 4 Verizon Dock Connector Replacement: stap 16, afbeelding 1 van 2 iPhone 4 Verizon Dock Connector Replacement: stap 16, afbeelding 2 van 2
    • Use a plastic opening tool to flip up the retaining flap on the home button ribbon cable ZIF socket.

    • Be sure you are prying up on the hinged retaining flap, not the socket itself.

  17. iPhone 4 Verizon Dock Connector Replacement: stap 17, afbeelding 1 van 1
    • Use a pair of tweezers to pull the home button ribbon cable out of its socket.

  18. iPhone 4 Verizon Dock Connector Replacement: stap 18, afbeelding 1 van 1
    • Carefully pull, but do not remove, the rubber microphone holder out of its tube in the bottom edge of the iPhone.

  19. iPhone 4 Verizon Dock Connector Replacement: stap 19, afbeelding 1 van 1
    • Remove the two 1.3 mm Phillips screws securing the dock connector to the case of the iPhone.

  20. iPhone 4 Verizon Dock Connector Replacement: stap 20, afbeelding 1 van 1
    • Use a pair of tweezers to remove the small rubber spacer beneath the speaker enclosure mounting ear near the vibrator.

  21. iPhone 4 Verizon Dock Connector Replacement: stap 21, afbeelding 1 van 1
    • Remove the tiny rubber spacer near the dock connector.

  22. iPhone 4 Verizon Dock Connector Replacement: stap 22, afbeelding 1 van 2 iPhone 4 Verizon Dock Connector Replacement: stap 22, afbeelding 2 van 2
    • Use the edge of a plastic opening tool to peel the dock connector and its cable off the black plastic case of the iPhone.

    • If you are replacing the dock connector with a new part, make sure to transfer the rubber casing around the microphone. You can do this using a spudger.

  23. iPhone 4 Verizon Dock Connector Replacement: stap 23, afbeelding 1 van 2 iPhone 4 Verizon Dock Connector Replacement: stap 23, afbeelding 2 van 2
    • Pry the dock connector away from its opening at the bottom of the iPhone.

    • Remove the dock connector.

Conclusie

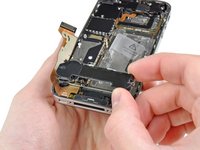
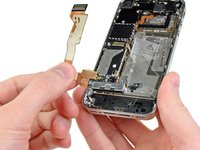
To reassemble your device, follow these instructions in reverse order.

117 andere personen hebben deze handleiding voltooid.

5 opmerkingen

So I attempted once to fix the dock connector and failed. A month later I took the phone apart again. The first thing I noticed when taking off the dock connector from the logic board is that it wasn't seated properly. I attached it properly and now the iPhone charges and home button works perfectly!

superedman69 - Antwoord

What about it was not seated properly? any specific contact point? was it not screwed in well if it wasn't seated properly? I just replaced on a friends 4, but it has not turned on yet, and I can't figure it out. It just stopped charging one day so I figured it was a bad port from corrosion or something and replaced it. The swap was easy enough so I'm confused as to why it isn't turning on yet.

Matthew -

Great instructions. Easy to follow. I found that a JIS000 bit worked better than a phillips #00 bit on my Verizon iPhone 4, model A1349.

tabacs - Antwoord

New part from IFixit works great. Some tips from my installation:

- PH000 screwdriver works well, but takes some finesse. A little pressure to get the screw going, and don't try to over tighten on the way back in. If you happen to round one out, a 00 or 0 PH screwdriver might get enough bite to get it going.

- Plastic pieces are covering the adhesive on numerous parts of the new dock connector. These are to be removed prior to installation.

- Battery does not have to be removed, so I avoided the risk of breaking something else.

seangannon - Antwoord

I completed this guide, but unfortunately my phone is in no better shape than it was before the dock replacement. Apparently, this was not the problem. The device won't restore in iTunes. It just sits with the Apple logo and an empty status bar on the screen. Now when I unplug it from the computer, I get a black screen, with just a touch of backlight, but no display otherwise. Before the dock replacement, it always said "Connect to iTunes" but would not restore either. Any thoughts on what else I could try now?

kwsshop - Antwoord

Voeg opmerking toe

Weergavestatistieken:

Afgelopen 24 uren: 0

Afgelopen 7 dagen: 0

Afgelopen 30 dagen: 12

Altijd: 37,398