Deze versie kan foutieve bewerkingen bevatten. Schakel over naar de recentste gecontroleerde momentopname.
Inleiding
Vervang of upgrade je harde schijf voor meer of snellere opslag.
Deze handleiding kan ook gebruikt worden om de harde schijf van je iMac's te vervangen door een SSD. Er wordt ook beschreven hoe je de thermometer van de SSD moet installeren, zodat de ventilatoren van de iMac op de juiste snelheid draaien.
Voordat je begint: koppel de iMac los van het lichtnet en houd de aan-/uitknop voor 10 seconden ingedrukt om de condensators in de voeding te ontladen.
Wees voorzichtig: Raak de uiteinden van de condensatoren en blootgestelde soldeerverbindingen aan de achterkant van de voeding niet aan.
Wat je nodig hebt
-
Deze stap is niet vertaald. Help het te vertalen
-
Stick a suction cup near each of the two top corners of the glass panel.
-
If your suction cups refuse to stick, try cleaning both the glass panel and the suction cup with a mild solvent.
-
-
Deze stap is niet vertaald. Help het te vertalen
-
Gently lift the glass panel perpendicular to the face of the LCD enough to clear the steel mounting pins attached along the underside of the top edge of the glass panel.
-
Pull the glass panel away from the lower edge of the iMac and carefully set it aside.
-
-
Deze stap is niet vertaald. Help het te vertalen
-
Remove the eight 8 mm T10 Torx screws securing the display to the outer case.
-
-
Deze stap is niet vertaald. Help het te vertalen
-
Slightly lift the top edge of the display out of the outer case.
-
-
Deze stap is niet vertaald. Help het te vertalen
-
Pull the vertical sync cable connector out of its socket on the LED driver board near the top left corner of your iMac.
-
-
Deze stap is niet vertaald. Help het te vertalen
-
Rotate the display out of the outer case enough to disconnect the LED backlight power cable from the LED driver board.
-
-
Deze stap is niet vertaald. Help het te vertalen
-
Grab the plastic pull tab secured to the display data cable lock and rotate it towards upwards.
-
Pull the display data cable straight out of its socket on the logic board.
-
-
Deze stap is niet vertaald. Help het te vertalen
-
Disconnect the LCD thermal sensor cable connector from its socket on the logic board.
-
-
-
Deze stap is niet vertaald. Help het te vertalen
-
Carefully pull the display toward the top edge of your iMac and lift it out of the outer case, minding any cables that may get caught.
-
-
Deze stap is niet vertaald. Help het te vertalen
-
Remove the two 9 mm T10 Torx screws securing the upper hard drive bracket to the outer case.
-
-
Deze stap is niet vertaald. Help het te vertalen
-
Slightly rotate the hard drive out of the outer case and lift it up off its mounting pins toward the top edge of the iMac.
-
-
Deze stap is niet vertaald. Help het te vertalen
-
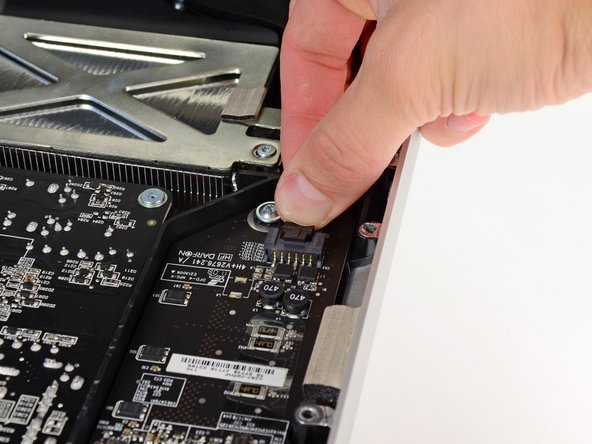
Disconnect the SATA data cable and SATA power connector from their respective sockets by pulling each connector away from the hard drive.
-
-
Deze stap is niet vertaald. Help het te vertalen
-
Remove the two T8 Torx screws securing the upper bracket to the hard drive.
-
Remove the upper bracket from the hard drive.
-
-
Deze stap is niet vertaald. Help het te vertalen
-
Remove the two T8 Torx pins from the other side of the hard drive.
-
-
Deze stap is niet vertaald. Help het te vertalen
-
Carefully peel off the piece of EMI foam attached to the front of the hard drive.
-
-
Deze stap is niet vertaald. Help het te vertalen
-
Line up the SSD connectors with the metal enclosure's sockets.
-
Press the drive against the enclosure sockets until the SSD is firmly seated.
-
-
Deze stap is niet vertaald. Help het te vertalen
-
Use a Phillips screwdriver to install the four silver screws (two on each side) along the edges of the SSD to secure it to the enclosure.
-
-
Deze stap is niet vertaald. Help het te vertalen
-
Plug the included sensor-enabled SATA power cable into the enclosure's port.
-
-
Deze stap is niet vertaald. Help het te vertalen
-
Peel the white liner off the back of the small temperature sensor board in order to expose the adhesive.
-
Adhere the temperature sensor board to an exposed, metal surface of the SSD, close to the SATA connector.
-
Fold the excess temperature sensor wires so that they are out of the way while you install the enclosure.
-
-
Deze stap is niet vertaald. Help het te vertalen
-
Use a T8 driver to install the mounting pins from the old hard drive onto the sides of the enclosure.
-
-
Deze stap is niet vertaald. Help het te vertalen
-
Attach any mounting brackets removed from the old hard drive onto the enclosure.
-
-
Deze stap is niet vertaald. Help het te vertalen
-
Connect the iMac's SATA power cable to the other end of the new sensor-enabled SATA cable.
-
-
Deze stap is niet vertaald. Help het te vertalen
-
Connect the iMac's SATA data cable to the enclosure.
-
-
Deze stap is niet vertaald. Help het te vertalen
-
Slide the SSD enclosure into the space previously occupied by the hard drive.
-
Route the SATA cables so that they will not interfere with any other components.
-


Volg de instructies in omgekeerde volgorde om je apparaat weer in elkaar te zetten.
Volg de instructies in omgekeerde volgorde om je apparaat weer in elkaar te zetten.
Annuleren: ik heb deze handleiding niet afgemaakt.
309 andere personen hebben deze handleiding voltooid.
Met dank aan deze vertalers:
100%


Deze vertalers helpen ons de wereld te repareren! Wil je bijdragen?
Begin met vertalen ›

80 opmerkingen
Hi guys, the tools arrived today and I did already chage the default harddisk against the WD Velociraptor 500GB. For now everything is working fine. The iMac is in the middle of restoring the time maschine backup. Everything worked out as described. Excellent! I was just a little surprised by the magnetic forces which one needs to overcome gently...
Is there a temp sensor that monitors the HD? I did the upgrade but now my fan is always on. I must've done something wrong.
Did you use the same brand hard drive? Did check the instructions about cable orientation on the hard drive? Did you double check the LCD thermal sensor cable?
Take a glance at this page for full explanations:
http://www.hddfancontrol.com/imac-hard-d...
I had the same issue here (after replacing the original HDD by a 1TB WB Caviar Blue) and it has been fixed by this utility.
HTH,
In response to the software, that does work, however, it can be taken care of hardware wise if our recommendations are followed.