Inleiding
Use this guide to replace a broken optical drive.
Wat je nodig hebt
-
-
Orient the iMac face-side down on a table with the bottom edge facing yourself.
-
Remove the two Phillips screws securing the access door to the bottom grille of your iMac.
 Vraag FixBot
-
-
-
Remove the three T8 Torx screws securing the front bezel to the rear case along the lower edge of the iMac.
-
-
-
Turn the computer over.
-
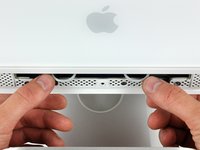
Use your thumbs to press both RAM arms in past the front bezel for enough clearance to lift it off the rear case.
-
-
-
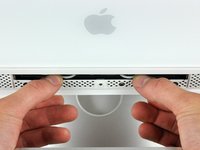
While holding the RAM arms in with your thumbs, lift the lower edge of the front bezel enough to clear the rear case.
-
-
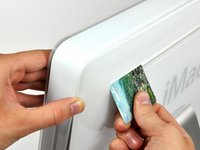
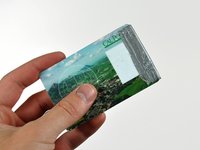
Gereedschap gebruikt in deze stap:Plastic Cards$2.99
-
Insert a plastic card up into the corner of the air vent slot near the top of the rear case.
-
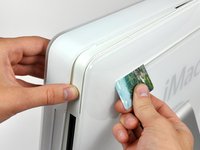
Push the card toward the top of the iMac to release the front bezel latch.
-
Pull the front bezel away from the rear case.
-
Repeat this process for the other side of the front bezel.
-
If the bezel refuses to release, try pressing the lower edge back onto the rear case and repeat this opening process.
-
-
-
Lay your iMac stand-side down on a table.
-
Lift the front bezel from its lower edge and rotate it away from the rest of your iMac, minding the RAM arms that may get caught.
-
Lay the front bezel above the rest of the iMac.
-
-
-
If necessary, remove the piece of kapton tape wrapped around the microphone and camera connectors.
-
-
-
Peel the lower EMI shield off the lower edge of the iMac and off the two vertical 4" sections on either side of the iMac.
-
-
-
Tape the lower EMI shield up against the face of the display to keep it out of the way while you work.
-
-
-
Remove the two T6 Torx screws securing the display data cable connector to the logic board.
-
-
-
-
To disconnect the display data cable, grab its connector's black tab and pull it away from the face of the logic board.
-
-
-
Peel back the two EMI tape strips from the left and right edges of the display.
-
-
-
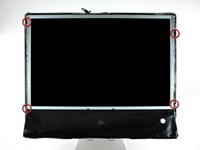
Remove the four recessed T10 Torx screws securing the display to the rear case.
-
-
-
Lift the lower edge of the display slightly out of the rear case.
-
Disconnect both inverter cables (shown in red) by pulling their connectors toward the bottom edge of your iMac.
-
-
-
Lift the display until it is nearly perpendicular to the rear case.
-
Disconnect the remaining two inverter cables (shown in red) by pulling their connectors toward the top edge of your iMac.
-
-
-
While holding the display perpendicular to the rear case, pull it upward to peel off the EMI shield stuck to its upper edge.
-
-
-
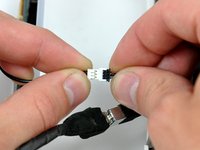
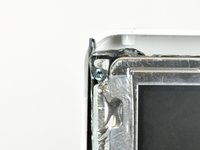
Disconnect the optical drive thermal sensor by pulling its cable toward the left edge of your iMac.
-
-
-
Remove the two T6 Torx screws holding the optical drive connector to the logic board.
-
-
-
Use the flat end of a spudger to pry the optical drive connector up off the logic board.
-
-
-
Insert the flat end of a spudger into the gap between the optical drive and its bracket until it contacts the chassis.
-
Grab the spudger as close to the surface of the optical drive as you can, then depress the release tab with your thumb while pulling toward yourself.
-
-
-
Remove the two T10 Torx screws from the lower edge of the optical drive.
-
-
-
Use the flat end of a spudger to press the bottom edge of the lower optical drive bracket release tab toward the lower edge of the iMac.
-
Maneuver the optical drive out of the rear case, minding the two plastic pins molded into the rear case near the open end of the optical drive that can break off.
-
-
-
Maneuver the optical drive out of the rear case, minding the two plastic pins molded into the rear case near the open end of the optical drive that can break off.
-
-
-
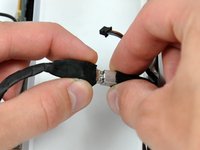
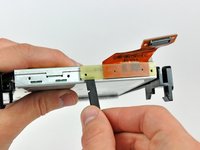
Remove the two T6 Torx screws securing the optical drive cable to the optical drive.
-
-
-
Insert the flat end of a spudger into the gap between the optical drive cable connector and the optical drive.
-
Twist the spudger to separate the connector from the optical drive.
-
Pull the optical drive cable connector away from the optical drive.
-
-
-
Use the flat end of a spudger to remove the small pieces of EMI foam from the underside of the optical drive.
-
-
-
Use the flat end of a spudger to remove the long strip of EMI foam from the underside of the optical drive.
-
-
-
Use the tip of a spudger to push the two optical drive bracket tabs out of their slots in the top of the optical drive.
-
-
-
Using the tip of a spudger, press the optical drive bracket tab out of its slot on the side of the optical drive.
-
-
-
Use the tip of a spudger to press the optical drive bracket tabs out of the slots in the top of the optical drive.
-
-
-
Pull the optical drive bracket toward the open end of the optical drive to free it from the optical drive.
-
-
-
Use the flat end of a spudger to pry the optical drive thermal sensor off the adhesive securing it to the optical drive.
-


To reassemble your device, follow these instructions in reverse order.
Annuleren: ik heb deze handleiding niet afgemaakt.
9 andere personen hebben deze handleiding voltooid.
