Ga door naar hoofdinhoud
Word lid van de reparatiegemeenschap - Account aanmaken

iBook G3 14" Bottom Shield Replacement

Wat je nodig hebt

    1. iBook G3 14" Bottom Shield Replacement, Battery: stap 1, afbeelding 1 van 1
      • Use a coin to rotate the battery locking screw 90 degrees clockwise.

      • Lift the battery out of the computer.

      Vraag FixBot

      Voeg opmerking toe

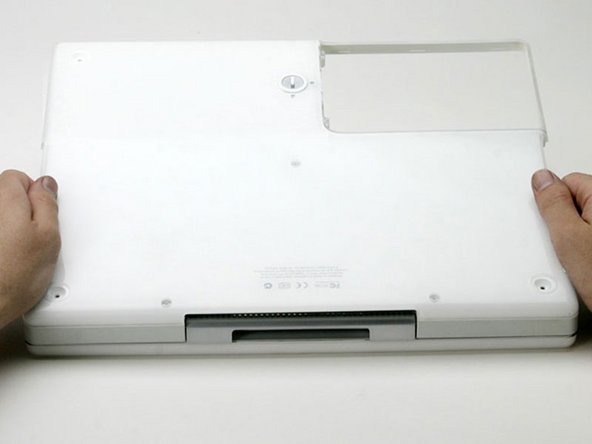
    1. iBook G3 14" Bottom Shield Replacement, Lower Case: stap 2, afbeelding 1 van 1
      • Use a pin to remove the three rubber feet from the lower case.

      Vraag FixBot

      Voeg opmerking toe

    2. iBook G3 14" Bottom Shield Replacement: stap 3, afbeelding 1 van 1
      • Remove the three newly-revealed Phillips screws.

      Vraag FixBot

      Voeg opmerking toe

    3. iBook G3 14" Bottom Shield Replacement: stap 4, afbeelding 1 van 1
      • Use a spudger or small flathead screwdriver to pry up the three metal rings that housed the rubber bumpers.

      Vraag FixBot

      Voeg opmerking toe

    4. iBook G3 14" Bottom Shield Replacement: stap 5, afbeelding 1 van 1
      • Remove the three hex screws using a T8 Torx screwdriver.

      • The screw in the center is shorter than the other two.

      Vraag FixBot

      Voeg opmerking toe

    5. iBook G3 14" Bottom Shield Replacement: stap 6, afbeelding 1 van 1
      • Remove the two Phillips screws on either side of the battery contacts.

      Vraag FixBot

      Voeg opmerking toe

    6. iBook G3 14" Bottom Shield Replacement: stap 7, afbeelding 1 van 1
      • Breathe deeply. Trying times are ahead, but we promise the lower case does come off.

      • Push the thin rims of the lower case surrounding the battery compartment in, bending them past the tabs, and then lift up to free that corner of the lower case.

      Vraag FixBot

      Voeg opmerking toe

    7. iBook G3 14" Bottom Shield Replacement: stap 8, afbeelding 1 van 1
      • There is a slot on the wall of the battery compartment that locks the lower case in place.

      • Use a small flathead screwdriver to pry out the slot's lower rim and pull up on the lower case to free the slot from the tabs holding it.

      Vraag FixBot

      Voeg opmerking toe

    8. iBook G3 14" Bottom Shield Replacement: stap 9, afbeelding 1 van 1
      • Run a spudger along the seam between the lower case and upper case on the front of the computer to free the tabs locking the lower case.

      • Pull up on the lower case and continue to use the spudger as necessary until you hear three distinct clicks.

      Vraag FixBot

      Voeg opmerking toe

    9. iBook G3 14" Bottom Shield Replacement: stap 10, afbeelding 1 van 1
      • Continue to run the spudger around the front, right corner.

      • There are two tabs on the port side of the computer, one near the front corner and one near the sound out port.

      Vraag FixBot

      Voeg opmerking toe

    10. iBook G3 14" Bottom Shield Replacement: stap 11, afbeelding 1 van 1
      • Once the front and sides of the lower case are free, turn the computer so that the back is facing you.

      • Pull the lower case up and toward you until the back tabs pop free.

      • It may be helpful to jiggle the case up and down.

      Vraag FixBot

      Voeg opmerking toe

    11. iBook G3 14" Bottom Shield Replacement: stap 12, afbeelding 1 van 1
      • Remove the small greasy springs with white plastic caps from either side of the battery contacts.

      Vraag FixBot

      Voeg opmerking toe

      • Peel back the yellow tape and foil shielding.

      Vraag FixBot

      Voeg opmerking toe

    1. iBook G3 14" Bottom Shield Replacement: stap 14, afbeelding 1 van 1
      • Remove the following 10 screws:

      • One 5 mm Phillips at the upper, right corner of the battery compartment.

      • Nine 6 mm Phillips scattered around the shield.

      • Lift the bottom shield off.

      Vraag FixBot

      Voeg opmerking toe

Conclusie

To reassemble your device, follow these instructions in reverse order.

Annuleren: ik heb deze handleiding niet afgemaakt.

Één andere persoon heeft deze handleiding voltooid.

Bijgevoegde documenten

iRobot

Lid sinds: 09/24/09

1 Reputatie

636 handleidingen geschreven

2Gids Commentaar

By using a T8 Torx screwdriver to remove and reinstall the three hex screws on the bottom case as suggested, I ended up stripping the screw heads when tightening them. By pushing hard on a T9 Torx driver I was able to carefully remove the stripped screws. I would recommend using the proper size hex driver instead of the T8 Torx driver for a more positive grip in the screw head.

randy3833 - Antwoord Deel

To add to my above comment: There doesn't seem to be a correct hex size for these 3 screws in either metric or SAE. Actually, the T9 Torx driver works pretty well. I replaced the stripped screws with three brand new ones.

randy3833 - Antwoord Deel

Voeg opmerking toe

Weergavestatistieken:

Afgelopen 24 uren: 1

Afgelopen 7 dagen: 6

Afgelopen 30 dagen: 32

Altijd: 4,424