Inleiding
The power block's connector to the motherboard is difficult to disconnect by hand initially. While unnecessary, we highly recommend removing the motherboard from the silver casing first to access the power block's connector.
Wat je nodig hebt
-
-
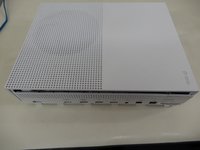
Flip the Xbox One S so that the bottom of the case is facing upward.
 Vraag FixBot
-
-
-
Begin by working at the case on the rear where the warranty sticker is located. Insert the plastic opening tool into the gap between the bottom of the case and the grated top side. Then find the clips in between that hold the case in place. Use the opening tool to pop the clips out. The best method is to pry the black case away from the bottom.
-
Use the opening tool to pop the clips out. The best method is to pry the black case away from the bottom.
-
-
-
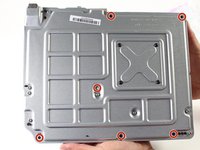
Use a T10 Torx screwdriver to remove the six green 50 mm long screws from the metal case labeled F1 through F6.
-
-
-
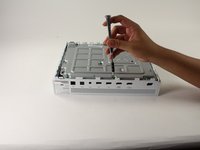
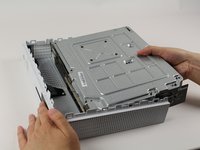
Gently separate the interior case from the white exterior case using the appropriate method.
-
Pry the white plastic sides outwards at the rear to separate from the plastic I/O shield.
-
-
-
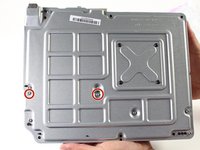
To replace the hard drive, flip over the console and remove the two 10 mm T-10 Torx screws, C3 and C5, from the backside of the Xbox One S.
-
-
-
-
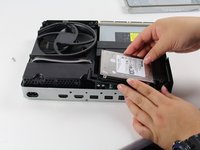
Gently disconnect the hard drive from the motherboard (at the two plastic connector bodies).
-
-
-
To remove the optical disc drive, remove the silver 10 mm T-10 Torx screw labeled "C4."
-
-
-
Pull the disc drive slightly off the motherboard and disconnect the plastic connectors from the motherboard.
-
-
-
To replace the motherboard you must remove the three silver 10 mm T-10 Torx screws labelled "C1," "C2," and "C6."
-
Remove the four black 8 mm T-8 Torx screws lablelled "A1," "A2," "A3," and "A4."
-
-
-
Locate the rectangular silver clamp on the opposite corner of the power block.
-
Remove the black bracket near the fan.
-
-
Gereedschap gebruikt in deze stap:Tweezers$4.99
-
Grab the clamp with the tweezers. Pull the clamp upward, away from the silver casing. Jiggle it back and forth like a tooth if necessary.
-
-
-
Remove the four black 8 mm T-9 Torx screws labeled "E1," "E2," "E3," and "E4."
-
-
-
Remove the three black 8 mm T-9 Torx screws labeled "D1," "D2," and "D3" to remove the Mediatek board.
-
-
-
Now that the clamp is removed, gently lift the motherboard from its edges out from the metal casing. The motherboard should come out with ease.
-
-
-
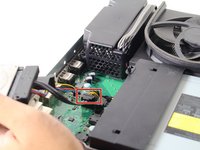
Locate the black connector that joins the power block to the motherboard.
-
-
-
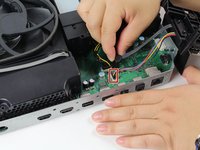
Grab the connector as shown, pinch the small black locking tab, and pull firmly upward to detach the power block from the motherboard .
-


To reassemble your device, follow these instructions in reverse order.
Annuleren: ik heb deze handleiding niet afgemaakt.
51 andere personen hebben deze handleiding voltooid.
Team

Cal Poly, Team S22-G3, Livingston Spring 2017 Lid van Cal Poly, Team S22-G3, Livingston Spring 2017
CPSU-LIVINGSTON-S17S22G3
4 Leden
59 handleidingen geschreven
24Gids Commentaar
So my Xbox One S isn’t turning on at all. No light, nothing. I went to take it apart and I plugged it in just to see if it would boot out of the blue. I turned it on and nothing happened but I can hear a faint clicking sound from the power supply. Does that mean, the power supply has gone bad, and I’ll need to replace it?
yes because this xbox one s internal power supply is a fail.. look at there newer model the “xbox one x “ the internal powersupply of it has air ventilation coming from the upgraded version of the fan.
meaning the xbox one s power supply has no proper ventilation no air that blow the exhaust the heat will stuck up inside .. thats why it will not last longer .
the worst is that its design it self .. imagine when you accidentaly pour a water into the fan .. the water will go directly to the cpu and mobo.
that is why they upgrade the “xbox one x“ they copied the design from the ps4 that the air ventilation is on the side panels..
My xbox one s stopped working after a power surge from a string of storms. It wont respond, make any noise at all. I figured i would replace the power supply and see if that’s the fix. While i’m waiting for the part to arrive, i’m wondering if there is any other damage that could’ve been done by the surge. Or does the power supply prevent that?
did you ever get that storm Xbox to work? I just lost mine to a storm last night :(
my one s is working fine all apps are good my network connection is goood its cleaned and maintenanced properly all is working well until i try doing the one thing i bought it for playing games doesnt matter if its disc or downloaded soon as it loads and im ready to play the console crashes to no signal and shuts off