Deze versie kan foutieve bewerkingen bevatten. Schakel over naar de recentste gecontroleerde momentopname.
Wat je nodig hebt
-
Deze stap is niet vertaald. Help het te vertalen
-
To open your Xbox, you're going to have to cut or peel up this tamper-evident tape. But don't worry—Microsoft can't legally void your warranty, as long as you don't damage anything. Have fun!
-
-
Deze stap is niet vertaald. Help het te vertalen
-
Use a plastic opening tool to pry up and remove the plastic vent that surrounds the side USB port.
-
The vent is fairly flexible, and held in place with weak plastic clips—start prying from the back and peel it out.
-
-
Deze stap is niet vertaald. Help het te vertalen
-
Insert the flat end of a spudger between the upper and lower case where they meet at the rear of the side vent opening.
-
-
Deze stap is niet vertaald. Help het te vertalen
-
Insert a plastic opening tool between the upper and lower case to separate the clip over the rear vent.
-
-
Deze stap is niet vertaald. Help het te vertalen
-
Keep moving along the rear of the Xbox, prying up clips.
-
-
Deze stap is niet vertaald. Help het te vertalen
-
Keep popping clips. It may help to slide the plastic opening tool across the clips.
-
-
Deze stap is niet vertaald. Help het te vertalen
-
Starting with the spudger you left in the crack, pry the upper case up to free the last few clips.
-
Lift the upper case slightly and shift it to give access to the front panel board.
-
-
-
Deze stap is niet vertaald. Help het te vertalen
-
Use tweezers to lift the blue plastic retaining loop over the white connector on the board.
-
Use the tip of a spudger to push the connector's locking tab toward the cable to unlatch it.
-
-
Deze stap is niet vertaald. Help het te vertalen
-
Use tweezers to pull the cable straight out of the connector on the board.
-
Remove the upper case.
-
-
Deze stap is niet vertaald. Help het te vertalen
-
Use the flat end of a spudger to free the clips securing the front panel to the upper case.
-
Remove the front panel from the rest of the upper case.
-
-
Deze stap is niet vertaald. Help het te vertalen
-
Replace the top part of the upper case.
-
Line up the clips and press firmly to re-seat them around the perimeter.
-
-
Deze stap is niet vertaald. Help het te vertalen
-
Support the front panel near the front of the Xbox.
-
Use tweezers to replace the front button cable in its ZIF socket.
-
Use the flat end of a spudger to push the ZIF lock to the left to secure the cable.
-
-
Deze stap is niet vertaald. Help het te vertalen
-
With the front panel at a 45 degree angle, interlock its plastic hooks with those in the lower case.
-
Push the top of the front panel into the Xbox, like closing a mailbox. Press firmly so that the clips securing the front panel to the upper case lock securely.
-
-
Deze stap is niet vertaald. Help het te vertalen
-
Gently pull up on the speaker cable connector to disconnect it from the front panel board.
-
Use the flat end of a spudger to disconnect the antenna cable from the front panel board.
-
-
Deze stap is niet vertaald. Help het te vertalen
-
Remove the two 9.5 mm T8 Torx screws from the WI-Fi board.
-
Lift the Wi-Fi board straight up from its socket in the upper metal case.
-
Leaving the Wi-Fi board antenna cable in place, move the Wi-Fi board aside, exposing the screw labeled "C3" that was beneath it.
-
-
Deze stap is niet vertaald. Help het te vertalen
-
Remove the eight 65 mm Torx T10 screws from the top of the upper metal case.
-
-
Deze stap is niet vertaald. Help het te vertalen
-
Disconnect the Wi-Fi board interconnect cable from the motherboard.
-
-
Deze stap is niet vertaald. Help het te vertalen
-
Disconnect the optical drive power and SATA data cables from the motherboard.
-
-
Deze stap is niet vertaald. Help het te vertalen
-
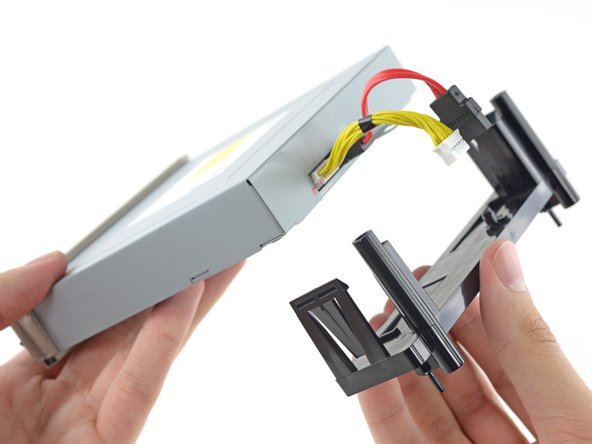
Push the clips outward and then slide the tray off the drive.
-
-
Deze stap is niet vertaald. Help het te vertalen
-
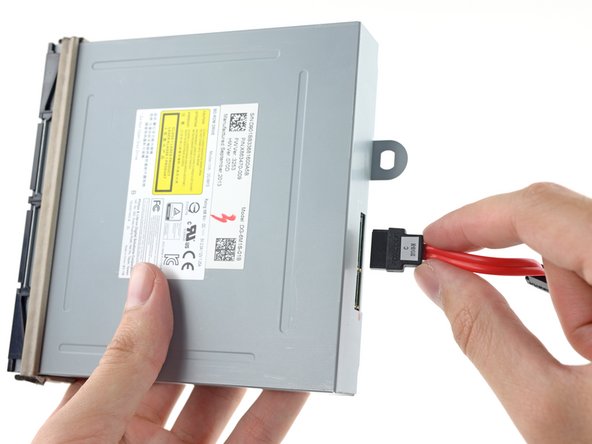
Remove the optical drive power and SATA data cables.
-


Annuleren: ik heb deze handleiding niet afgemaakt.
82 andere personen hebben deze handleiding voltooid.

44 opmerkingen
I torn down my one to attempt to see why it stopped reading disc, i discovered that it wasn't a spinning issue but that the disc popped back out just a bit leading to why it will not spin. Any way of fixing that?
there is a black bar that rolls the disc into the tray try cleaning that (you will have to fully open the disc drive)
Once replacing the optical drive does one need to flashit/swap pcb boards. Has Microsoft stopped hard coding these.
I would like to know the answer to this as well. My xbox has a terrible time loading discs. If I use the hold method to install the disc it will eventually read it.