Ga door naar hoofdinhoud

TomTom Runner Front Cover Replacement

Wat je nodig hebt

  1. TomTom Runner Front Cover  Replacement, Wristband: stap 1, afbeelding 1 van 1
    • First, lift the bottom part of the band to start removing the wristband from the button area of the watch.

  2. TomTom Runner Front Cover  Replacement: stap 2, afbeelding 1 van 2 TomTom Runner Front Cover  Replacement: stap 2, afbeelding 2 van 2
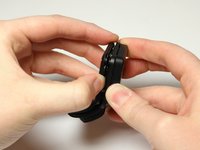
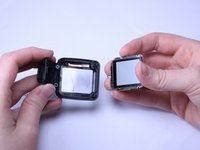
    • Continue to lift up on the band until the screen of the watch becomes loose from the band.

    • You may need to apply a small amount of force downward on the face of the screen.

    • Continue to pull up on the wristband until it is completely off the watch.

  3. TomTom Runner Front Cover  Replacement, Back Panel: stap 3, afbeelding 1 van 1
    • Grab the watch once it is separated from the wristband.

  4. TomTom Runner Front Cover  Replacement: stap 4, afbeelding 1 van 1
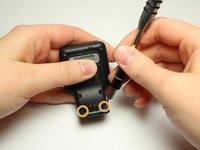
    • Flip over the watch and remove the four 3.0 mm Torx head screws with a T4 Torx head screwdriver.

  5. TomTom Runner Front Cover  Replacement: stap 5, afbeelding 1 van 2 TomTom Runner Front Cover  Replacement: stap 5, afbeelding 2 van 2
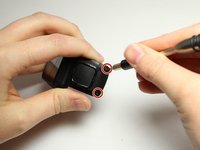
    • Remove the two 3.0 mm Torx screws from the front. Use a T4 Torx screwdriver to remove the screws.

    • The two 3.0 mm Torx screws are painted blue at the end. These screws have screw holders around them that will also need to be removed.

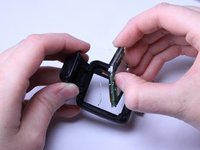
    • Unscrew the screws from the front of the watch casing and the screw holders fall out from the back of the watch casing.

  6. TomTom Runner Front Cover  Replacement: stap 6, afbeelding 1 van 2 TomTom Runner Front Cover  Replacement: stap 6, afbeelding 2 van 2
    • Gently pull the back panel away from the front panel.

    • Do not to pull too fast or too hard. There are red and black wires connected to the vibrator component that should not be ripped.

  7. TomTom Runner Front Cover  Replacement: stap 7, afbeelding 1 van 2 TomTom Runner Front Cover  Replacement: stap 7, afbeelding 2 van 2
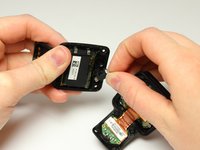
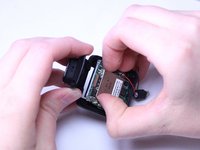
    • Gently wiggle the black box vibrator component away from the back panel with your fingers or a Spudger tool.

    • Be gentle with the red and black wires. You do not want them to rip or pop out.

    • The vibrator component is the small black box with the silver metal part at end. The black box is glued down, so it will take a little force to free it and it will be sticky.

  8. TomTom Runner Front Cover  Replacement, Front Cover: stap 8, afbeelding 1 van 2 TomTom Runner Front Cover  Replacement, Front Cover: stap 8, afbeelding 2 van 2
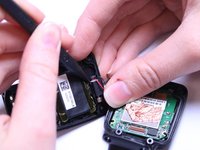
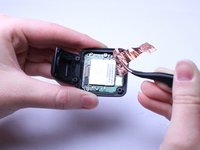
    • Now lift the smaller square of copper off the Front Panel. Use the bent, metal precision tweezers and slide it under the smaller square of copper lining then gently lift it up.

    • You will need to be gentle and pull the copper slowly so that it does not rip.

  9. TomTom Runner Front Cover  Replacement: stap 9, afbeelding 1 van 2 TomTom Runner Front Cover  Replacement: stap 9, afbeelding 2 van 2
    • Use the bent, metal precision tweezers to remove the thin copper piece from large square silver piece in the Front Casing.

    • You will need to be gentle and pull the copper slowly so that it does not rip.

  10. TomTom Runner Front Cover  Replacement: stap 10, afbeelding 1 van 1
    • Remove the two 2.0 mm Torx Head screws with the T5 Torx screwdriver.

  11. TomTom Runner Front Cover  Replacement: stap 11, afbeelding 1 van 3 TomTom Runner Front Cover  Replacement: stap 11, afbeelding 2 van 3 TomTom Runner Front Cover  Replacement: stap 11, afbeelding 3 van 3
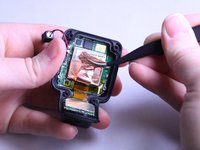
    • Use your fingers to gently pull the whole green motherboard out of the Front Casing.

    • If you have trouble using your fingers, then use the black Spudger tool.

Conclusie

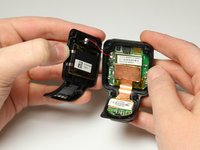
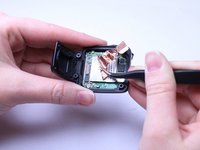
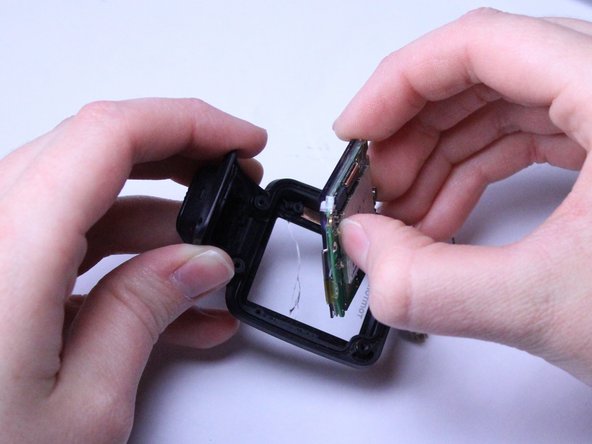
You are finished when all parts have been removed to leave just the front casing by itself. To reassemble your device, follow these instructions in reverse order.

2 andere personen hebben deze handleiding voltooid.

Amber Scarborough

Lid sinds: 03/20/17

1.133 Reputatie

5 handleidingen geschreven

Team

Texas Tech, Team S8-G6, Bennett Spring 2017 Lid van Texas Tech, Team S8-G6, Bennett Spring 2017

TTU-BENNETT-S17S8G6

4 Leden

15 handleidingen geschreven

9 opmerkingen

Great explaination, though you mention you don't replacement parts...? Can you share a link where you found the new front cover assembly?

steffen klifman - Antwoord

Same question as Dyeffen : where can we get some replacement screens ?

Ansre

a_limal@yahoo.com.au

Andre - Antwoord

Steffen sorry :-(

Andre - Antwoord

Same question: where can we find the replacement cover part?

Thomas - Antwoord

Hello if the control button is tight can the button be removed and cleaned underneath

Imran

Imran Moosagie - Antwoord

Voeg opmerking toe

Weergavestatistieken:

Afgelopen 24 uren: 2

Afgelopen 7 dagen: 10

Afgelopen 30 dagen: 24

Altijd: 6,210