Ga door naar hoofdinhoud
Word lid van de reparatiegemeenschap - Account aanmaken

ThinkPad T420 Memory Replacement

Wat je nodig hebt

  1. ThinkPad T420 Memory Replacement, Change note: stap 1, afbeelding 1 van 2 ThinkPad T420 Memory Replacement, Change note: stap 1, afbeelding 2 van 2
    Gereedschap gebruikt in deze stap:
    Essential Electronics Toolkit
    $29.95
    • Due to the EET missing several components present in the Pro Tech Go and only being $20 cheaper, the EET has been removed. The EET will work for this guide as-is, but if you are shopping for a new toolkit to complete this guide, the Pro Tech Go (new or refurbished, refurbished is ~$32 cheaper), or Pro Tech ($79 new/~$59.95 refurb) is the current recommended toolkit for this guide.

    • If you are interested in a refurbished kit stock levels change frequently but can be found here.

    Vraag FixBot

    Voeg opmerking toe

  2. ThinkPad T420 Memory Replacement, Unlock the battery: stap 2, afbeelding 1 van 3 ThinkPad T420 Memory Replacement, Unlock the battery: stap 2, afbeelding 2 van 3 ThinkPad T420 Memory Replacement, Unlock the battery: stap 2, afbeelding 3 van 3
    • If completing a step like a clone of your old hard drive/SSD, DO NOT remove the battery until the process is complete!

    • Unlock the latch locking the battery in the laptop.

    • NOTE: To remove the battery, the tab must be held in to avoid having the lock reinitiate inside the laptop.

    Vraag FixBot

    Voeg opmerking toe

  3. ThinkPad T420 Memory Replacement, Release the battery: stap 3, afbeelding 1 van 3 ThinkPad T420 Memory Replacement, Release the battery: stap 3, afbeelding 2 van 3 ThinkPad T420 Memory Replacement, Release the battery: stap 3, afbeelding 3 van 3
    • After unlocking the battery, remove the battery from the reverse way it is installed to remove it from the laptop.

    Vraag FixBot

    Voeg opmerking toe

  4. ThinkPad T420 Memory Replacement, Remove the RAM door: stap 4, afbeelding 1 van 3 ThinkPad T420 Memory Replacement, Remove the RAM door: stap 4, afbeelding 2 van 3 ThinkPad T420 Memory Replacement, Remove the RAM door: stap 4, afbeelding 3 van 3
    • EET owners: Your kit has this bit. No purchase needed.

    • If you are removing this cover to upgrade/replace your lower RAM module, the keyboard screw DOES NOT need to be removed.

    • WWAN ready systems ship with antenna covers over these cables. Someone installed a WLAN card in this T420 which disabled the better card and was removed.

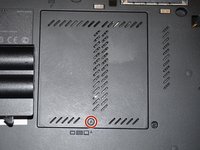
    • Loosen the screw in red (Phillips #2). This screw stays captive in the bottom RAM door cover, and does not need to be removed.

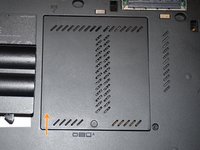
    • Pull the cover up with a fingernail or a nonmarring pry tool.

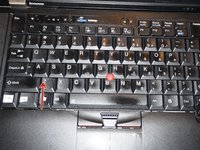
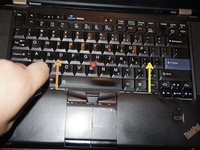
    • Remove the screw retaining the keyboard.

    Vraag FixBot

    Voeg opmerking toe

  5. ThinkPad T420 Memory Replacement, Remove the keyboard: stap 5, afbeelding 1 van 3 ThinkPad T420 Memory Replacement, Remove the keyboard: stap 5, afbeelding 2 van 3 ThinkPad T420 Memory Replacement, Remove the keyboard: stap 5, afbeelding 3 van 3
    • Open the laptop.

    • To remove the keyboard, release the keyboard hooks using a plastic pry tool.

    • Once the keyboard is loose, remove it from the chassis.

    Vraag FixBot

    Voeg opmerking toe

  6. ThinkPad T420 Memory Replacement, Disconnect the keyboard: stap 6, afbeelding 1 van 3 ThinkPad T420 Memory Replacement, Disconnect the keyboard: stap 6, afbeelding 2 van 3 ThinkPad T420 Memory Replacement, Disconnect the keyboard: stap 6, afbeelding 3 van 3
    • To reinstall the keyboard, refer to the steps in this guide.

    • This step can be skipped if you remove the keyboard to upgrade/replace the RAM. However, disconnecting it may allow for better access to the upper (Keyboard) RAM module.

    • If you have a can of compressed air available, some of the dust can be removed at this point. Further disassembly is required for a full cleaning.

    • Disconnect the keyboard from the motherboard. Use a plastic pry tool for this step.

    Vraag FixBot

    Voeg opmerking toe

  7. ThinkPad T420 Memory Replacement, RAM module - Bottom: stap 7, afbeelding 1 van 3 ThinkPad T420 Memory Replacement, RAM module - Bottom: stap 7, afbeelding 2 van 3 ThinkPad T420 Memory Replacement, RAM module - Bottom: stap 7, afbeelding 3 van 3
    • Unclip the RAM module by pulling the memory retention tabs back.

    • Remove the existing module by pulling the module from the side, at a 90 degree angle.

    Vraag FixBot

    Voeg opmerking toe

  8. ThinkPad T420 Memory Replacement, RAM module - keyboard: stap 8, afbeelding 1 van 3 ThinkPad T420 Memory Replacement, RAM module - keyboard: stap 8, afbeelding 2 van 3 ThinkPad T420 Memory Replacement, RAM module - keyboard: stap 8, afbeelding 3 van 3
    • To reinstall the keyboard, refer to the steps in this guide.

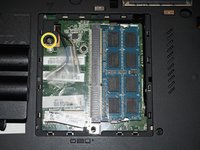
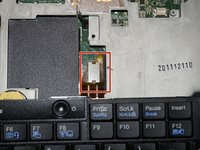
    • Lift the plastic cover hiding the RAM module.

    • Unlatch the tabs retaining the memory module.

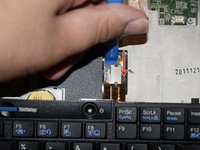
    • Pull the module out from a 90 degree angle.

    Vraag FixBot

    Voeg opmerking toe

Conclusie

To reassemble your device, follow these instructions in reverse order.

Annuleren: ik heb deze handleiding niet afgemaakt.

16 andere personen hebben deze handleiding voltooid.

Nick

Lid sinds: 11/10/09

103.384 Reputatie

68 handleidingen geschreven

Team

Master Techs Lid van Master Techs

Community

333 Leden

1.484 handleidingen geschreven

2Gids Commentaar

What tool might one use as a pry?

commander - Antwoord Deel

The plastic pry tool will also work for the bottom RAM/mSATA part. I can usually get it open without the assistance of pry tools.

Nick - Antwoord Deel

Voeg opmerking toe

Weergavestatistieken:

Afgelopen 24 uren: 3

Afgelopen 7 dagen: 24

Afgelopen 30 dagen: 140

Altijd: 21,845