Ga door naar hoofdinhoud
Word lid van de reparatiegemeenschap - Account aanmaken

The Claw Item Replacement

Wat je nodig hebt

    1. The Claw Item Replacement, Top Cover: stap 1, afbeelding 1 van 1
      • Place The Claw machine in the up-right position with the control knobs facing you.

      Vraag FixBot

      Voeg opmerking toe

    2. The Claw Item Replacement: stap 2, afbeelding 1 van 1
      • Turn The Claw machine upside-down placing the top cover on the surface of your work area.

      Vraag FixBot

      Voeg opmerking toe

    3. The Claw Item Replacement: stap 3, afbeelding 1 van 1
      • Remove all ten 6mm phillips #1 screws underneath the top cover using your #1 phillips head screwdriver.

      • It is helpful to choose a clear, well lit work space. There are multiple tiny screws that are easy to lose.

      Vraag FixBot

      Voeg opmerking toe

    4. The Claw Item Replacement: stap 4, afbeelding 1 van 1
      • Turn The Claw machine back to the upright position with controls facing you.

      Vraag FixBot

      Voeg opmerking toe

    5. The Claw Item Replacement: stap 5, afbeelding 1 van 1
      • Remove the top cover of The Claw machine.

      Vraag FixBot

      Voeg opmerking toe

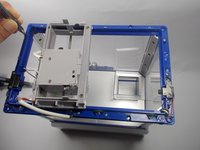
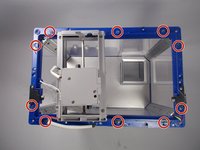
    6. The Claw Item Replacement: stap 6, afbeelding 1 van 2 The Claw Item Replacement: stap 6, afbeelding 2 van 2
      • Remove the ten 6 mm phillips #1 screws from the top flange.

      Vraag FixBot

      Voeg opmerking toe

    7. The Claw Item Replacement: stap 7, afbeelding 1 van 1
      • Lift the flange upward and off to the side of the machine.

      • There is enough wire connecting the flange to the machine that you will not need to cut the wire. The flange can be moved off to the side of the machine while you are working.

      • Cutting or ripping out the wire will cause damage to the machine so try not to put much tension on the wire.

      Vraag FixBot

      Voeg opmerking toe

    1. The Claw Item Replacement, Overfill: stap 8, afbeelding 1 van 1
      • After emptying out contents have The Claw machine facing you

      Vraag FixBot

      Voeg opmerking toe

    2. The Claw Item Replacement: stap 9, afbeelding 1 van 1
      • View the Claw machine from the top

      Vraag FixBot

      Voeg opmerking toe

    3. The Claw Item Replacement: stap 10, afbeelding 1 van 1
      • Place thumb on grip section and pull away from the Claw machine.

      Vraag FixBot

      Voeg opmerking toe

    4. The Claw Item Replacement: stap 11, afbeelding 1 van 1
      • Place items in the Claw machine.

      Vraag FixBot

      Voeg opmerking toe

Conclusie

To reassemble your device, follow these instructions in reverse order.

Annuleren: ik heb deze handleiding niet afgemaakt.

Alain Pierre

Lid sinds: 03/22/16

1.188 Reputatie

9 handleidingen geschreven

Team

UMass Dartmouth, Team 4-8, Catania Spring 2016 Lid van UMass Dartmouth, Team 4-8, Catania Spring 2016

UMASSD-CATANIA-S16S4G8

3 Leden

18 handleidingen geschreven

0Gids Commentaar

Voeg opmerking toe

Weergavestatistieken:

Afgelopen 24 uren: 0

Afgelopen 7 dagen: 18

Afgelopen 30 dagen: 70

Altijd: 1,986