Deze versie kan foutieve bewerkingen bevatten. Schakel over naar de recentste gecontroleerde momentopname.
Wat je nodig hebt
-
Deze stap is niet vertaald. Help het te vertalen
-
To avoid electronically damaging either your computer or your mouse, unplug the usb cable from its socket.
-
-
Deze stap is niet vertaald. Help het te vertalen
-
The Rival 700 mouse is a non wireless mouse. The micro-USB cable end is an elbow socket, secured by a plastic clip.
-
To disconnect the cable from the mouse, firmly press the plastic clip using your thumb
-
-
Deze stap is niet vertaald. Help het te vertalen
-
The original nameplate is a soft rubber one that can be removed just by pulling it softly out of its socket.
-
WARNING: When reassembling, if you're using a custom nameplate that may not be as stretchable as the original one, insert it softly, and use a lime tool on the new part to avoid damaging the mouse socket.
-
-
-
Deze stap is niet vertaald. Help het te vertalen
-
You will be able to download the 3D files to design a custom nameplate on the Steelseries website. The link is also provided in the part description.
-
On this picture, the original "RIVAL" nameplate will be replaced with a new one on which i just had my Twitch ID printed.
-
Be creative, use colored plastic, put logos and drawings on your mouse.
-
-
Deze stap is niet vertaald. Help het te vertalen
-
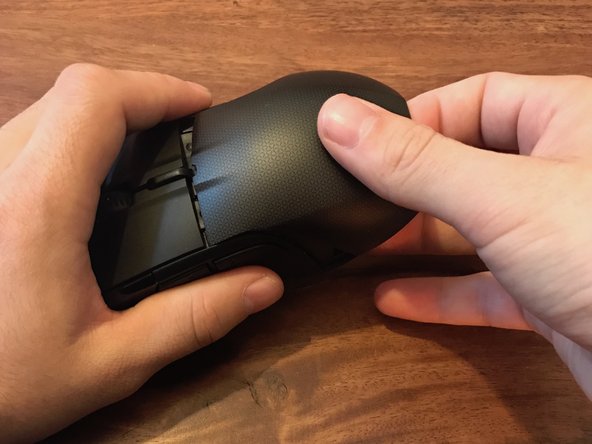
Use both your index and thumb to gently pry the top cover out from the mouse.
-
This part is a thin plastic one which needs a certain amount of strength to be removed. Be careful not to break it.
-
-
Deze stap is niet vertaald. Help het te vertalen
-
Steelseries sells a set of two different covers to replace the original one, with a sweat-resistant one f.e.
-
Check the parts section for the purchase link.
-
On the left, you can see on the wide led slot that is used to color the Steelseries logo on your mouse.
-
-
Deze stap is niet vertaald. Help het te vertalen
-
Use a Philips #0 screwdriver to remove the four screws that are keeping the mouse sensor assembly sealed.
-
-
Deze stap is niet vertaald. Help het te vertalen
-
Insert your thumb and index in the two mouse holes and gently pry the sensor assembly out from its socket.
-


Annuleren: ik heb deze handleiding niet afgemaakt.
3 andere personen hebben deze handleiding voltooid.
