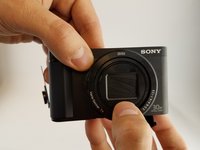
Ga door naar hoofdinhoud

Sony Cyber-shot DSC-HX90V Lens Replacement

Wat je nodig hebt

  1. Sony Cyber-shot DSC-HX90V Lens Replacement, Button board: stap 1, afbeelding 1 van 2 Sony Cyber-shot DSC-HX90V Lens Replacement, Button board: stap 1, afbeelding 2 van 2
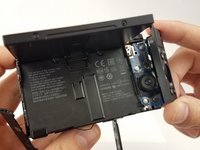
    • Place the device so bottom of the camera is facing up .

    • Remove the five marked screws with a Phillips #000 screwdriver.

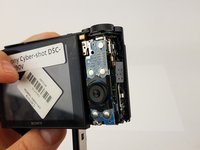
    • Insert the spudger where arrow marks to gently remove the lower panel.

  2. Sony Cyber-shot DSC-HX90V Lens Replacement: stap 2, afbeelding 1 van 1
    • Remove the marked screw on the side of the camera with a Phillips #000 screwdriver.

  3. Sony Cyber-shot DSC-HX90V Lens Replacement: stap 3, afbeelding 1 van 1
    • Remove the marked screw with a Phillips #000 screwdriver.

  4. Sony Cyber-shot DSC-HX90V Lens Replacement: stap 4, afbeelding 1 van 1
    • Orient the device so the lens is facing down.

    • Remove the two black M1.4 X 3.5 Phillips head screws using Phillips #000 screwdriver.

  5. Sony Cyber-shot DSC-HX90V Lens Replacement: stap 5, afbeelding 1 van 1
    • Orient the device so the lens is facing down.

    • Remove the black M1.4 X 3.5 Phillips head screw.

  6. Sony Cyber-shot DSC-HX90V Lens Replacement, Side cover: stap 6, afbeelding 1 van 1
    • Use the plastic opening tool with a prying motion to remove the side cover of the camera.

    • The cover should come off easily but you might hear light snapping or popping.

  7. Sony Cyber-shot DSC-HX90V Lens Replacement, LCD: stap 7, afbeelding 1 van 2 Sony Cyber-shot DSC-HX90V Lens Replacement, LCD: stap 7, afbeelding 2 van 2
    • Remove the small screw under the multi/USB cover.

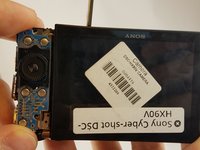
    • Use the plastic opening tool to remove the button board.

  8. Sony Cyber-shot DSC-HX90V Lens Replacement: stap 8, afbeelding 1 van 2 Sony Cyber-shot DSC-HX90V Lens Replacement: stap 8, afbeelding 2 van 2
    • Disconnect the control board data cable with care. Permanent damage may occur to the control board if tools are used to disconnect the data cable. Use your fingers only.

    • Disconnect the control board data cable by wiggling carefully with your fingertips. Set the control board to the side once it is disconnected.

  9. Sony Cyber-shot DSC-HX90V Lens Replacement: stap 9, afbeelding 1 van 1
    • LCD screen is very fragile. Handle with care. Do not use tools to remove the screen.

    • Lift the metal plate and LCD screen simultaneously until it is perpendicular to the camera.

  10. Sony Cyber-shot DSC-HX90V Lens Replacement, Motherboard: stap 10, afbeelding 1 van 2 Sony Cyber-shot DSC-HX90V Lens Replacement, Motherboard: stap 10, afbeelding 2 van 2
    • LCD screen is very fragile. Handle with care. Do not use tools to remove the screen.

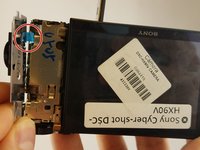
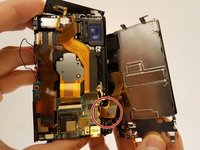
    • Remove the ribbon cable connecting LCD display to camera sensor and battery housing.

  11. Sony Cyber-shot DSC-HX90V Lens Replacement: stap 11, afbeelding 1 van 1
    • Make sure all ribbon cables are unplugged and remove the motherboard.

    • Ribbon wires can be easily damaged.

  12. Sony Cyber-shot DSC-HX90V Lens Replacement, Lens: stap 12, afbeelding 1 van 3 Sony Cyber-shot DSC-HX90V Lens Replacement, Lens: stap 12, afbeelding 2 van 3 Sony Cyber-shot DSC-HX90V Lens Replacement, Lens: stap 12, afbeelding 3 van 3
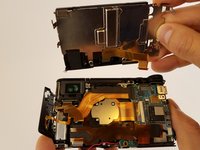
    • Press on the lens with your finger.

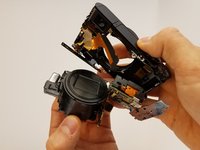
    • Gently pull the lens container out of the camera.

    • Make sure all ribbon wires are unplugged.

Conclusie

To reassemble your device, follow these instructions in reverse order.

8 andere personen hebben deze handleiding voltooid.

Marin Rusinov

Lid sinds: 02/02/17

853 Reputatie

5 handleidingen geschreven

5 opmerkingen

Aside from a few missed screws, very nicely done. And I suspect that if one didn’t realize the need to remove those screws, sh/e probably shouldn’t be attempting the job in the first place. :) (I noted the comments after completing lens removal.)

Leon - Antwoord

Can you comment where/specifically the missing screws that were not listed can be found? Any other guides out there that are more comprehensive?

Eric C -

Under multi cover

Dufour - Antwoord

First at step 7

Dufour -

At step 8 remove two 2mm screws both lower sides of LCD

Dufour - Antwoord

Voeg opmerking toe

Weergavestatistieken:

Afgelopen 24 uren: 5

Afgelopen 7 dagen: 33

Afgelopen 30 dagen: 179

Altijd: 10,822