Ga door naar hoofdinhoud
Word lid van de reparatiegemeenschap - Account aanmaken

Sony Alpha A3000 Motherboard Replacement

Wat je nodig hebt

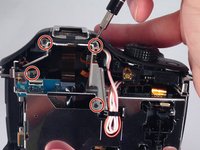
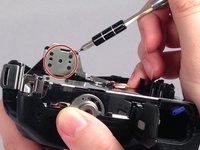
    1. Sony Alpha A3000 Motherboard Replacement, Rear Case: stap 1, afbeelding 1 van 3 Sony Alpha A3000 Motherboard Replacement, Rear Case: stap 1, afbeelding 2 van 3 Sony Alpha A3000 Motherboard Replacement, Rear Case: stap 1, afbeelding 3 van 3
      • Remove the seven highlighted screws shown here.

      • Screws are teeny tiny, don't lose them!

      Vraag FixBot

      Voeg opmerking toe

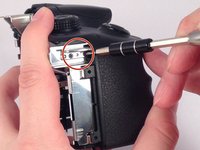
    2. Sony Alpha A3000 Motherboard Replacement: stap 2, afbeelding 1 van 2 Sony Alpha A3000 Motherboard Replacement: stap 2, afbeelding 2 van 2
      • Remove this final screw from the memory card compartment.

      • Remove the chassis by pulling the back cover away from the camera.

      • Be careful not to damage any of the delicate ribbon cables when removing the chassis.

      Vraag FixBot

      Voeg opmerking toe

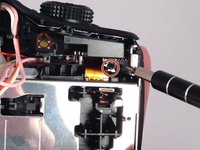
    3. Sony Alpha A3000 Motherboard Replacement: stap 3, afbeelding 1 van 2 Sony Alpha A3000 Motherboard Replacement: stap 3, afbeelding 2 van 2
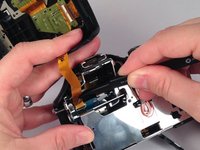
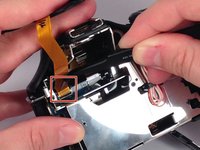
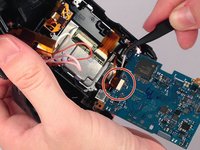
      • Gently but forcefully lift up on the parallel cable connecting the two halves of the camera.

      Vraag FixBot

      Voeg opmerking toe

    1. Sony Alpha A3000 Motherboard Replacement, Motherboard: stap 4, afbeelding 1 van 2 Sony Alpha A3000 Motherboard Replacement, Motherboard: stap 4, afbeelding 2 van 2
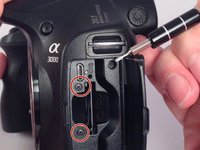
      • After removing the backing from the camera. Remove the two final screws in the memory compartment area.

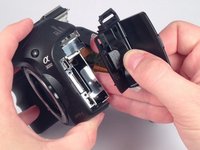
      • Detach the facing for the memory dock.

      Vraag FixBot

      Voeg opmerking toe

    2. Sony Alpha A3000 Motherboard Replacement: stap 5, afbeelding 1 van 2 Sony Alpha A3000 Motherboard Replacement: stap 5, afbeelding 2 van 2
      • Remove the eight screws securing the mount for the flash device.

      Vraag FixBot

      Voeg opmerking toe

    3. Sony Alpha A3000 Motherboard Replacement: stap 6, afbeelding 1 van 2 Sony Alpha A3000 Motherboard Replacement: stap 6, afbeelding 2 van 2
      • Remove the three remaining screws holding in the protective metal casing.

      Vraag FixBot

      Voeg opmerking toe

    4. Sony Alpha A3000 Motherboard Replacement: stap 7, afbeelding 1 van 1
      • Remove the metal casing.

      Vraag FixBot

      Voeg opmerking toe

    5. Sony Alpha A3000 Motherboard Replacement: stap 8, afbeelding 1 van 1
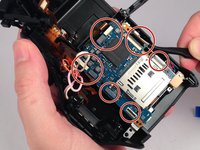
      • Remove three screws holding down the motherboard .

      Vraag FixBot

      Voeg opmerking toe

    6. Sony Alpha A3000 Motherboard Replacement: stap 9, afbeelding 1 van 2 Sony Alpha A3000 Motherboard Replacement: stap 9, afbeelding 2 van 2
      • Detach the nine serial cables connecting it to the camera body.

      Vraag FixBot

      Voeg opmerking toe

    7. Sony Alpha A3000 Motherboard Replacement: stap 10, afbeelding 1 van 1
      • Finally remove the motherboard from the casing.

      Vraag FixBot

      Voeg opmerking toe

Conclusie

To reassemble your device, follow these instructions in reverse order.

Annuleren: ik heb deze handleiding niet afgemaakt.

8 andere personen hebben deze handleiding voltooid.

Leonard Holloman

Lid sinds: 08/31/15

662 Reputatie

4 handleidingen geschreven

Team

USF Tampa, Team 4-4, Meier Fall 2015 Lid van USF Tampa, Team 4-4, Meier Fall 2015

USFT-MEIER-F15S4G4

4 Leden

45 handleidingen geschreven

1Gids Commentaar

Then loose the plug all the motherboard?

kongre172 - Antwoord Deel

Voeg opmerking toe

Weergavestatistieken:

Afgelopen 24 uren: 0

Afgelopen 7 dagen: 7

Afgelopen 30 dagen: 42

Altijd: 3,232