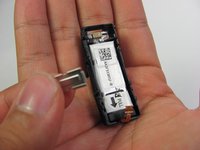
Ga door naar hoofdinhoud

Samsung Gear Fit Battery Replacement

Wat je nodig hebt

  1. Samsung Gear Fit Battery Replacement, Watch Band: stap 1, afbeelding 1 van 2 Samsung Gear Fit Battery Replacement, Watch Band: stap 1, afbeelding 2 van 2
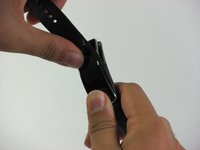
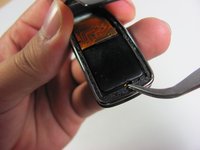
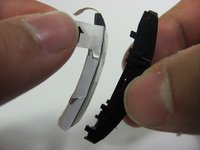
    • Place your thumbs on the ends of the screen.

    • Push the watch outward while pulling the band away from the watch.

  2. Samsung Gear Fit Battery Replacement, Screen: stap 2, afbeelding 1 van 1
    • Heating the device with a hair dryer may warp the screen or damage the device. It it preferable to use an iOpener for this step.

    • For step-by-step instructions on using an iOpener, see the Instructies voor de iOpener.

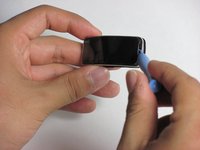
    • Use a hair dryer, heat gun, or an iOpener to heat the Gear Fit for 1-2 minutes until it is hot to the touch.

  3. Samsung Gear Fit Battery Replacement: stap 3, afbeelding 1 van 3 Samsung Gear Fit Battery Replacement: stap 3, afbeelding 2 van 3 Samsung Gear Fit Battery Replacement: stap 3, afbeelding 3 van 3
    • The screen is connected to the device by a ribbon cable on the left side with the power button facing you. Do not try to completely separate the screen from the device yet, and be careful.

    • Gently pry the screen loose using a plastic opening tool.

    • If the screen doesn't easily come loose, more heating may be required

  4. Samsung Gear Fit Battery Replacement: stap 4, afbeelding 1 van 3 Samsung Gear Fit Battery Replacement: stap 4, afbeelding 2 van 3 Samsung Gear Fit Battery Replacement: stap 4, afbeelding 3 van 3
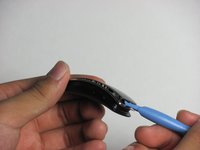
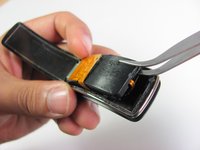
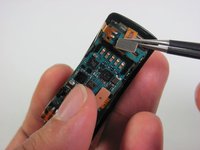
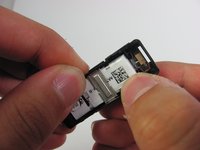
    • Using tweezers as a lever, pry the inner assembly out of the external casing.

    • This will be harder than removing the screen. Moderate force may be required.

  5. Samsung Gear Fit Battery Replacement: stap 5, afbeelding 1 van 3 Samsung Gear Fit Battery Replacement: stap 5, afbeelding 2 van 3 Samsung Gear Fit Battery Replacement: stap 5, afbeelding 3 van 3
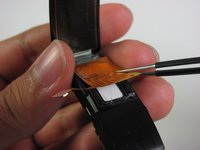
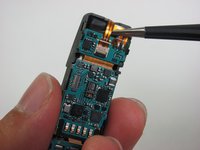
    • Disconnect the ribbon cables connecting the screen to the motherboard by lifting their metal connectors up off of the board with tweezers.

  6. Samsung Gear Fit Battery Replacement: stap 6, afbeelding 1 van 2 Samsung Gear Fit Battery Replacement: stap 6, afbeelding 2 van 2
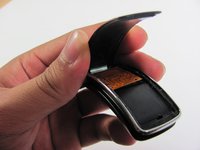
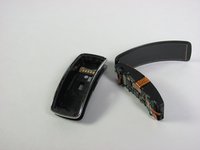
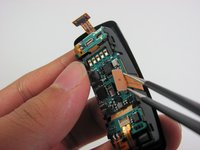
    • Gently peel the screen assembly up and away from the device using tweezers.

  7. Samsung Gear Fit Battery Replacement, Motherboard: stap 7, afbeelding 1 van 3 Samsung Gear Fit Battery Replacement, Motherboard: stap 7, afbeelding 2 van 3 Samsung Gear Fit Battery Replacement, Motherboard: stap 7, afbeelding 3 van 3
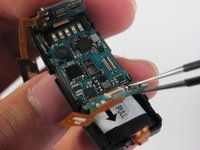
    • Three ribbon cables hold the motherboard to the rest of the assembly.

    • The battery cable in the front.

    • When reassembling the device, make sure the battery cable is securely connected. Moderate force may be required to push it in all the way.

    • And two on the side.

    • Using a pair of tweezers, carefully pull each connector away to disconnect it from the rest of the assembly.

  8. Samsung Gear Fit Battery Replacement: stap 8, afbeelding 1 van 2 Samsung Gear Fit Battery Replacement: stap 8, afbeelding 2 van 2
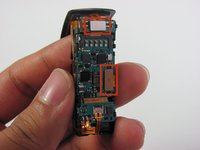
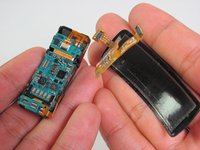
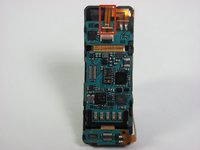
    • The motherboard is a segmented three piece construction.

    • Use tweezers to first lift up, with a moderate amount of force, and free each ends of the motherboard from the assembly.

    • Be sure to use ESD safe tweezers to prevent static discharge from zapping your device.

  9. Samsung Gear Fit Battery Replacement: stap 9, afbeelding 1 van 1
    • The motherboard should now be removable from the assembly.

    • Use tweezers to lightly pry, lift, and remove the board by its middle section.

    • If the motherboard is stuck it may be caught on the assembly. Wiggle it around to free it. You may also need to pull the edges of the assembly away from the motherboard to create space.

  10. Samsung Gear Fit Battery Replacement, Battery: stap 10, afbeelding 1 van 2 Samsung Gear Fit Battery Replacement, Battery: stap 10, afbeelding 2 van 2
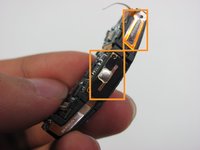
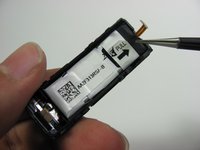
    • With the motherboard removed, the battery is exposed.

    • A small metal strut protects the battery.

    • Remove the small metal strut by prying it out of both sides of the enclosure.

  11. Samsung Gear Fit Battery Replacement: stap 11, afbeelding 1 van 3 Samsung Gear Fit Battery Replacement: stap 11, afbeelding 2 van 3 Samsung Gear Fit Battery Replacement: stap 11, afbeelding 3 van 3
    • Use caution when handling the battery. If damaged or punctured, it can release hazardous chemicals or catch fire.

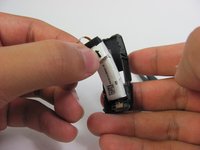
    • Remove the battery by pulling on the pull tab.

    • Don't be afraid to use force, the battery is tightly packed into the plastic enclosure.

Conclusie

To reassemble your device, follow these instructions in reverse order. Make sure that the ribbon cable connecting the battery is firmly attached; Don't be afraid to use some force.

37 andere personen hebben deze handleiding voltooid.

Nathan Powell

Lid sinds: 04/24/14

1.577 Reputatie

3 handleidingen geschreven

Team

Cal Poly, Team 11-49, Amido Spring 2014 Lid van Cal Poly, Team 11-49, Amido Spring 2014

CPSU-AMIDO-S14S11G49

4 Leden

4 handleidingen geschreven

9 opmerkingen

Bgdhdhdhxhzjxjchf

engineer taha - Antwoord

Gdkysgkdgkdgxgmzg

engineer taha -

Anyone know where I can find replacement parts for the charging terminals? One of the 5 fell out and I can't seem to find this simple piece anywhere.

Alexis Sanchez - Antwoord

Where can I purchase a replacement battery?

Soloze - Antwoord

Where i can purchase a replacement battery in india?

Somak Guchhait - Antwoord

Voeg opmerking toe

Weergavestatistieken:

Afgelopen 24 uren: 3

Afgelopen 7 dagen: 27

Afgelopen 30 dagen: 132

Altijd: 72,354