Ga door naar hoofdinhoud

Saeco Minuto Test Mode

  1. Saeco Minuto Test Mode, Saeco Minuto Test Mode: stap 1, afbeelding 1 van 3 Saeco Minuto Test Mode, Saeco Minuto Test Mode: stap 1, afbeelding 2 van 3 Saeco Minuto Test Mode, Saeco Minuto Test Mode: stap 1, afbeelding 3 van 3
    • Turn off the machine at the power switch on the back.

    • With your left hand, press and hold the top left and bottom right buttons at the same time. On this model, it is the espresso and menu buttons.

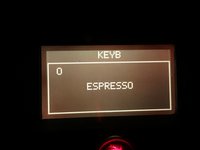
    • Turn the power switch on the back back on with your other hand. Release the buttons and the machine is in test mode

  2. Saeco Minuto Test Mode: stap 2, afbeelding 1 van 2 Saeco Minuto Test Mode: stap 2, afbeelding 2 van 2
    • The first screen shows the technical data and the software version.

    • To get to the next screen, tap the power button on the front.

  3. Saeco Minuto Test Mode: stap 3, afbeelding 1 van 2 Saeco Minuto Test Mode: stap 3, afbeelding 2 van 2
    • In the next menu you can test the keys. Press one of the keys, then the display should turn red and the corresponding key should appear.

    • In the second picture the espresso button is pressed.

  4. Saeco Minuto Test Mode: stap 4, afbeelding 1 van 1
    • The sensors are displayed in the third menu. H20 stands for water tank, DOOR for the door sensor, BU-P indicates the brew group sensor. N means no, of course, Y means yes.

  5. Saeco Minuto Test Mode: stap 5, afbeelding 1 van 1
    • In the next menu you can test the brew group motor and the sensors for the end position. WORK is the upper end position, HOME is the rest position. CUR outputs the position of the drive shaft.

    • To move the engine, briefly tap the top left or middle button.

  6. Saeco Minuto Test Mode: stap 6, afbeelding 1 van 1
    • The next screen is split. The electric valve can be seen on the left, closed here. Press the top left button to shift. On the right the pump or the impulses of the flowmeter. To test, press the top right button.

  7. Saeco Minuto Test Mode: stap 7, afbeelding 1 van 1
    • The next screen is split again. On the left is the temperature of the heater, if you press the top left button, the heater will turn on and the temperature will increase. On the right you can check the grinder by pressing the top right button, key figures for the motor are displayed.

    • The next key press takes you back to the beginning. To exit test mode, turn the device off and on again using the power switch on the back.

Conclusie

Work the steps in reverse order to reassemble your device.

2 andere personen hebben deze handleiding voltooid.

Met dank aan deze vertalers:

de en

100%

oldturkey03 helpt ons de wereld te herstellen! Wil je bijdragen?
Begin met vertalen ›

VauWeh

Lid sinds: 10/19/15

203.741 Reputatie

246 handleidingen geschreven

Team

Repair is War on Entropy Lid van Repair is War on Entropy

Community

25 Leden

1.127 handleidingen geschreven

Één opmerking

Bin sehr dankbar fΓΌr diese Anleitung πŸ‘πŸ‘πŸ‘ŒπŸ‘Œ

Kaffeemann - Antwoord

Voeg opmerking toe

Weergavestatistieken:

Afgelopen 24 uren: 7

Afgelopen 7 dagen: 62

Afgelopen 30 dagen: 220

Altijd: 4,639