Ga door naar hoofdinhoud

Ryobi CSB125 Motor Replacement

Wat je nodig hebt

  1. Ryobi CSB125 Motor Replacement, Motor: stap 1, afbeelding 1 van 1
    • Place the saw on a flat surface with the blade facing up.

    • Make sure that the saw is unplugged from any power source.

  2. Ryobi CSB125 Motor Replacement: stap 2, afbeelding 1 van 2 Ryobi CSB125 Motor Replacement: stap 2, afbeelding 2 van 2
    • Remove the bumper by using the T20 torx screwdriver to loosen the M5 x 20mm screw.

  3. Ryobi CSB125 Motor Replacement: stap 3, afbeelding 1 van 2 Ryobi CSB125 Motor Replacement: stap 3, afbeelding 2 van 2
    • Use the 7”/32 allen key to loosen the 5/16-18 x 9/16 in. blade screw.

  4. Ryobi CSB125 Motor Replacement: stap 4, afbeelding 1 van 1
    • Remove the 5/16-18 x 9/16 in. blade screw, spring washer, the outer blade washer, the blade, and the inner blade washer.

  5. Ryobi CSB125 Motor Replacement: stap 5, afbeelding 1 van 3 Ryobi CSB125 Motor Replacement: stap 5, afbeelding 2 van 3 Ryobi CSB125 Motor Replacement: stap 5, afbeelding 3 van 3
    • Use the #2 Phillip screwdriver to remove the four M4x16mm screws shown.

    • You will need to rotate the protective shell around in order to access them.

  6. Ryobi CSB125 Motor Replacement: stap 6, afbeelding 1 van 1
    • Remove the lower blade guard support assembly from the rest of the saw.

  7. Ryobi CSB125 Motor Replacement: stap 7, afbeelding 1 van 1
    • Flip the saw over and place the saw down on a flat surface with the motor facing up.

  8. Ryobi CSB125 Motor Replacement: stap 8, afbeelding 1 van 1
    • Use the Phillips #2 screwdriver to remove the five M4x16mm screws.

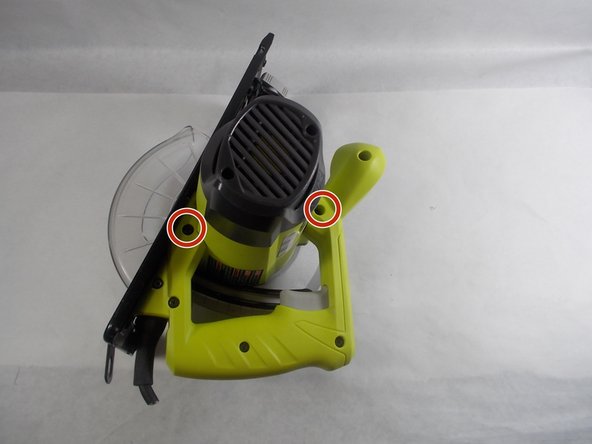
  9. Ryobi CSB125 Motor Replacement: stap 9, afbeelding 1 van 1
    • Use the Phillips #2 screwdriver to remove the two M45x35mm screws.

  10. Ryobi CSB125 Motor Replacement: stap 10, afbeelding 1 van 2 Ryobi CSB125 Motor Replacement: stap 10, afbeelding 2 van 2
    • Use the Phillips #2 screwdriver to remove the two M4x16mm screws holding down the end cover.

    • Pull off the end cover.

  11. Ryobi CSB125 Motor Replacement: stap 11, afbeelding 1 van 1
    • Use the Phillips #2 screwdriver to remove the M45x35mm screw holding down the motor housing.

  12. Ryobi CSB125 Motor Replacement: stap 12, afbeelding 1 van 1
    • Remove the motor housing for access to the internal motor components.

Conclusie

To reassemble your device, follow these instructions in reverse order.

3 andere personen hebben deze handleiding voltooid.

Curtis Melo

Lid sinds: 10/31/19

1.066 Reputatie

5 handleidingen geschreven

Team

UMass Dartmouth, Team S2-G1, Barthe Fall 2019 Lid van UMass Dartmouth, Team S2-G1, Barthe Fall 2019

UMASSD-BARTHE-F19S2G1

3 Leden

5 handleidingen geschreven

0 opmerkingen

Voeg opmerking toe

Weergavestatistieken:

Afgelopen 24 uren: 2

Afgelopen 7 dagen: 4

Afgelopen 30 dagen: 9

Altijd: 561