Ga door naar hoofdinhoud
Razer Basilisk V3 LED Replacement

Razer Basilisk V3 LED Replacement

Mary Quin

Mary Quin en een andere bijdrager

Voor het laatst geüpdatet op July 24, 2024

1 - 2 uren
Moeilijk
Behoeft meer afbeeldingen
Betere introductie

Wat je nodig hebt

Gereedschap

Toon meer…

  1. Razer Basilisk V3 LED Replacement, Skates: stap 1, afbeelding 1 van 1
    • Locate each of the skates.

  2. Razer Basilisk V3 LED Replacement: stap 2, afbeelding 1 van 3 Razer Basilisk V3 LED Replacement: stap 2, afbeelding 2 van 3 Razer Basilisk V3 LED Replacement: stap 2, afbeelding 3 van 3
    • Heat the skate using a heat gun or hair dryer.

    • Using the pointy end of the spudger pry away a corner of the skate.

    • If the adhesive does not pull away easily, heat the skate more.

    • Once the corner of the skate comes free use the flat end of the spudger to peel off the rest of the skate.

    • Repeat these steps for each of the skates.

  3. Razer Basilisk V3 LED Replacement, Backplate: stap 3, afbeelding 1 van 1
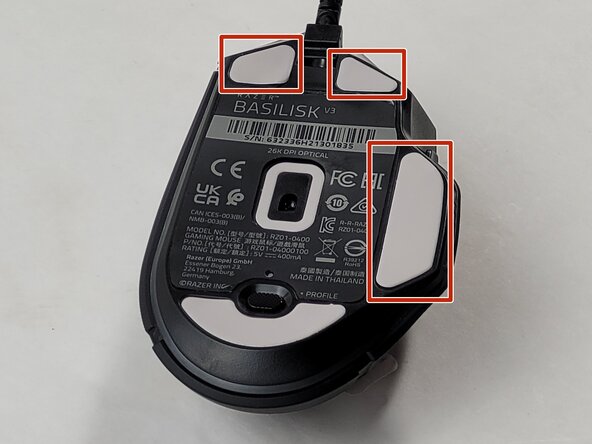
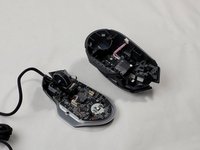
    • Remove two 4.8 mm screws that were hidden under the skates using a JIS #1 screwdriver.

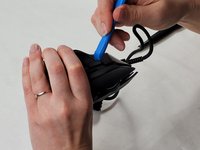
    • Remove the single 4 mm screw beneath the thumb grip using a JIS #1 screwdriver.

  4. Razer Basilisk V3 LED Replacement: stap 4, afbeelding 1 van 3 Razer Basilisk V3 LED Replacement: stap 4, afbeelding 2 van 3 Razer Basilisk V3 LED Replacement: stap 4, afbeelding 3 van 3
    • Heat the label gently with a heat gun or hair dryer.

    • Once the adhesive is loosened, use a spudger to peel off the label carefully, revealing two additional screws.

    • Remove the two 4.8 mm screws using a JIS #1 screwdriver.

  5. Razer Basilisk V3 LED Replacement: stap 5, afbeelding 1 van 3 Razer Basilisk V3 LED Replacement: stap 5, afbeelding 2 van 3 Razer Basilisk V3 LED Replacement: stap 5, afbeelding 3 van 3
    • Carefully pry apart the mouse's top and bottom halves. Using the iFixit opening tool, start at one corner and work around the edge.

    • Be cautious of the clips that may break during this process.

    • Using a plastic opening tool, gently pry the connector apart by moving side to side to avoid bending the pins.

    • When reassembling, be mindful that the connector only fits one way, as shown in the pictures.

  6. Razer Basilisk V3 LED Replacement, Scroll Wheel Assembly: stap 6, afbeelding 1 van 3 Razer Basilisk V3 LED Replacement, Scroll Wheel Assembly: stap 6, afbeelding 2 van 3 Razer Basilisk V3 LED Replacement, Scroll Wheel Assembly: stap 6, afbeelding 3 van 3
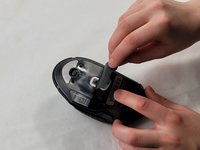
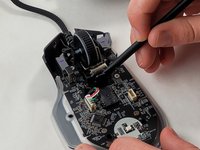
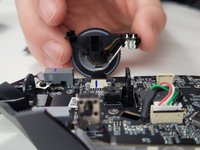
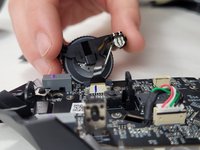
    • Use the flat end of the spudger to pop-out the scroll wheel assembly.

    • Make sure you are careful when removing the assembly since it is still connected to the device with a ribbon cable. If you pull too hard the cable could break.

  7. Razer Basilisk V3 LED Replacement: stap 7, afbeelding 1 van 3 Razer Basilisk V3 LED Replacement: stap 7, afbeelding 2 van 3 Razer Basilisk V3 LED Replacement: stap 7, afbeelding 3 van 3
    • Pull up on the top half of the cable connector and pull the cable from the connector.

    • The connection pins on the wire face towards the scroll wheel assembly housing. When reassembling, make sure the connectors on the cable are facing the correct direction.

  8. Razer Basilisk V3 LED Replacement, LEDs: stap 8, afbeelding 1 van 1
    • Heat the soldering iron to middle high heat.

    • The soldering iron can burn when heated. Use caution when using. For more information on using a soldering iron, take a look at How to Solder and Desolder Connections

    • Inject a small amount of flux onto the LED solder connection you wish to replace.

    • Place the solder wick on top of the solder joint.

    • Press the soldering iron on top of the solder wick on top of the solder joint, and press until you see the solder come through the wick.

    • Once you see the solder through the wick (it should look silver and not copper colored) pull the wick off the solder joint and remove the soldering iron.

    • Repeat on the 3 other solder joints for the LED.

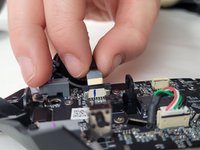
    • Remove the LED with tweezers.

Conclusie

To reassemble your device, follow these instructions in reverse order.

Mary Quin

Lid sinds: 03/20/24

252 Reputatie

2 handleidingen geschreven

Team

UMass Dartmouth, Team 1-2, Santin Spring 2024 Lid van UMass Dartmouth, Team 1-2, Santin Spring 2024

UMASSD-SANTIN-S24S1G2

3 Leden

11 handleidingen geschreven

0 opmerkingen

Voeg opmerking toe

Weergavestatistieken:

Afgelopen 24 uren: 2

Afgelopen 7 dagen: 29

Afgelopen 30 dagen: 52

Altijd: 233