Ga door naar hoofdinhoud

RCA RCT6378W2 Battery Replacement

Gearchiveerde handleiding
Deze handleiding wordt enkel nog bijgehouden voor historische doeleinden. Gebruik de laatste versie van deze gids om uw reparatie uit te voeren.

Wat je nodig hebt

  1. RCA RCT6378W2 Battery Replacement, Battery: stap 1, afbeelding 1 van 3 RCA RCT6378W2 Battery Replacement, Battery: stap 1, afbeelding 2 van 3 RCA RCT6378W2 Battery Replacement, Battery: stap 1, afbeelding 3 van 3
    • Remove two 2.4mm x 4mm screws from bottom of the tablet with Phillips #00 Screwdriver.

  2. RCA RCT6378W2 Battery Replacement: stap 2, afbeelding 1 van 3 RCA RCT6378W2 Battery Replacement: stap 2, afbeelding 2 van 3 RCA RCT6378W2 Battery Replacement: stap 2, afbeelding 3 van 3
    • Remove back cover with lever tool, exposing the battery and motherboard.

  3. RCA RCT6378W2 Battery Replacement: stap 3, afbeelding 1 van 3 RCA RCT6378W2 Battery Replacement: stap 3, afbeelding 2 van 3 RCA RCT6378W2 Battery Replacement: stap 3, afbeelding 3 van 3
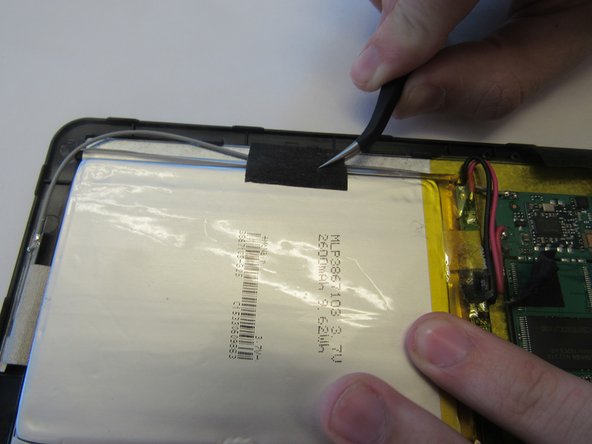
    • Remove the two black tape strips from the battery pack.

  4. RCA RCT6378W2 Battery Replacement: stap 4, afbeelding 1 van 3 RCA RCT6378W2 Battery Replacement: stap 4, afbeelding 2 van 3 RCA RCT6378W2 Battery Replacement: stap 4, afbeelding 3 van 3
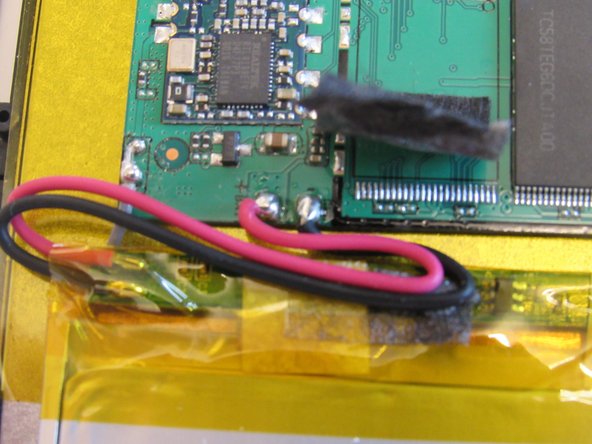
    • Remove the battery pack by carefully prying the battery back from the front cover. Then remove the wires connecting the battery to the motherboard at the motherboard using the tweezers.

  5. RCA RCT6378W2 Battery Replacement: stap 5, afbeelding 1 van 1
    • Replace the damaged or malfunctioning battery with the new battery and wires. The new battery must be stuck back into its original place using thermal tape.

  6. RCA RCT6378W2 Battery Replacement: stap 6, afbeelding 1 van 3 RCA RCT6378W2 Battery Replacement: stap 6, afbeelding 2 van 3 RCA RCT6378W2 Battery Replacement: stap 6, afbeelding 3 van 3
    • The new wires must be soldered back into place on the motherboard at the original location.

    • For tips on soldering techniques, see this Soldering Guide

Conclusie

To reassemble your device, follow these instructions in reverse order.

Één andere persoon heeft deze handleiding voltooid.

Justin

Lid sinds: 01/29/15

425 Reputatie

2 handleidingen geschreven

Team

Clemson, Team 14-4, Shirley Spring 2015 Lid van Clemson, Team 14-4, Shirley Spring 2015

CLEM-SHIRLEY-S15S14G4

6 Leden

15 handleidingen geschreven

0 opmerkingen

Voeg opmerking toe

Weergavestatistieken:

Afgelopen 24 uren: 0

Afgelopen 7 dagen: 0

Afgelopen 30 dagen: 2

Altijd: 2,062