Ga door naar hoofdinhoud
Word lid van de reparatiegemeenschap - Account aanmaken

PowerBook 3400 M3553 RAM Replacement

Wat je nodig hebt

  1. PowerBook 3400 M3553 RAM Replacement, Battery: stap 1, afbeelding 1 van 1
    • Close the screen and turn the PowerBook over, orienting the computer upside down, using the label to guide you.

    Vraag FixBot

    Voeg opmerking toe

  2. PowerBook 3400 M3553 RAM Replacement: stap 2, afbeelding 1 van 2 PowerBook 3400 M3553 RAM Replacement: stap 2, afbeelding 2 van 2
    • Hold the button on the front left side and slide the battery out.

    Vraag FixBot

    Voeg opmerking toe

  3. PowerBook 3400 M3553 RAM Replacement, Keyboard: stap 3, afbeelding 1 van 1
    • With a Torx T8 screwdriver, remove the three Torx 24mm screws along the center of the back panel.

    Vraag FixBot

    Voeg opmerking toe

  4. PowerBook 3400 M3553 RAM Replacement: stap 4, afbeelding 1 van 3 PowerBook 3400 M3553 RAM Replacement: stap 4, afbeelding 2 van 3 PowerBook 3400 M3553 RAM Replacement: stap 4, afbeelding 3 van 3
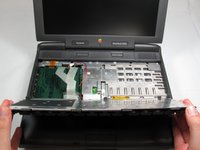
    • Turn the computer over and open the display. You should see that the keyboard is loose.

    • Before attempting to remove the keyboard, note that a ribbon cable connects the keyboard to the logic board. Improper removal may damage your keyboard.

    • Slightly lift the front of the keyboard up, and slide the keyboard towards yourself.

    • Carefully lift the top half of the keyboard and pull it towards yourself.

    Vraag FixBot

    Voeg opmerking toe

  5. PowerBook 3400 M3553 RAM Replacement: stap 5, afbeelding 1 van 2 PowerBook 3400 M3553 RAM Replacement: stap 5, afbeelding 2 van 2
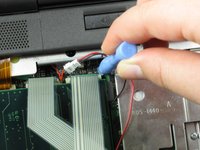
    • Loosen the ribbon cables connecting the keyboard to the computer by using a plastic opening tool to lift the tabs on either side of the cable port.

    • Gently remove the ribbons from its tabs.

    Vraag FixBot

    Voeg opmerking toe

  6. PowerBook 3400 M3553 RAM Replacement, RAM: stap 6, afbeelding 1 van 2 PowerBook 3400 M3553 RAM Replacement, RAM: stap 6, afbeelding 2 van 2
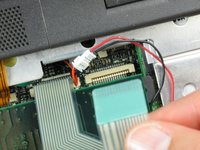
    • Gently wiggle the RAM card to loosen the connection until it pulls free.

    Vraag FixBot

    Voeg opmerking toe

Conclusie

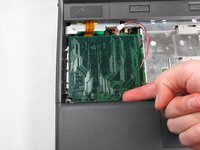
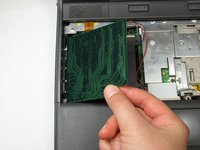
To install the new RAM card, follow these steps in reverse order.

Annuleren: ik heb deze handleiding niet afgemaakt.

2 andere personen hebben deze handleiding voltooid.

Michael Mondragon

Lid sinds: 04/12/11

397 Reputatie

9 handleidingen geschreven

Team

Cal Poly, Team 24-59, Amido Spring 2011 Lid van Cal Poly, Team 24-59, Amido Spring 2011

CPSU-AMIDO-S11S24G59

4 Leden

9 handleidingen geschreven

1Gids Commentaar

To reattach the keyboard I found it necessary to keep the kid open and push the keyboard all the way down; otherwise, the screws didn’t engage.

Scott - Antwoord Deel

Voeg opmerking toe

Weergavestatistieken:

Afgelopen 24 uren: 0

Afgelopen 7 dagen: 6

Afgelopen 30 dagen: 66

Altijd: 3,142