Inleiding
Sony heeft nu 3 verschillende modellen van de PS4-spelcomputer uitgebracht. Dit is de huidige versie en er is veel aan veranderd. Wij hebben hem voor je uit elkaar gehaald om te zien wat er anders is.
*Let wel: Gebruik deze handleiding op eigen risico. iFixit is niet verantwoordelijk en zal niet garant staan voor eventuele schade die ontstaat tijdens, na of door gebruik van deze handleiding.
Wat je nodig hebt
-
-
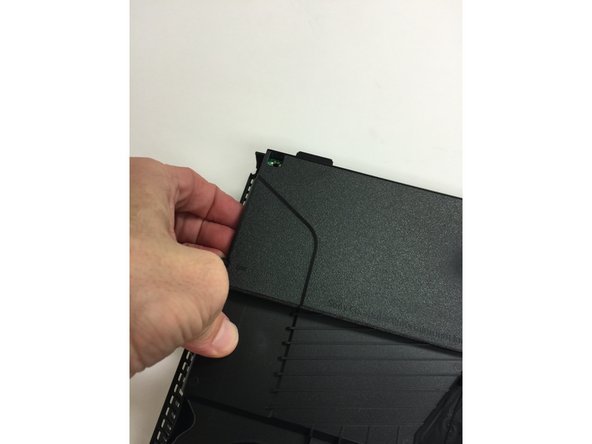
De kap van de harde schijf kun je er zo afschuiven, net als bij eerdere modellen.
No it doesnt
What is different about it?
i know the model i have (CUH-1215 jet black star wars collection bundle) does not just slide off like the older versions :(
Actually, it does. All 1200 series have removable hard drive covers that just slide off. They are usually a bit harder to remove, but they do come off the same way.
What is the little black square mounted up the hard drive case called?
For anyone having trouble it slides off to the left of the console not front or back
Just save yourself some trouble, close this tutorial, and go to YouTube: PlayStation 4 model CUH-1200 cleaning tutorial.
-
-
-
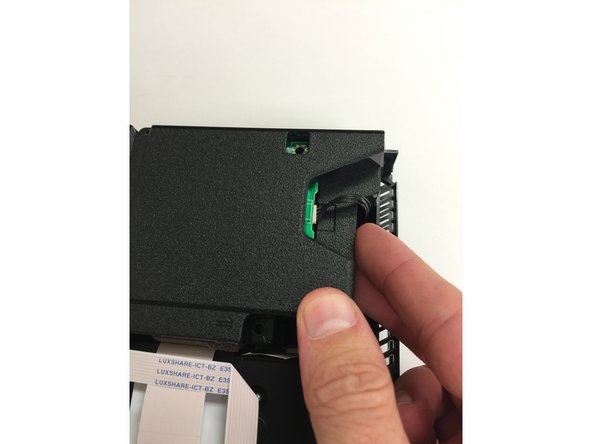
De harde schijf bevat één schroef die je er uit moet schroeven, dan schuift de harde schijf er zo uit.
-
Je hebt voor deze schroef een PH0-schroevendraaier nodig.
Pulling out the hard drive can I corrupt my online status meaning my network and games
Will my PS4 hard drive that I pull out will that screw up my online account means I can't get no longer online or play my games I need to know if that will mess up
-
-
-
Gebruik een plectrum of iets soortgelijks om de garantiestickers los te peuteren. Deze onthullen vervolgens twee zwarte T9 security Torx-schroeven.
-
Verwijder de twee T9 security Torx-schroeven.
-
Dit is de eerste grote revisie die we in het toestel vinden... er zijn slechts twee schroeven die de plastic behuizing bevestigen. Het vorige model bevatte er vier.
Hola que tal… una pregunta.
¿Este es el modelo más reciente del (PS4 FAT)?
Me intriga esta pregunta, ya que mi playstation 4 igual tiene 2 tornillos, y veo muchos vídeos que tienen 4 tornillos…
Bueno sin más que decir espero y me respondas gracias!
¡saludos!
-
-
-
Verwijder als eerst de twee schroeven die de bovenste cover aan de PS4 bevestigen. Het verwijderen van de bovenste cover zal veel gemakkelijker zijn als je de volgende vier stappen in de juiste volgorde volgt:
-
1) Pak de bovenste cover aan de onderkant, bij de aan-/uitknop, vast.
-
2) Trek de bovenste cover omhoog... je zult deze horen klikken bij het omhoog trekken.
-
3) Verplaats je hand naar de tegenoverliggende kant van de bovenste cover en trek de cover ook hier omhoog.
-
4) Nadat je beide zijden van de bovenste cover omhoog hebt getrokken, zou deze nu naar achteren en van de PS4 af moeten schuiven.m
-
En zo werpen we onze eerste blik op de binnenkant van de PS4 CUH 1200. Het eerst dat ons opvalt is dat het moederbord veel, veel kleiner is en dat dat APU-klem volledig opnieuw is ontworpen. De binnenkant van dit model is helemaal anders dan die van de vorige modellen.
The cuh-1215(A) has 2 more t9s at this point, the plastic retainer clip adhered along the left underside of the top cover, (shown between thumb and HDD in image 1 of this step) had 1 right there in front, and 1 about 1/2 way to the back of the console. (Empty screw-hole shown in step 14, image 1 below) At the bottom, and top right corners of the HDD enclosure, respectively.
-
-
-
Om de onderste cover te verwijderen, zul je beide zijden van de cover, dichtbij de achterkant van de spelcomputer, stevig omhoog moeten trekken.
-
Het kan voldoende zijn om hier enkel je handen voor te gebruiken, maar het kan ook handig zijn om openingstools te gebruiken om de cover eraf te duwen.
-
En zo kunnen we ook onze eerste blik werpen op de onderdelen aan de onderkant van de spelcomputer. Het lijkt erop dat we een volledig herontworpen stroomvoorziening en optische schijf hebben!
Can't get back piece off. Pulling hard. There is only 1 screw on the bottom right? No hidden ones?
using a jimmy makes this a breeze
I have a CUH-1202A that I cant get past this step. I’ve pulled so hard I think the casing is about to break. Anyone have any ideas or a more detailed description of how to use a jimmy?
Ok, I got it off. I pulled the case apart and made a small gap near the corners. Wedged some tweezers in the gap, levered it and made a larger gap for a screwdriver. Levered that and it popped off.
It damaged the edges of the case but wont be noticeable once its all back together.
I used a spudger to pry about 1/4” in from the back on each side and the cover just fell off.
There are definitely 2 more screws. On the bottom casing section, there is a screw close to the ac plug in and one at the same place on the opposite side. They are covered by plain black stickers similar to the ones that have the warranty info on. Don’t try removing the bottom with having removed 4 black screws from the back.
Don't pull the case hard before unsecuring the sides and the corners. You will find that the corners of the case are hard to pull. First you need to put some pry tool in-between the sides then pull a bit horizontally so they get freed from the clips. Finally you pull the case up gently then it will open for you.
There are indeed 2 more security screws
Very little force required! I recently removed the bottom cover on my PS4 CUH-1216A. On that version at least, there’s only one screw, behind the warranty sticker. I removed the cover by prying with a small flathead screwdriver in the joint between lid and case, on each side of the console, approx. 10-15 mm from the corners; the cover simply popped free from the two tabs that hold it on each side. It could then be lifted off without any risk of damaging it.
STOP SAYING THERE ARE 2 MORE SCREWS! If you have 2 more screws you have a different model, there is a separate guide for the model you have. Make sure you're following the correct guide.
This guy gets it.
I had to go through 3 different manuals before I found this particular one. My PS4 is a fat model (CHU 1215A), but it's not the 1st edition like the ones that launched. Those are the ones with the 4 screw cases. My PS4, and the one in debate here, is like a 2nd edition. The next PS4 would be the PS4 slim model, release soon after. Sony made a few small scale tweaks, like going from the 4 screws to 2 screws in the case, as this guide points out most of the other differences.
Jesus, as a tech of over 25 years I have never lost so much confidence in a company than with the phrase "just pull hard bro."
As others have mentioned, the case practically falls off with the use of a spudger/pry at the clips about 2" from the back on each side. A proper teardown video that demonstrates how easy these clips pop can be found on YouTube under the name: PlayStation 4 model CUH-1200 cleaning tutorial.
-
-
-
Na het verwijderen van de onderste plastic cover zien we de fysieke uitwerpknop waar Sony voor heeft gekozen. Dit is nog een significante verandering ten opzichte van de vorige modellen.
-
We gokken dat deze aanpassing gemaakt is om de "willekeurige uitwerping" van cd's, een probleem dat de vorige modellen weleens plaagde, te voorkomen.
-
-
-
-
Verwijder eerst de drie T9 Torx-schroeven en daarna de twee lange Phillips PH0-schroeven.
-
Trek eerst de linkerzijde (de zijde zoner vier kabels) en daarna de rechterzijde omhoog. De rechterzijde zal wat lastiger omhoog te trekken zijn, dus zorg dat je hier rekening mee houdt.
I can’t montage the PH0 Screw. It gets in but I gets off really easy.
The reason the right side needs some initial slight-wiggly pull to raise up is due to its solid two-prong-like plug pins beside its connector seen on the next step.
-
-
-
Je zult deze vierkabelaansluiting van het moederbord los moeten koppelen.
-
De beste manier om dit te doen is door middel van een mini-tang. Trek daarmee eerst de ene zijde en dan de andere zijde omhoog, totdat je de aansluiting er als het ware uit hebt "gelopen".
-
De stroomvoorziening kan nu worden verwijderd.
I found that if you use a xacto knife or box cutter slide it down the flat side lessens it right up but still use caution it's a tough littlet connection
I broke it. I feel so bad. FML
I found that an easier way was to deconnect the cable from the power supply unit instead of the mainboard. It should be less risky since you’re going to exchange the old PSU anyway and you keep the connection cable with the rest of the console when you haven’t got the new PSU already (as in my case). I don’t know if the connector is removable on every PSU. Mine was the N14-200P1A for the PS4 CUH-1216A.
I removed the power supply during a cleaning of my PS4 CUH-1216A. Instead of disconnecting the cable from the circuit board, i disconnected it from the power supply unit. It did not require much force nor special tools. Optimally it would be done prior to removing the power supply unit (it is readily accessible) as the power unit can then be lifted vertically out of its seat (as opposed to “folding” out), which minimizes the risk of damaging two thin metal skewers which protrude from the mother board up into the underside of the power supply unit.
I tried this. I think I may have broken it. Will find out on reassembly. After much frustration and a suspected break, I tried removing it from the power supply. It came out easily. No special tools. Much, much easier and I suspect less risky. I'm new to this world and didn't know there were comments. I wish I had read them and gone with the power supply connection first. Recommend a change to the guide.
P.s. we need a guide on how to fix this connection now.
Did you find out how to fix this?
Loki -
-
-
-
Pak de kabel van de Wi-Fi-antenne vast met dezelfde tang als die je hiervoor voor de aansluiting gebruikte en trek de kabel op voorzichtige wijze omhoog.
-
De erg brede kabel van de optische schijf bevat een zwarte "band" die aan beide zijden omhoog getrokken moet worden. Dit zal ervoor zorgen dat de kabel los komt.
-
De andere twee kabels kun je simpelweg uit hun respectievelijke contacten trekken.
-
-
-
Verwijder de T9 security Torx-schroef die de Wi-Fi-antenne bevestigt.
-
Begeleid de Wi-Fi-kabel uit de kabelgoot.
-
-
-
Verwijder de kleine lintkabel van de optische schijf.
-
Verwijder de vijf T9 security Torx-schroeven.
-
Verwijder de twee PH0 Phillips-schroeven samen met het groene PCB-bord.
-
-
-
Hoewel de optische schijf herontworpen is, maakt het nog steeds gebruik van hetzelfde rolsysteem met de witte balk in het midden. We gokken dat het probleem, waarbij de witte balk uit het toestel valt, daarmee niet is verholpen.
-
De laser en de drager lijken erg op die uit de vorige modellen.
Could you point me in the direction of a supplier for these rollers? I have a damaged pair but don't really want to replace the entire drive.
When reassembling your cuh 1215a ps4 is there a certain way you have to hook up the ribbon flex? Like take the big one for ex. does one end of it have to plung into the lazer and the other end have to plug into the motherboard? And how can you tell when a wire has went bad
Bjr j'ai démontré ma play pour la nettoyer. Après je l'ai testé. Ma play ne reconnaît plus le disque sachant que je n'ai pas touché au lecteur. J'ai comme message disque inconnu ou nettoyer le disque. Qu'est-ce que je dois faire.
-
-
-
Verwijder de twaalf T9 security Torx-schroeven.
-
Verwijder de zes PH0 Phillips-schroeven.
-
Verwijder de drie PH0 Phillips-schroeven.
-
Verwijder de twee PH0 Phillips-schroeven.
-
Trek het bovenste metalen schild uit de spelcomputer.
-
-
-
Het eerste wat ons bij het moederbord opvalt (naast de grootte), is dat Sony de klem bij het koellichaam volledig heeft herontworpen. We gokken en hopen dat dit het probleem verhelpt waarbij de PS4 soms aan gaat maar zichzelf vervolgens weer uitschakelt.
No, it doesn't either reduced or eliminated the problem of PS4's turning on then back off. My PS4 showed the same problem on 2020, 07, january.
-
-
-
Verwijder de twee PH0 Phillips-schroeven.
-
De spacer die zich onder de klem bevindt zal, nadat je de klem hebt weten te verwijderen, ook moeten worden verwijderd.
-
Verwijder de aan-/uitknop door deze omhoog te wrikken via de haak die in het moederbord is geplaatst.
-
De knop zal, nadat je de haak omhoog hebt geduwd, naar achteren en uit de spelcomputer kunnen schuiven.
-
-
-
Bij het optillen van de voorkant van het moederbord zul je merken dat de ventilator nog steeds aangesloten is. Deze kan worden losgekoppeld en worden verwijderd door de aansluiting met een kleine tang vast te pakken en eruit te trekken.
-
Het moederbord zal er, nadat je de ventilator hebt verwijderd, vervolgens uit gehaald kunnen worden.
-
-
-
We kunnen nu een van de grootste verschillen tussen het huidige en de oudere modellen zien...er bevindt zich aan een kant van het moederbord geen RAM!
-
Het toestel bevat nog wel steeds dezelfde hoeveelheid aan RAM-geheugen, maar het totale aantal aan RAM-chips is gehalveerd.
-
Een andere opvallendheid is dat de HDMI-poort eindelijk herontworpen is! Dat is ontzettend goed nieuws, aangezien de oude poort erg kwetsbaar was en vaak stuk ging.
-
-
-
Verwijder de drie PH0 Phillips-schroeven en verwijder vervolgens het metalen stuk.
-
Als je die dingen verwijderd hebt, is er slechts een enkele PH0-schroef die de ventilator bevestigt. Verwijder deze en de ventilator is los!
I was hoping that I can get the motherboard & plate off together so I won't have to repaste it... Nope! These 3 screws are in-between the motherboard & the plate.
-
-
-
Bij het weer in elkaar zetten van deze PS4 stuitten we op de bodem van de metalen plaat een losliggend klein onderdeel. Bij het weer in elkaar zetten bleek dat deze op het moederbord, op een van de lange schroeven van de stroomvoorziening, geplaatst moet worden. Het gaat om een zwarte, plastic onderdeel dat de schroef bedekt.
That small black plastic thing, that you use to swotch on and off, where is that?
Step 16 photo #2
I can't seem to find it. Does this piece have any significance to it other than holding the screw?
I lost my peace where would I be able to get one
I almost lost this piece please move this step after step 8 in this post. I did found it in the corner of my room. Dont know how it got there!?
I almost put it in the spot of the fan screw before I saw this post!
How do I remove this screw from the motherboard?
I have a small metal piece that I dont know what to do with it, it is not for the long power supply screws that metal piece is accounted for it has an engraving of f2 I dont know how to post a picture need help asap @moralesmiguel43@mygya.com
I took apart my PS4 and realized I lost the loose piece warned on step 20 when I was putting it back together. Does it have any actual significance or will my PS4 be fine without it?
-
-
-
Met dit radicaal andere model van de PS4 hopen we dat Sony een aantal van de problemen van de oudere modellen heeft weten te verhelpen (bijv. de HDMI-poort, etc.). We zijn licht optimistisch in onze verwachting dat de problemen ook daadwerkelijk zijn verbeterd.
-


Annuleren: ik heb deze handleiding niet afgemaakt.
157 andere personen hebben deze handleiding voltooid.
Met dank aan deze vertalers:
100%

Deze vertalers helpen ons de wereld te repareren! Wil je bijdragen?
Begin met vertalen ›

Team

78 opmerkingen
You didn't show what the supply connector is supposed to look like, when disconnected. Now I ripped it off of my mother board, attempting to assess milk damage. Thanks for helping me make sure my PS4 will stay broken.
I'm so sorry it ripped off. I'm assuming you are talking about the power supply connector? If so step #10 shows the method we use to remove this connector. We use mini pliers and grasp one end at a time and pull up gently but firmly each time...this will eventually get the connector off without damage in most cases. That being said we have had to fix a connector every once in a while on these because some of them are fragile.
I ripped off my power supply from the motherboard too, assuming that from these photos that was where I was supposed to pull. Playstation is very broken now.
Same here. I really don’t know what I’m supposed to do now.
i dropped my ps4 and it made grinding noises when it reading discs and also it wouldnt eject disc, i fixed the eject problem by disassembling the blu ray drive but it still grinds when reading and only reads when i rebuild database. are you guys gonna start selling replacements anytime soon or will the blu ray from the cuh-11xx models work?
ifixit doesn't currently carry them. I'm assuming that they will at some point. We at Tronicsfix have just gotten a few in (we just don't have them up on our website yet) and could sell you one. You can contact me here: steve@tronicsfix.com
If i buy this model from japan 100v will it work in india 220v plz help me
Yes...it's universal. It will work with any voltage.
I have a hdmi connector taken out of an old blu ray player, it looks the same as my ps4 one, will it work or do I need one designed for the ps4?
It's highly unlikely that it would work. I haven't seen any that would work other than ports that are made just for the PS4. Just be careful where you buy it. Most of them out there (especially the really cheap ones) don't even line up correctly.
The contacts at the back of the HDMI port are offset on the PS4. The port may look the same but when placed onto the board, the contacts will be in between the solder pads in stead of over them. Sometimes you can bend the mounting legs of the port to shift it over and align the contacts, but it’s best to just get the correct port. Heads up though, almost all suppliers of the PS4 port are not selling the offset style, so you’ll have to do some hunting to find a supplier that has the proper port…
Kevin -
Step 15:
Good to know that this part was changed. But since the CUH1100 Sony has changed the fan profile. So the units since are more quiet. I see a problem with this. The fan is working slower now under high loads. The heatsink is not bigger thant the CUH1000. So the temperature under load is much higher than before.
So we know the problems of the PS3 fat console.
I like a louder fan more than the chance to got broken solder.
If we could see the APU tempertures (like on an PC) we would change the cooling I am sure.
You're forgetting that this model uses less power. Less power = less heat generated. Less heat = less cooling needed.
Where can I get a new power supply
Here is the new link for that power supply: http://www.tronicsparts.com/store/p65/PS...
How does one going about repairing the connection from the power supply to the motherboard if it gets pulled off the motherboard? I accidentally did this and it's driving me crazy
The only way is to solder it back onto the motherbaord. My company has done lots of these so you can always send it in if you need to.
My ps4 freezes every time I search for WiFi and sometimes and my control always blinks then turns off but ssometimes when I hard reset the game it connects can u please help
Hmmm...that's kind of a strange one. It could be a software problem or maybe the chip is bad...there's no way for me to know for sure without having it here in my shop to look at. Sorry I can't give you a better answer.
Can you tell me if the CUH-1200 rubber feet is the same as the CUH-1100
No, they are not.
Hi! So I tore down my ps4 but there's one extra piece which you didn't show in pictures my bad luck that I didn't notice it coming out as I was flipping ps over n now I am unable to figure out where'll it go! It's a black plastic piece at first I thought it was in hdd cage but it not fitting anyway . HELP?
here's the piece.
Naeem -
That piece is shown in step #14. It has two silver screws that hold it down.
What is the fan part number or where can I buy a replacement fan? My fan doesn't seem to work anymore
So thank you so much because now my power supply was ripped from the motherboard because I was following your instructions. Thanks so much. And I'm not the only one reading the first comment.
I've done my best on step #9 to show exactly how to place the pliers to get that connector off. I hope more people read the first comment so they are more careful with this connector. If there is a better wat to describe how to remove this connector please let me know what that would be.
The power button has gone bad on my PS4. I can not see it in pictures, but I have found out something is missing between the black power button and the microswitch on the mainboard. The microswitch is cowered by a small metal thingy, and then there must be something else, but what is it????
If you can post a pic of it I can tell you what you're missing. Either way though you'll have to replace the entire switch most likely...it's soldered onto the motherboard so it will need to be soldered on.
The microswitch is still on the motherboard, and working. It is all the plastic that actuates the switch that has gone missing :-( . Can not post pics in this site, sorry.
So the plastic piece that you actually press on with your finger to turn it on? I haven't seen those for sale anywhere but I'd keep my eye on Ebay.
There is a black thingy on eBay that looks like the one I've got - 30 bucks!!!!!
Bummer...that's a lot!
Loose piece warning on pic. 20: It goes under the black cover on pic. 14, (upper left). So: Before taking out PSU, remove said cover, and the long screw from the buttom. Then you are in crontrol of the process....
Yep...you'll lose it if you're not careful!
Is the HDMI input on my CUH-1114A model PS4 connected to my motherboard? If not can I replace it. It seems that while traveling with my consoles instantly the hdmi port has been damadehed and needs replaced. Please help!!
Yes, it's connected to your motherboard. It will need to be replaced if it's not working.
Hello, I've seen your video on Youtube with the PS4 CUH-1215 Teardown, and you wrote their I would need T8 Torx Security Screw driver and a PH00 Phillips Screw Driver. My unit is CUH-1200 and I'm wondering if Torx T8 and PH00 phillips will fit in my Unit's screws since you used a T9 and a PH0 in this guide, opposite to your video even though they're just the same unit. Thank you ^^
TR8 or TR9 work fine. I presonally use a TR8 because I've found it to fit looser and not get stuck in the screw hole. When I'm fixing a bunch of these at a time it makes it much faster if the bit doesn't stick in the screw.
I'm trying to do the wifi antenna mod. Where the heck can I find a 38cm U.FL / IPEX to RP-SMA wifi wire. Did Sony special make this? I can't find it anywhere. I wonder if part of making new models is to defy user mods.
The longest length I can find is 30cm. I'm going to order the 30cm and try to alter my route. But I don't think it will work
Dustin -
Unfortunately, I don't know of anywhere to get it. Sorry about that.
My PS4 is an older model I dropped it once but it continued working for a while but suddenly sometimes the PS4 comes on but doesn't have enough power to come on fully
I watched the tear down to this and it is accurate. 8/10. It is a bit difficult. There are so many screws and they are varying on type. My advice is pay high attention to the type of head the screws have. If it is round, or flat. Especially with the Phillips screws. The torx are much easier to keep track of since they are the same. But the Phillips are a pain to keep track of. And be sure to read the steps thoroughly . There is a piece that gets loose and it's easy to lose. You will need it. I think the article could use a small update. At least with the description of the screw. That way you don't put one where it doesn't go. Honestly the Xbox one is a f*** ton easier than the ps4. Just starting I thought I was going to break the plastic. Also be careful. It can be on there real tight.
My PlayStation4 keeps freezing and just runs extremely sloppy. If i try to run ANY application or Game, practically ANYTHING, it freezes and i have to hard reset it. Any idea what it could be?
Any reply wold be extremely helpful! Thanks in advance!!
What wires on the PS4 cooling fan are the positives there is brown, black, or white?
What is the microswitch for that is on the pcb board on the optical drive that you remove in step 12?
Does the pcb board need to be sat in a certain position before screwing back down? Either towards the front or rear of the console as it has a Little play to position it.
Thanks
Un grand merci pour ce tuto, grâce à celui-ci, j’ai réussi à remplacer mon bloc optique alors merciii!!! ;-)
I used this guide to replace the fan in my sons PS4 and can say this did work the only problem I had was disconnecting the power pack I couldn’t do it at all but managed to work around with the help of another part of hands and being very careful move to motherboard other the way and I have never done anything like this before
I lost the loose piece is there anywhere online I can find the piece? Thank you
Thanks to this guide, I finally was able to clean out 3 and a half years worth of dust from the fan and other areas of my console. Even though this guide was for the revised version, it still helped extensively with my original PS4 (CUH-1102a) Hopefully it wont sound too much like a jet engine at full throttle when I play any game lol
There was no mention of the model of USB control chip soldered to the board. What is that chip for the Playstation 4 1215A model? I need to buy one to repair a PS4 with complete loss of USB function, but cannot unless I know what the make and model of that chip is.
Thank you,
David
Just fixed my PS with this guide. I had a wall off dust between the fan and the metal grid after it, at first i thought it was broken even bought me another one. The noise was driving me crazy. Finally decided to go in. Either i was gonna wrecked it completely or fix it. I never had opened something like this and with some time and patience now all is quiet again. Great work on the guide.
Step 8, the center screw, all PS4s are now shipping with a black plastic screw that uses a type of hexagon bit. Impossible to remove. I tried on three different PS4 Pros and this plastic screw strips into dust every time, and I tried a hexagon bit, cutting down the screw to fit a flathead, still strips. It's like it's welded to something underneath, doesn't move. Only way to remove it is to use a drill bit and completely drill the plastic out which I have no tools to do so, nor a screw to put in its place. How do you remove this thing? Curse Sony for even thinking about using such a thing.
Hey so I cleaned out my PS4 and found this.
https://www.reddit.com/r/PS4/comments/c7...
they don’t seem to know what it is so hoping you guys know where this back? It’s the same console as your post
That’s the power button. It just slides into place
This is all good but now to put back together have everything put together and I have a small aluminum piece and I don't remember where it goes…
Thank you very much. I was able to completely disassemble my ps4 in no less than an hour, althought I think I broke a small part of the wifi connector, but that was my fault anyways for not being careful when removing it. Definitely will rate 5 stars.
Glad this helped! Nice work!
tres bon tutoriel merci
How do you take apart the power supply
i soldered the connector back on. however there is a rectangular box about and eighth of and inch form the inside left corner of the connector. and my playstation will not turn back on. could that be the issue . or couldi have touched the wrong part with the soldering iron.
Is this same for PS4 CUH 1216b?
Was told that my southbridge IC needs to be replaced. I have cuh 1206. What model is the southbridge?
I took apart my PS4 and realized I lost the loose piece warned on step 20 when I was putting it back together. Does it have any actual significance or will my PS4 be fine without it?
Absolutely fantastic tutorial my friends son has learning impairments and his ps4 is so very important to him.
this tutorial has made it possible for me to fix an issue with thermal paste and clogged up fan and heatsink, verry easy to follow I did not encounter any problems not even the dreaded psu connector!
thanks!!!
buenas noches-
soy de Lima Perú
a que se debe el error SU - 42118-6
la version del play esta en 10.50 pero no quiiere actualizar a la ver. 11.50
haciendo als mediciones de los voltajes de la placa indica que esta bien todo pero sigue saliendo ese error. a alguien le habra pasado algo similar con la ver. del play 1215A
como lo soluciono?
gracias