Ga door naar hoofdinhoud

PlayStation 2 Slimline SCPH-7500x Motherboard Replacement

Wat je nodig hebt

  1. Voorzichtig: stappen 1-7 komen van een handleiding die in bewerking is.

    • Turn off the PlayStation 2 and carefully unplug it from the power source. Also, it is important to eject the CD from the console before flipping the it upside down.

  2. PlayStation 2 Slimline SCPH-7500x Motherboard Replacement: stap 2, afbeelding 1 van 1
    • Locate the six feet on the bottom of the PS2.

    • Five of these feet are in plain sight while the last foot is located under the black void sticker on the back of the device.

    • Some versions of the console, such as the PAL Version, may not have this sticker. In this case, the foot or the screw should be in plain sight.

  3. PlayStation 2 Slimline SCPH-7500x Motherboard Replacement: stap 3, afbeelding 1 van 3 PlayStation 2 Slimline SCPH-7500x Motherboard Replacement: stap 3, afbeelding 2 van 3 PlayStation 2 Slimline SCPH-7500x Motherboard Replacement: stap 3, afbeelding 3 van 3
    • Remove the five visible feet from the bottom of the device using a spudger.

  4. PlayStation 2 Slimline SCPH-7500x Motherboard Replacement: stap 4, afbeelding 1 van 2 PlayStation 2 Slimline SCPH-7500x Motherboard Replacement: stap 4, afbeelding 2 van 2
    • Remove the sticker and then remove the 6th foot.

  5. PlayStation 2 Slimline SCPH-7500x Motherboard Replacement: stap 5, afbeelding 1 van 3 PlayStation 2 Slimline SCPH-7500x Motherboard Replacement: stap 5, afbeelding 2 van 3 PlayStation 2 Slimline SCPH-7500x Motherboard Replacement: stap 5, afbeelding 3 van 3
    • After all of the feet have been removed, Use a Phillips #1 screwdriver to remove the six 4.0mm screws from the base of the PS2.

  6. PlayStation 2 Slimline SCPH-7500x Motherboard Replacement: stap 6, afbeelding 1 van 3 PlayStation 2 Slimline SCPH-7500x Motherboard Replacement: stap 6, afbeelding 2 van 3 PlayStation 2 Slimline SCPH-7500x Motherboard Replacement: stap 6, afbeelding 3 van 3
    • Once all of the screws have been removed, pry apart the plastic covers. Start by lifting the side containing the power cable and Ethernet port. Then, lift the opposite side to fully separate the two sides.

    • You may need to apply some gentle force to detach the covers. Be careful not to break the plastic screw pins.

  7. PlayStation 2 Slimline SCPH-7500x Motherboard Replacement: stap 7, afbeelding 1 van 1
    • If done correctly, you should have a fully detached plastic backing, revealing the electronic components of the PlayStation 2.

  8. Voorzichtig: stap 8 komt van een handleiding die in bewerking is.

    PlayStation 2 Slimline SCPH-7500x Motherboard Replacement, IR Sensor: stap 8, afbeelding 1 van 3 PlayStation 2 Slimline SCPH-7500x Motherboard Replacement, IR Sensor: stap 8, afbeelding 2 van 3 PlayStation 2 Slimline SCPH-7500x Motherboard Replacement, IR Sensor: stap 8, afbeelding 3 van 3
    • Locate the IR sensor on the motherboard. Then, use tweezers to gently detach the blue/white ribbon that attaches the IR sensor to the motherboard.

  9. PlayStation 2 Slimline SCPH-7500x Motherboard Replacement, Clock Battery: stap 9, afbeelding 1 van 3 PlayStation 2 Slimline SCPH-7500x Motherboard Replacement, Clock Battery: stap 9, afbeelding 2 van 3 PlayStation 2 Slimline SCPH-7500x Motherboard Replacement, Clock Battery: stap 9, afbeelding 3 van 3
    • Identify the clock battery, then use tweezers to disconnect the connector from the motherboard.

  10. PlayStation 2 Slimline SCPH-7500x Motherboard Replacement: stap 10, afbeelding 1 van 2 PlayStation 2 Slimline SCPH-7500x Motherboard Replacement: stap 10, afbeelding 2 van 2
    • Gently lift the battery up from the battery compartment using a spudger.

  11. PlayStation 2 Slimline SCPH-7500x Motherboard Replacement, Fan: stap 11, afbeelding 1 van 3 PlayStation 2 Slimline SCPH-7500x Motherboard Replacement, Fan: stap 11, afbeelding 2 van 3 PlayStation 2 Slimline SCPH-7500x Motherboard Replacement, Fan: stap 11, afbeelding 3 van 3
    • Locate the fan component of the motherboard of the PS2.

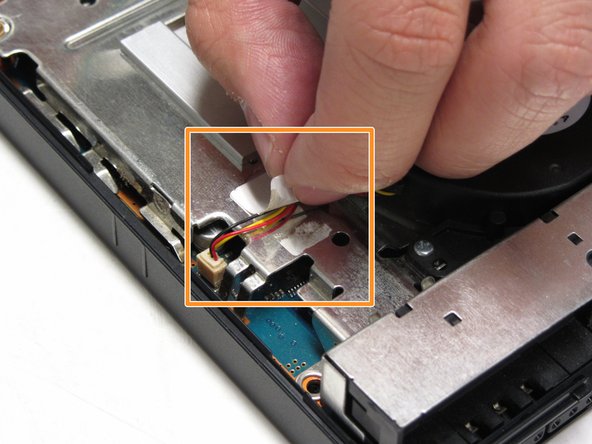
    • With your fingers or tweezers, peel off the sticker that holds down the fan's wiring.

  12. PlayStation 2 Slimline SCPH-7500x Motherboard Replacement: stap 12, afbeelding 1 van 2 PlayStation 2 Slimline SCPH-7500x Motherboard Replacement: stap 12, afbeelding 2 van 2
    • Detach the terminal (white covering) to the red and yellow cords from the motherboard to the fan with the use of tweezers.

  13. PlayStation 2 Slimline SCPH-7500x Motherboard Replacement: stap 13, afbeelding 1 van 2 PlayStation 2 Slimline SCPH-7500x Motherboard Replacement: stap 13, afbeelding 2 van 2
    • Locate and unscrew the three 1.6mm screws located next to the base of the fan.

    • They are located off the curved edge of the fan.

    • Once you have removed the three screws, you are able to remove the fan from the PS2.

  14. Voorzichtig: stappen 14-18 komen van een handleiding die in bewerking is.

    PlayStation 2 Slimline SCPH-7500x Motherboard Replacement, Optical Drive: stap 14, afbeelding 1 van 2 PlayStation 2 Slimline SCPH-7500x Motherboard Replacement, Optical Drive: stap 14, afbeelding 2 van 2
    • Locate the optical drive on the motherboard.

  15. PlayStation 2 Slimline SCPH-7500x Motherboard Replacement: stap 15, afbeelding 1 van 3 PlayStation 2 Slimline SCPH-7500x Motherboard Replacement: stap 15, afbeelding 2 van 3 PlayStation 2 Slimline SCPH-7500x Motherboard Replacement: stap 15, afbeelding 3 van 3
    • Unscrew the four 4.0mm screws that mount the optical drive to the motherboard.

  16. PlayStation 2 Slimline SCPH-7500x Motherboard Replacement: stap 16, afbeelding 1 van 1
    • Locate the three ribbons that are attached to the motherboard.

    • Note: These ribbons are different sizes: one large, one medium and one small sized ribbon.

  17. PlayStation 2 Slimline SCPH-7500x Motherboard Replacement: stap 17, afbeelding 1 van 3 PlayStation 2 Slimline SCPH-7500x Motherboard Replacement: stap 17, afbeelding 2 van 3 PlayStation 2 Slimline SCPH-7500x Motherboard Replacement: stap 17, afbeelding 3 van 3
    • Using tweezers, gently detach all three ribbons from the motherboard terminal. Unlock the middle orange ribbon to lift the black tab up on either side.

    • IMPORTANT: The orange ribbon is glued to the metal chassis. Gently pull the ribbon upward to make sure that you don't rip it.

  18. PlayStation 2 Slimline SCPH-7500x Motherboard Replacement: stap 18, afbeelding 1 van 3 PlayStation 2 Slimline SCPH-7500x Motherboard Replacement: stap 18, afbeelding 2 van 3 PlayStation 2 Slimline SCPH-7500x Motherboard Replacement: stap 18, afbeelding 3 van 3
    • Gently lift the optical drive away from the motherboard.

  19. PlayStation 2 Slimline SCPH-7500x Motherboard Replacement, Motherboard: stap 19, afbeelding 1 van 1
    • What you see in this picture is the electronic components found in the PS2. We are now going to remove the top metal casing found on top of the motherboard.

  20. PlayStation 2 Slimline SCPH-7500x Motherboard Replacement: stap 20, afbeelding 1 van 1
    • Locate the one 2.4mm screw that mounts the metal casing to the top of the motherboard and unscrew the screw with a Philips Screwdriver.

  21. PlayStation 2 Slimline SCPH-7500x Motherboard Replacement: stap 21, afbeelding 1 van 2 PlayStation 2 Slimline SCPH-7500x Motherboard Replacement: stap 21, afbeelding 2 van 2
    • Gently lift the metal casing from the motherboard.

    • Then lift the motherboard from the plastic outer shell.

    • You should have three separate components: The metal casing, the motherboard and the top half of the outer shell of the PS2.

  22. PlayStation 2 Slimline SCPH-7500x Motherboard Replacement: stap 22, afbeelding 1 van 2 PlayStation 2 Slimline SCPH-7500x Motherboard Replacement: stap 22, afbeelding 2 van 2
    • Flip the motherboard over.

    • Locate and unscrew all five 1.6mm screws that mount the metal plate to the motherboard.

    • Note that there are four on one side and one on the other.

  23. PlayStation 2 Slimline SCPH-7500x Motherboard Replacement: stap 23, afbeelding 1 van 2 PlayStation 2 Slimline SCPH-7500x Motherboard Replacement: stap 23, afbeelding 2 van 2
    • Gently lift the metal plates from the top and the bottom of the motherboard.

  24. PlayStation 2 Slimline SCPH-7500x Motherboard Replacement: stap 24, afbeelding 1 van 1
    • Remove the plastic film that is sandwiched in between the metal plate and the motherboard.

  25. PlayStation 2 Slimline SCPH-7500x Motherboard Replacement: stap 25, afbeelding 1 van 2 PlayStation 2 Slimline SCPH-7500x Motherboard Replacement: stap 25, afbeelding 2 van 2
    • After you have detached all the other components, it should look like the image shown.

Conclusie

To reassemble your device, follow these instructions in reverse order.

12 andere personen hebben deze handleiding voltooid.

Jared Hirata

Lid sinds: 04/09/13

880 Reputatie

7 handleidingen geschreven

Team

Cal Poly, Team 17-4, Regan Spring 2013 Lid van Cal Poly, Team 17-4, Regan Spring 2013

CPSU-REGAN-S13S17G4

3 Leden

28 handleidingen geschreven

0 opmerkingen

Voeg opmerking toe

Weergavestatistieken:

Afgelopen 24 uren: 2

Afgelopen 7 dagen: 21

Afgelopen 30 dagen: 85

Altijd: 7,848