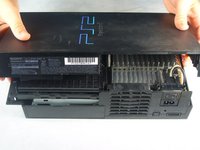
Ga door naar hoofdinhoud

PlayStation 2 Fan Replacement

Wat je nodig hebt

  1. PlayStation 2 Fan Replacement, Top Cover: stap 1, afbeelding 1 van 3 PlayStation 2 Fan Replacement, Top Cover: stap 1, afbeelding 2 van 3 PlayStation 2 Fan Replacement, Top Cover: stap 1, afbeelding 3 van 3
    • Flip the PlayStation 2 over so it lays with the bottom of the device facing upwards.

    • Use the flat edge of a metal spudger to pry the eight flat screw covers out.

    • Remove the following eight screws securing the top cover to the bottom case:

    • Four 55.4 mm Philips screws

    • Four 18.0 mm Phillips screws

  2. PlayStation 2 Fan Replacement: stap 2, afbeelding 1 van 1
    • Some models have a different number of screws and feet. Remove all the feet and screws in the bottom of the case.

    • The 10 screw model has 6 screws in the bottom-most portion and 4 in the upper tray.

  3. PlayStation 2 Fan Replacement: stap 3, afbeelding 1 van 1
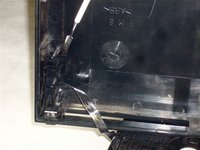
    • Peel the warranty sticker (located next to the main power switch) straight away from the case.

    • To avoid activating the VOID that may come up, heat it carefully to remove and replace it clean

  4. PlayStation 2 Fan Replacement: stap 4, afbeelding 1 van 2 PlayStation 2 Fan Replacement: stap 4, afbeelding 2 van 2
    • Flip the PlayStation 2 back to its original upside position.

    • Lift the top cover off the bottom case.

    • To facilitate the removal, it is recommended to pry open the half closer to the power switch first while rocking the top cover towards the front of the bottom case.

    • Carefully remove the power cord that attaches the top and bottom halves by disconnecting the power cord assembly from the top case.

  5. PlayStation 2 Fan Replacement, Power Board: stap 5, afbeelding 1 van 2 PlayStation 2 Fan Replacement, Power Board: stap 5, afbeelding 2 van 2
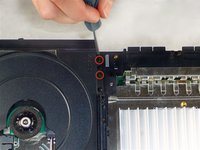
    • Remove the two 6.4 mm black Phillips screws securing the optical disc drive to the bottom case.

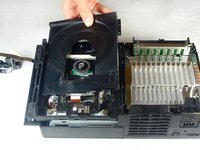
    • Lift and remove the optical disc drive straight up out of the bottom case.

  6. PlayStation 2 Fan Replacement: stap 6, afbeelding 1 van 2 PlayStation 2 Fan Replacement: stap 6, afbeelding 2 van 2
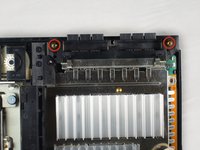
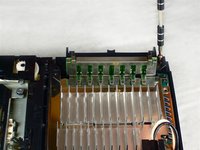
    • Remove the two 14.6 mm gold-headed Phillips securing the controller ports to the bottom case.

  7. PlayStation 2 Fan Replacement: stap 7, afbeelding 1 van 2 PlayStation 2 Fan Replacement: stap 7, afbeelding 2 van 2
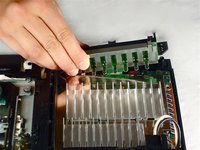
    • Gently lift the controller port board out of its recess within the bottom case.

    • Do not completely remove the controller port board. It is still attached via a ribbon cable.

    • Pull the controller port ribbon cable straight away from its socket on the controller port board.

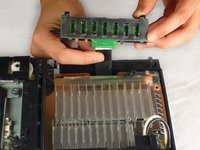
    • Remove the controller port board out of the bottom case.

  8. PlayStation 2 Fan Replacement: stap 8, afbeelding 1 van 1
    • Remove the two 14.6 mm gold Phillips screws securing the fan to the bottom case.

  9. PlayStation 2 Fan Replacement: stap 9, afbeelding 1 van 1
    • If there is a device occupying the expansion bay, make sure to remove the device. The expansion base should be empty.

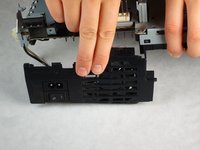
    • Pry and remove the expansion bay cover away from its posts on the bottom case.

  10. PlayStation 2 Fan Replacement: stap 10, afbeelding 1 van 1
    • Lift the motherboard assembly from its front edge and remove it from the lower case.

  11. PlayStation 2 Fan Replacement: stap 11, afbeelding 1 van 1
    • Now that all of that bulky plastic is out of the way, we can get to the fun stuff - electronics!

    • Remove the four 7.6 mm gold-head Phillips securing the power supply to the motherboard assembly.

  12. PlayStation 2 Fan Replacement: stap 12, afbeelding 1 van 1
    • Lift the expansion bay cage up off the motherboard assembly.

  13. PlayStation 2 Fan Replacement: stap 13, afbeelding 1 van 2 PlayStation 2 Fan Replacement: stap 13, afbeelding 2 van 2
    • Do not remove the power board yet. It is still attached to the motherboard assembly via the power board connector (highlighted in the first picture), which is located next to the main power switch.

    • Carefully lift the power board. You should now see the power board connector attached to the power board.

    • Pull the power board connector straight to lift it out of its socket on the power board.

  14. PlayStation 2 Fan Replacement, Fan: stap 14, afbeelding 1 van 1
    • The transparent piece of plastic located underneath the power supply recess in the motherboard assembly is the heat shield.

    • Remove the heat shield from the motherboard assembly.

    • Dislodging the heat shield can be a bit stubborn, so it may take a little finessing to get it free.

  15. PlayStation 2 Fan Replacement: stap 15, afbeelding 1 van 3 PlayStation 2 Fan Replacement: stap 15, afbeelding 2 van 3 PlayStation 2 Fan Replacement: stap 15, afbeelding 3 van 3
    • We can now remove the fan and main power switch assembly.

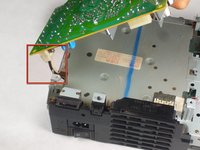
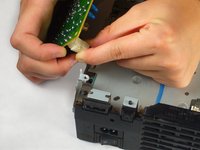
    • Remove the small white piece of tape (highlighted in red) that holds the fan cable connected to the fan.

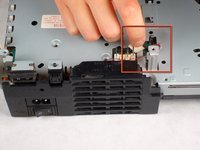
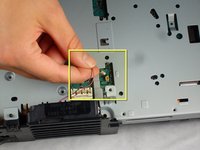
    • Pull the fan cable straight up from its socket on the motherboard.

    • The fan and power switch are now free from the rest of the PlayStation 2.

    • Remove the fan and power switch assembly by pulling it out the bottom case.

  16. PlayStation 2 Fan Replacement: stap 16, afbeelding 1 van 1
    • Remove the fan from the power switch assembly.

    • The fan simply slides out of the top along its track.

  17. PlayStation 2 Fan Replacement: stap 17, afbeelding 1 van 1
    • Remove the power switch from its recess within the fan/power switch holder.

    • The power switch simply slides out just like the fan.

Conclusie

To reassemble your device, follow these instructions in reverse order.

37 andere personen hebben deze handleiding voltooid.

jwyoung

Lid sinds: 11/04/09

2.797 Reputatie

5 handleidingen geschreven

Team

Cal Poly, Team 19-1, Maness Fall 2009 Lid van Cal Poly, Team 19-1, Maness Fall 2009

CPSU-MANESS-F09S19G1

4 Leden

34 handleidingen geschreven

10 opmerkingen

what about on fixing when the unit doesn't turn back on? Replaced the ribbon cable after blowing out the dust, reassemble the unit and it didn't turn back on no green or red light's.

themidnightdj - Antwoord

You should check to c if the side with the blue is on the top @ the silver on the bottom

Trudy Green -

What do I do if the fan connector to motherboard has a broken leg? Can I rewire the connector to other points to solder to the board?

RJ Weber - Antwoord

What about the slim model? Is there a guide for that?

the stronk green bean - Antwoord

I have a question about this I just want to clean off the fan not replace it how do I do

Miranda Decker - Antwoord

Voeg opmerking toe

Weergavestatistieken:

Afgelopen 24 uren: 13

Afgelopen 7 dagen: 121

Afgelopen 30 dagen: 530

Altijd: 100,584