Ga door naar hoofdinhoud

Packard Bell ms-Hera c Disassembly

Wat je nodig hebt

  1. Packard Bell ms-Hera c Disassembly, Unscrew the lid: stap 1, afbeelding 1 van 3 Packard Bell ms-Hera c Disassembly, Unscrew the lid: stap 1, afbeelding 2 van 3 Packard Bell ms-Hera c Disassembly, Unscrew the lid: stap 1, afbeelding 3 van 3
    • Remove the battery.

    • Unscrew the red marked screws with a Phillips screwdriver.

    • Remove the DVD reader.

  2. Packard Bell ms-Hera c Disassembly, Disconnect the keyboard: stap 2, afbeelding 1 van 3 Packard Bell ms-Hera c Disassembly, Disconnect the keyboard: stap 2, afbeelding 2 van 3 Packard Bell ms-Hera c Disassembly, Disconnect the keyboard: stap 2, afbeelding 3 van 3
    • Pry in the red marked spots to release the keyboard

    • Unplug the keyboard connector.

  3. Packard Bell ms-Hera c Disassembly, Unplug the cables: stap 3, afbeelding 1 van 3 Packard Bell ms-Hera c Disassembly, Unplug the cables: stap 3, afbeelding 2 van 3 Packard Bell ms-Hera c Disassembly, Unplug the cables: stap 3, afbeelding 3 van 3
    • Unplug the 3 connectors on the motherboard

    • Remove the 2 screws holding the display in place

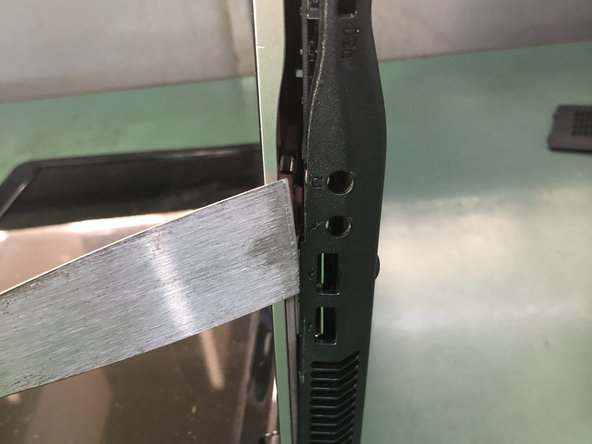
    • Use a thin tool to pry up the back cover of the laptop on the side

  4. Packard Bell ms-Hera c Disassembly, Unscrew the motherboard: stap 4, afbeelding 1 van 3 Packard Bell ms-Hera c Disassembly, Unscrew the motherboard: stap 4, afbeelding 2 van 3 Packard Bell ms-Hera c Disassembly, Unscrew the motherboard: stap 4, afbeelding 3 van 3
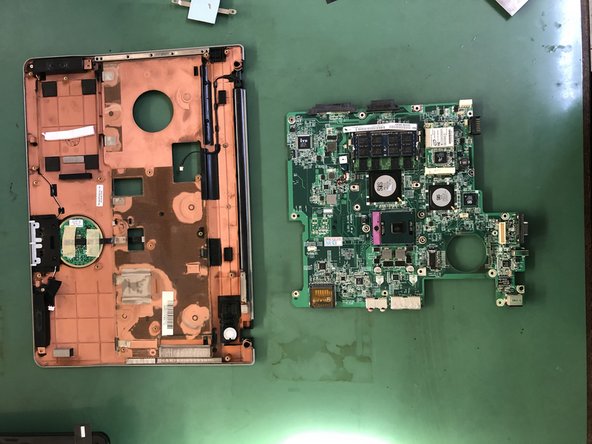
    • Remove the back cover.

    • Remove the HDD.

    • Remove the screws that hold the motherboard.

  5. Packard Bell ms-Hera c Disassembly, Remove the display: stap 5, afbeelding 1 van 3 Packard Bell ms-Hera c Disassembly, Remove the display: stap 5, afbeelding 2 van 3 Packard Bell ms-Hera c Disassembly, Remove the display: stap 5, afbeelding 3 van 3
    • Remove the marked screws and connectors.

    • Disconnect the display connector.

    • Remove the display.

  6. Packard Bell ms-Hera c Disassembly, Remove the heatsink: stap 6, afbeelding 1 van 3 Packard Bell ms-Hera c Disassembly, Remove the heatsink: stap 6, afbeelding 2 van 3 Packard Bell ms-Hera c Disassembly, Remove the heatsink: stap 6, afbeelding 3 van 3
    • Remove the cooling fan.

    • Remove the heatsink.

    • Remove the screws on the connector.

  7. Packard Bell ms-Hera c Disassembly, Remove the motherboard: stap 7, afbeelding 1 van 2 Packard Bell ms-Hera c Disassembly, Remove the motherboard: stap 7, afbeelding 2 van 2
    • Remove the screws to remove the motherboard.

Conclusie

To reassemble your device, follow these instructions in reverse order.

Één andere persoon heeft deze handleiding voltooid.

Met dank aan deze vertalers:

it en

100%

Deze vertalers helpen ons de wereld te repareren! Wil je bijdragen?
Begin met vertalen ›

Smilzo

Lid sinds: 11/09/13

11.294 Reputatie

39 handleidingen geschreven

0 opmerkingen

Voeg opmerking toe

Weergavestatistieken:

Afgelopen 24 uren: 3

Afgelopen 7 dagen: 9

Afgelopen 30 dagen: 48

Altijd: 1,104