Ga door naar hoofdinhoud
Word lid van de reparatiegemeenschap - Account aanmaken

Oster 6329 Bread Grabber Spring Replacement

Wat je nodig hebt

  1. Oster 6329 Bread Grabber Spring Replacement, Outer Shell Removal: stap 1, afbeelding 1 van 2 Oster 6329 Bread Grabber Spring Replacement, Outer Shell Removal: stap 1, afbeelding 2 van 2
    • Using the Phillips-head #2 screwdriver, unscrew the three 1cm Phillips-head screws on the plastic base of the toaster to separate the outer metal shell from the plastic base.

    Vraag FixBot

    Voeg opmerking toe

  2. Oster 6329 Bread Grabber Spring Replacement: stap 2, afbeelding 1 van 1
    • Push the plastic push-down handle down and pull the plastic handle straight from metal arm.

    Vraag FixBot

    Voeg opmerking toe

  3. Oster 6329 Bread Grabber Spring Replacement: stap 3, afbeelding 1 van 1
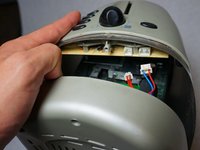
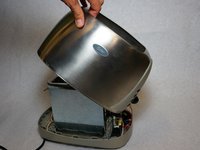
    • Loosen the outer metal shell from the plastic base by holding the plastic base while pulling up on the metal shell.

    • Only lift the outer shell a little so as not to disconnect the cables that connect the circuit board.

    Vraag FixBot

    Voeg opmerking toe

  4. Oster 6329 Bread Grabber Spring Replacement: stap 4, afbeelding 1 van 2 Oster 6329 Bread Grabber Spring Replacement: stap 4, afbeelding 2 van 2
    Gereedschap gebruikt in deze stap:
    Tweezers
    $4.99
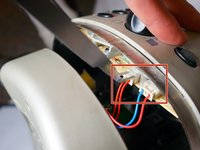
    • Disconnect the cable clips from the circuit board using the tweezers to free the outer metal shell from the plastic base.

    Vraag FixBot

    Voeg opmerking toe

  5. Oster 6329 Bread Grabber Spring Replacement: stap 5, afbeelding 1 van 2 Oster 6329 Bread Grabber Spring Replacement: stap 5, afbeelding 2 van 2
    • Lift the top outer metal shell.

    • Carefully lift the outer metal shell at an angle so as not to damage the components in the front of the toaster.

    Vraag FixBot

    Voeg opmerking toe

  6. Oster 6329 Bread Grabber Spring Replacement, Bread Grabber Spring: stap 6, afbeelding 1 van 1
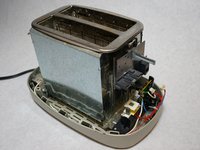
    • Press down on the toaster handle to access to the grabber spring located behind the large metal plate.

    Vraag FixBot

    Voeg opmerking toe

  7. Oster 6329 Bread Grabber Spring Replacement: stap 7, afbeelding 1 van 1
    • Locate the grabber spring.

    Vraag FixBot

    Voeg opmerking toe

  8. Oster 6329 Bread Grabber Spring Replacement: stap 8, afbeelding 1 van 1
    • Use the large needle nose pliers to unwind the grabber spring from one side of the carriage to remove.

    • Repeat this step for the opposite side.

    Vraag FixBot

    Voeg opmerking toe

  9. Oster 6329 Bread Grabber Spring Replacement: stap 9, afbeelding 1 van 1
    • Remove the old spring from the toaster unit to insert new.

    Vraag FixBot

    Voeg opmerking toe

Conclusie

To reassemble your device, follow these instructions in reverse order.

Annuleren: ik heb deze handleiding niet afgemaakt.

3 andere personen hebben deze handleiding voltooid.

Isaac Williams

Lid sinds: 01/24/14

237 Reputatie

2 handleidingen geschreven

Team

Cal Poly, Team 13-15, Regan Winter 2014 Lid van Cal Poly, Team 13-15, Regan Winter 2014

CPSU-REGAN-W14S13G15

5 Leden

6 handleidingen geschreven

0Gids Commentaar

Voeg opmerking toe

Weergavestatistieken:

Afgelopen 24 uren: 1

Afgelopen 7 dagen: 11

Afgelopen 30 dagen: 34

Altijd: 1,245