Ga door naar hoofdinhoud

Oral-B White Pro 1000 Motherboard Replacement

Wat je nodig hebt

  1. Oral-B White Pro 1000 Motherboard Replacement, Motherboard: stap 1, afbeelding 1 van 1
    • Remove the brush head by pulling the top away from the base.

  2. Oral-B White Pro 1000 Motherboard Replacement: stap 2, afbeelding 1 van 3 Oral-B White Pro 1000 Motherboard Replacement: stap 2, afbeelding 2 van 3 Oral-B White Pro 1000 Motherboard Replacement: stap 2, afbeelding 3 van 3
    • Pry open the end cap from the toothbrush body.

    • Remove the spring.

  3. Oral-B White Pro 1000 Motherboard Replacement: stap 3, afbeelding 1 van 2 Oral-B White Pro 1000 Motherboard Replacement: stap 3, afbeelding 2 van 2
    • Apply pressure on the brush shaft to release the toothbrush internals.

    • Remove the internals through the bottom of the toothbrush body.

  4. Oral-B White Pro 1000 Motherboard Replacement: stap 4, afbeelding 1 van 2 Oral-B White Pro 1000 Motherboard Replacement: stap 4, afbeelding 2 van 2
    • Use flat head screwdriver to remove power button pressure plate.

  5. Oral-B White Pro 1000 Motherboard Replacement: stap 5, afbeelding 1 van 3 Oral-B White Pro 1000 Motherboard Replacement: stap 5, afbeelding 2 van 3 Oral-B White Pro 1000 Motherboard Replacement: stap 5, afbeelding 3 van 3
    • Desolder the coil wire from the motherboard.

    • Check out this helpful guide for some soldering and desoldering tips.

    • Squeeze and remove coil from motherboard.

  6. Oral-B White Pro 1000 Motherboard Replacement: stap 6, afbeelding 1 van 2 Oral-B White Pro 1000 Motherboard Replacement: stap 6, afbeelding 2 van 2
    • Desolder the motor from motherboard.

    • Remove motherboard and battery from body of toothbrush internals.

  7. Oral-B White Pro 1000 Motherboard Replacement: stap 7, afbeelding 1 van 2 Oral-B White Pro 1000 Motherboard Replacement: stap 7, afbeelding 2 van 2
    • Desolder the battery connections from the motherboard.

    • Remove motherboard from battery holder.

Conclusie

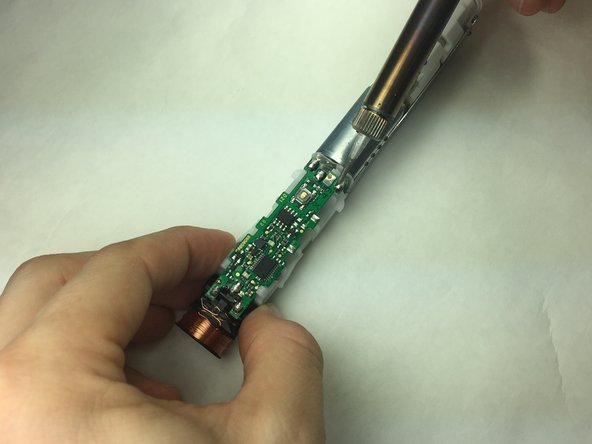
Reattach new motherboard and reassemble your device following instructions in reverse order. Solder appropriate connections during reassembly.

2 andere personen hebben deze handleiding voltooid.

Hannah Parker

Lid sinds: 11/08/17

203 Reputatie

1 Handleiding geschreven

Team

IUPUI, Team S5-G4, Baechle Fall 2017 Lid van IUPUI, Team S5-G4, Baechle Fall 2017

IUPUI-BAECHLE-F17S5G4

3 Leden

6 handleidingen geschreven

Één opmerking

Motor are brushless?

joseferreira_ms - Antwoord

Voeg opmerking toe

Weergavestatistieken:

Afgelopen 24 uren: 2

Afgelopen 7 dagen: 11

Afgelopen 30 dagen: 56

Altijd: 2,655