Ga door naar hoofdinhoud
Word lid van de reparatiegemeenschap - Account aanmaken

Nintendo GameCube Front and Back Panel Replacement

Wat je nodig hebt

  1. Nintendo GameCube Front and Back Panel Replacement, Top Case: stap 1, afbeelding 1 van 3 Nintendo GameCube Front and Back Panel Replacement, Top Case: stap 1, afbeelding 2 van 3 Nintendo GameCube Front and Back Panel Replacement, Top Case: stap 1, afbeelding 3 van 3
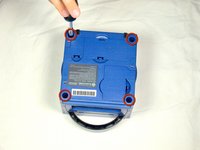
    • Turn over the Gamecube so that the bottom side is facing up.

    • Use the 4.5 mm Gamebit screwdriver to remove all four screws.

    Vraag FixBot

    Voeg opmerking toe

  2. Nintendo GameCube Front and Back Panel Replacement: stap 2, afbeelding 1 van 3 Nintendo GameCube Front and Back Panel Replacement: stap 2, afbeelding 2 van 3 Nintendo GameCube Front and Back Panel Replacement: stap 2, afbeelding 3 van 3
    • With the bottom side of the GameCube facing upward and the screws removed, carefully pull the outer shell of the unit away from the top half.

    • Move the GameCube so that the inside is facing upwards.

    Vraag FixBot

    Voeg opmerking toe

  3. Nintendo GameCube Front and Back Panel Replacement, Removing the back panel: stap 3, afbeelding 1 van 1
    • Gently press down on the clips located on either side of the back panel.

    • Carefully remove the back panel from the GameCube.

    Vraag FixBot

    Voeg opmerking toe

  4. Nintendo GameCube Front and Back Panel Replacement: stap 4, afbeelding 1 van 1
    • Unclip the controller ports at the front of the unit.

    • A ribbon cable (outlined in orange) is still attached to the unit. Do not disconnect this cable.

    • Controller ports are where the controllers plug into the game console, and are a half circular shape.

    Vraag FixBot

    Voeg opmerking toe

  5. Nintendo GameCube Front and Back Panel Replacement, Separate the casing: stap 5, afbeelding 1 van 2 Nintendo GameCube Front and Back Panel Replacement, Separate the casing: stap 5, afbeelding 2 van 2
    • This step may not be necessary depending on your end goal

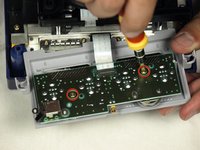
    • Use a Phillips #2 screwdriver to remove the two screws on the back of the control port.

    • Carefully separate the gray outer casing of the control port and the circuit board.

    Vraag FixBot

    Voeg opmerking toe

Conclusie

To reassemble your device, follow these instructions in reverse order.

Annuleren: ik heb deze handleiding niet afgemaakt.

6 andere personen hebben deze handleiding voltooid.

dcarlin

Lid sinds: 11/05/09

399 Reputatie

4 handleidingen geschreven

Team

Cal Poly, Team 6-2, Maness Fall 2009 Lid van Cal Poly, Team 6-2, Maness Fall 2009

CPSU-MANESS-F09S6G2

4 Leden

45 handleidingen geschreven

0Gids Commentaar

Voeg opmerking toe

Weergavestatistieken:

Afgelopen 24 uren: 2

Afgelopen 7 dagen: 51

Afgelopen 30 dagen: 172

Altijd: 18,987