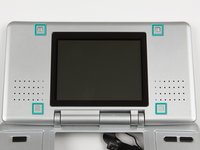
Ga door naar hoofdinhoud
Word lid van de reparatiegemeenschap - Account aanmaken

Nintendo DS Upper LCD Screen Replacement

Wat je nodig hebt

  1. Nintendo DS Upper LCD Screen Replacement, Battery: stap 1, afbeelding 1 van 3 Nintendo DS Upper LCD Screen Replacement, Battery: stap 1, afbeelding 2 van 3 Nintendo DS Upper LCD Screen Replacement, Battery: stap 1, afbeelding 3 van 3
    • Remove the cartridge from the console.

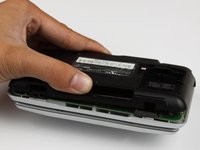
    • Use a Phillips #00 Screwdriver to remove the screw securing the battery door to the rear case.

    • Remove the battery door.

    • In the images, it shows that the fixer is using a flathead screwdriver. This flathead screwdriver will work just like the Phillips #00 Screwdriver.

    Vraag FixBot

    Voeg opmerking toe

  2. Nintendo DS Upper LCD Screen Replacement: stap 2, afbeelding 1 van 1
    • Use a plastic opening tool or spudger to pry out the battery from the bottom. If a plastic opening tool or spudger isn't available, your fingernails may work.

    Vraag FixBot

    Voeg opmerking toe

  3. Nintendo DS Upper LCD Screen Replacement: stap 3, afbeelding 1 van 1
    • Remove the battery from the Nintendo DS.

    Vraag FixBot

    Voeg opmerking toe

  4. Nintendo DS Upper LCD Screen Replacement, Back Panel: stap 4, afbeelding 1 van 1
    • Remove the seven 6.4mm Y00 screws located on the back.

    • If your DS has a lanyard attached to it, you can remove it to make the process of opening the top-left screw easier.

    Vraag FixBot

    Voeg opmerking toe

  5. Nintendo DS Upper LCD Screen Replacement: stap 5, afbeelding 1 van 3 Nintendo DS Upper LCD Screen Replacement: stap 5, afbeelding 2 van 3 Nintendo DS Upper LCD Screen Replacement: stap 5, afbeelding 3 van 3
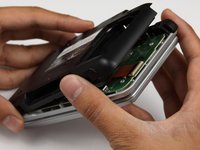
    • With your hands, pry the back panel off the main case.

    • Separate the back from the front, and set it aside.

    Vraag FixBot

    Voeg opmerking toe

  6. Nintendo DS Upper LCD Screen Replacement, Motherboard replacement.: stap 6, afbeelding 1 van 1
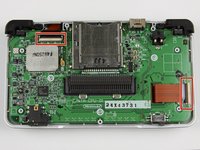
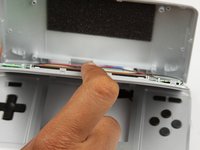
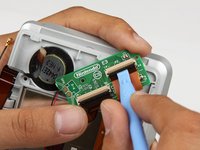
    • Using a Phillips #00 screwdriver, remove the four screws on the circuit board.

    • Be careful NOT to slip with the screwdriver, you can damage the circuit board!

    Vraag FixBot

    Voeg opmerking toe

  7. Nintendo DS Upper LCD Screen Replacement: stap 7, afbeelding 1 van 3 Nintendo DS Upper LCD Screen Replacement: stap 7, afbeelding 2 van 3 Nintendo DS Upper LCD Screen Replacement: stap 7, afbeelding 3 van 3
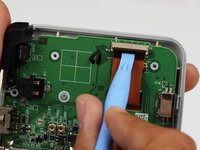
    • Unlock the two large ribbon cables by moving the black clip up.

    • Carefully pull the ribbon cables down and out with your fingers.

    • Do not use pliers to pull the cables, as they can be damaged easily.

    Vraag FixBot

    Voeg opmerking toe

  8. Nintendo DS Upper LCD Screen Replacement: stap 8, afbeelding 1 van 2 Nintendo DS Upper LCD Screen Replacement: stap 8, afbeelding 2 van 2
    Gereedschap gebruikt in deze stap:
    Tweezers
    $4.99
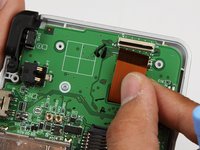
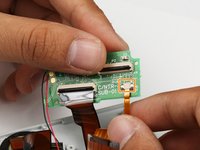
    • Locate the two small ribbon cables, beneath the rightmost large ribbon cable.

    • Slide the locks for the small ribbon cables down to the side, and remove the cables.

    • It may be useful to use tweezers to remove the small ribbon cables.

    • Be careful not to damage the delicate ribbon cables.

    Vraag FixBot

    Voeg opmerking toe

  9. Nintendo DS Upper LCD Screen Replacement: stap 9, afbeelding 1 van 2 Nintendo DS Upper LCD Screen Replacement: stap 9, afbeelding 2 van 2
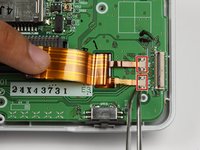
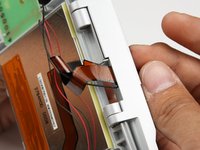
    • Locate the Wifi antenna pigtail connector.

    • Remove the antenna by grasping it at the head with tweezers. Using a slight rocking motion, pull up to dislodge the connector.

    Vraag FixBot

    Voeg opmerking toe

  10. Nintendo DS Upper LCD Screen Replacement: stap 10, afbeelding 1 van 1
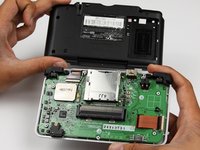
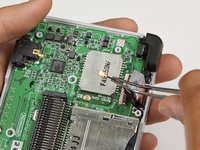
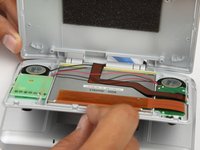
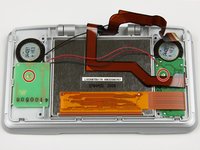
    • Feed the ribbon cables through the opening on the board.

    • Pull up and remove the circuit board, and set it aside.

    Vraag FixBot

    Voeg opmerking toe

  11. Nintendo DS Upper LCD Screen Replacement, Remove the screw covers: stap 11, afbeelding 1 van 3 Nintendo DS Upper LCD Screen Replacement, Remove the screw covers: stap 11, afbeelding 2 van 3 Nintendo DS Upper LCD Screen Replacement, Remove the screw covers: stap 11, afbeelding 3 van 3
    Gereedschap gebruikt in deze stap:
    Tweezers
    $4.99
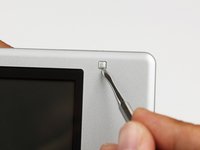
    • Use a flathead screwdriver, tweezers, a toothpick or dental tool to remove rubber covers on screen.

    • While doing so, please be sure to remove the rubber screw covers carefully. If they rip or get damaged, you may have to buy new ones. These are NOT required to seal up the console, but for aesthetic purposes and for keeping dirt and water out, you should (re)install the rubber screw covers.

    • Remove the four screws using a Phillips #00 screwdriver.

    Vraag FixBot

    Voeg opmerking toe

  12. Nintendo DS Upper LCD Screen Replacement, Remove the front cover: stap 12, afbeelding 1 van 3 Nintendo DS Upper LCD Screen Replacement, Remove the front cover: stap 12, afbeelding 2 van 3 Nintendo DS Upper LCD Screen Replacement, Remove the front cover: stap 12, afbeelding 3 van 3
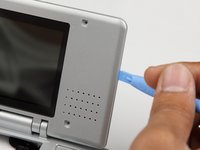
    • Using a plastic opening tool, pry the edges of the plastic case apart at the seam.

    Vraag FixBot

    Voeg opmerking toe

  13. Nintendo DS Upper LCD Screen Replacement, Separate the top cover: stap 13, afbeelding 1 van 3 Nintendo DS Upper LCD Screen Replacement, Separate the top cover: stap 13, afbeelding 2 van 3 Nintendo DS Upper LCD Screen Replacement, Separate the top cover: stap 13, afbeelding 3 van 3
    • Separate the top cover from the body.

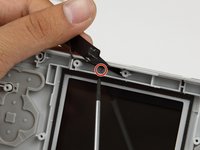
    • Using a Phillips #00 screwdriver, remove the screw holding the hinge cover in place.

    • Remove the hinge cover and set it aside.

    Vraag FixBot

    Voeg opmerking toe

  14. Nintendo DS Upper LCD Screen Replacement: stap 14, afbeelding 1 van 2 Nintendo DS Upper LCD Screen Replacement: stap 14, afbeelding 2 van 2
    • Feed the ribbon cables and the Wifi pigtail cable through the opening in the hinge cover.

    • Remove the yellow spacer, and set aside.

    Vraag FixBot

    Voeg opmerking toe

  15. Nintendo DS Upper LCD Screen Replacement, Remove the speaker boards: stap 15, afbeelding 1 van 2 Nintendo DS Upper LCD Screen Replacement, Remove the speaker boards: stap 15, afbeelding 2 van 2
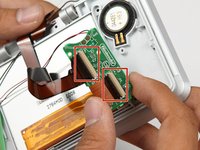
    • Using a Phillips #00 screwdriver, remove the two screws holding down the speaker circuit boards.

    • Remove the two small circuit boards and set aside.

    • Be careful of the small red and black wires connecting the two circuit boards not to break them.

    Vraag FixBot

    Voeg opmerking toe

  16. Nintendo DS Upper LCD Screen Replacement: stap 16, afbeelding 1 van 3 Nintendo DS Upper LCD Screen Replacement: stap 16, afbeelding 2 van 3 Nintendo DS Upper LCD Screen Replacement: stap 16, afbeelding 3 van 3
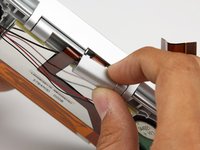
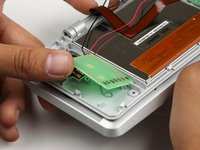
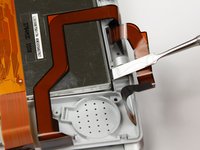
    • Move the black lock on the two large ribbon cables up with a pry tool, and gently pull out the two ribbon cables.

    • For the small ribbon cable, pull the lock downwards.

    • Gently pull out the small ribbon cable from the connector.

    • Set the two small circuit boards aside

    • Be careful not to damage the two delicate ribbon cables when removing them from the DS.

    Vraag FixBot

    Voeg opmerking toe

  17. Nintendo DS Upper LCD Screen Replacement, Remove the screen: stap 17, afbeelding 1 van 2 Nintendo DS Upper LCD Screen Replacement, Remove the screen: stap 17, afbeelding 2 van 2
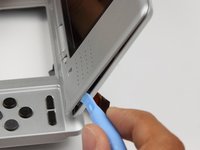
    • Using a pry tool, gently lift the top screen out of the shell.

    • Set the top screen aside

    Vraag FixBot

    Voeg opmerking toe

Conclusie

To reassemble your device, follow these instructions in reverse order.

Annuleren: ik heb deze handleiding niet afgemaakt.

48 andere personen hebben deze handleiding voltooid.

dnguye26

Lid sinds: 10/28/09

758 Reputatie

4 handleidingen geschreven

Team

Cal Poly, Team 18-3, Maness Fall 2009 Lid van Cal Poly, Team 18-3, Maness Fall 2009

CPSU-MANESS-F09S18G3

4 Leden

31 handleidingen geschreven

14Gids Commentaar

Unlike the DS Lite and later models, there is no reason to take apart the bottom portion of the original DS in order to remove the top screen. The first ten steps of this guide could be skipped.

PohTayToez - Antwoord Deel

Thanks great advice

truenhete TrueNhero - Antwoord Deel

Can a ds lite screen be used to repair a ds??

David Moore - Antwoord Deel

Nope, Nintendo engineered the Lite as a refinement of the original. Therefore almost every component is different! Likely to become cheaper to manufacture.

Del Riordan - Antwoord Deel

Can a ds lite screen be used to repair a ds one?? Lots of ds lite screens about......

David Moore - Antwoord Deel

Voeg opmerking toe

Weergavestatistieken:

Afgelopen 24 uren: 28

Afgelopen 7 dagen: 302

Afgelopen 30 dagen: 1,387

Altijd: 138,998