Ga door naar hoofdinhoud
Word lid van de reparatiegemeenschap - Account aanmaken

Nintendo 3DS XL Microphone Replacement

Wat je nodig hebt

  1. Nintendo 3DS XL Microphone Replacement, Remove the back cover screws: stap 1, afbeelding 1 van 1
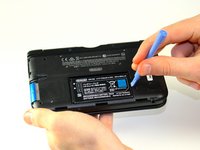
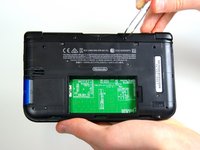
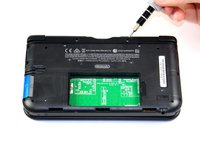
    • Use a JIS 00 screwdriver to loosen the 4.2 mm‑long screws on the top edge of the back cover.

    • The screws have locking washers that prevent the screws from falling out. Keep these in place.

    Vraag FixBot

    Voeg opmerking toe

  2. Nintendo 3DS XL Microphone Replacement, Remove the back cover: stap 2, afbeelding 1 van 2 Nintendo 3DS XL Microphone Replacement, Remove the back cover: stap 2, afbeelding 2 van 2
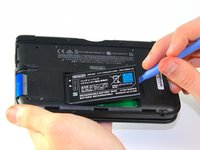
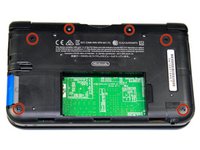
    • Use a plastic opening tool to pry off the clips securing the back cover, starting at the top corners and working your way down.

    • Use your hands to keep the clips from reattaching.

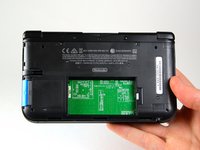
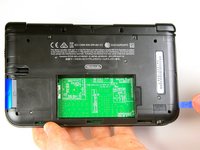
    • Use your hands to remove the back cover.

    Vraag FixBot

    Voeg opmerking toe

  3. Nintendo 3DS XL Microphone Replacement: stap 3, afbeelding 1 van 3 Nintendo 3DS XL Microphone Replacement: stap 3, afbeelding 2 van 3 Nintendo 3DS XL Microphone Replacement: stap 3, afbeelding 3 van 3
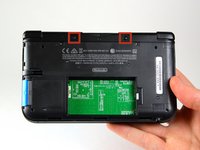
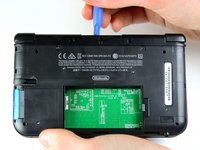
    • Insert the plastic opening tool into the opening located on the right side of the battery.

    • Pry off the battery from the lower casing.

    • Lift the battery out of the case and set aside.

    Vraag FixBot

    Voeg opmerking toe

  4. Nintendo 3DS XL Microphone Replacement, Microphone: stap 4, afbeelding 1 van 2 Nintendo 3DS XL Microphone Replacement, Microphone: stap 4, afbeelding 2 van 2
    Gereedschap gebruikt in deze stap:
    Tweezers
    $4.99
    • Using tweezers pull out the rubber bumpers that are located at the top of the device on either side of the game cartridge compartment.

    Vraag FixBot

    Voeg opmerking toe

  5. Nintendo 3DS XL Microphone Replacement: stap 5, afbeelding 1 van 2 Nintendo 3DS XL Microphone Replacement: stap 5, afbeelding 2 van 2
    • Remove the six 6.2 mm screws using a Phillips #000 screwdriver.

    Vraag FixBot

    Voeg opmerking toe

  6. Nintendo 3DS XL Microphone Replacement: stap 6, afbeelding 1 van 1
    • Remove the 2.3 mm screw located above the game cartridge slot with a Phillips #000 screwdriver.

    Vraag FixBot

    Voeg opmerking toe

  7. Nintendo 3DS XL Microphone Replacement: stap 7, afbeelding 1 van 3 Nintendo 3DS XL Microphone Replacement: stap 7, afbeelding 2 van 3 Nintendo 3DS XL Microphone Replacement: stap 7, afbeelding 3 van 3
    • With a plastic opening tool pry off the lower case starting at the bottom edge and working around the perimeter.

    • Two ribbon cables connect the case to the circuit board. Be careful to not pull the case too hard and rip the ribbon cables.

    Vraag FixBot

    Voeg opmerking toe

  8. Nintendo 3DS XL Microphone Replacement: stap 8, afbeelding 1 van 3 Nintendo 3DS XL Microphone Replacement: stap 8, afbeelding 2 van 3 Nintendo 3DS XL Microphone Replacement: stap 8, afbeelding 3 van 3
    • Remove the ribbon cables located underneath the left and right bumpers by prying up the base of the cables with a plastic opening tool.

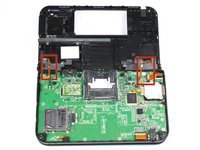
    • Completely remove the lower case from the rest of the device and set aside.

    Vraag FixBot

    Voeg opmerking toe

  9. Nintendo 3DS XL Microphone Replacement: stap 9, afbeelding 1 van 3 Nintendo 3DS XL Microphone Replacement: stap 9, afbeelding 2 van 3 Nintendo 3DS XL Microphone Replacement: stap 9, afbeelding 3 van 3
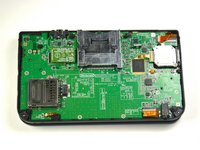
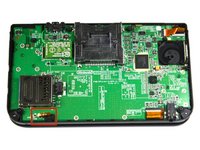
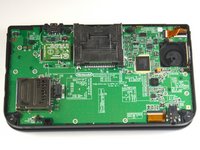
    • Position the device such that the game cartridge slot is located at the top.

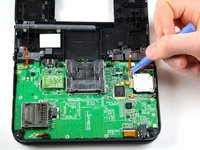
    • Locate the microphone in the bottom left corner.

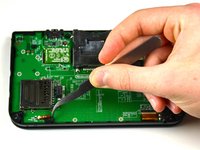
    • Using tweezers remove the microphone.

    • There will be a ribbon that connects the microphone to the motherboard.

    Vraag FixBot

    Voeg opmerking toe

  10. Nintendo 3DS XL Microphone Replacement: stap 10, afbeelding 1 van 2 Nintendo 3DS XL Microphone Replacement: stap 10, afbeelding 2 van 2
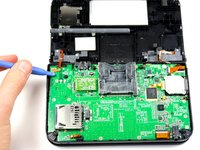
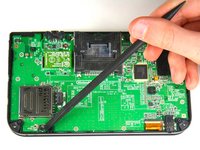
    • Using the flat head side of the spudger carefully lift up the flap and remove the ribbon.

    • The attached microphone can now be removed.

    Vraag FixBot

    Voeg opmerking toe

Conclusie

To reassemble your device, follow these instructions in reverse order.

Annuleren: ik heb deze handleiding niet afgemaakt.

6 andere personen hebben deze handleiding voltooid.

Charlene Donlon

Lid sinds: 04/08/14

11.196 Reputatie

8 handleidingen geschreven

Team

Cal Poly, Team 9-13, Regan Spring 2014 Lid van Cal Poly, Team 9-13, Regan Spring 2014

CPSU-REGAN-S14S9G13

5 Leden

56 handleidingen geschreven

2Gids Commentaar

Hello! Do these instructions apply to the New 3DS XL as well? I followed steps from 1-8, but when I get to step 9, the layout is different and I can’t find the mic. Any help would be greatly appreciated!

Melissa Cardenas - Antwoord Deel

please learn to repair the mic of new 3ds xl

andrew.hws - Antwoord Deel

Voeg opmerking toe

Weergavestatistieken:

Afgelopen 24 uren: 9

Afgelopen 7 dagen: 68

Afgelopen 30 dagen: 244

Altijd: 15,551