Inleiding
Dr.Wreck heeft eindelijk de moed verzameld om zijn gloednieuwe Motorola Droid uit elkaar te halen! Wat zit erin?! Blijf op de hoogte via PhoneWreck om de details te zien zodra ze binnenkomen!
Deze door gebruikers bijgedragen demontage is een reactie op de Droid bounty-aanbieding van iFixit.
Wat je nodig hebt
-
-
-
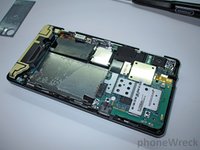
Daar is hij dan! Blijf iFixit en PhoneWreck in de gaten houden om alle details te zien zodra ze beschikbaar komen!
 Vraag FixBot
-
-
-
De eerste stap is het verwijderen van de achterkant en de accu.
-
Hier zie je twee schroeven.
-
Gebruik je T6-schroevendraaier om zowel de zwarte als de zilveren schroeven te verwijderen.
-
Er zijn meer schroeven, maar die zitten op een lastig bereikbare plek verborgen. Deze vinden was het moeilijkste deel!
-
-
-
Helaas heeft Motorola de schroeven van de behuizing op een lastig te vinden plek geplaatst...
-
Twee daarvan bevinden zich onder het plastic onderdeel aan de bovenkant van het toestel.
-
Gebruik een pin of een zeer dunne, stijve openingstool om dit los te wrikken van de dubbelzijdige tape en zo nog twee T6-schroeven bloot te leggen.
-
-
-
De rest van de bevestigingen vinden is een hele klus...
-
Had je eraan gedacht om onder de lensdop en het google-label te kijken? Waarschijnlijk niet... dat zou je wel moeten doen! Er zit daar een T5 onder!
-
Probeer je niet te storen aan de enorme teen-duimen van Dr. Wreck...
-
-
-
-
Je bent nog niet klaar! Je moet nog steeds op zoek naar de bevestigingen onderin het apparaat!
-
Gelukkig zijn ze *niet* echt makkelijk te vinden. Zie je dat gouden rooster onder de batterijklep? Ja... pel die weg.
-
-
-
Nu deze schroeven verwijderd zijn, kun je het achterste deel van het chassis loswrikken.
-
Gebruik een wig en werk deze voorzichtig rondom de buitenkant van de omlijsting.
-
-
-
Daar is hij!
-
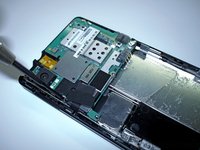
Gebruik de T5 om de laatste zilveren printplaatschroef te verwijderen.
-
Trek de flexkabels los waarmee de bovenkant van het logic board aan het schermgedeelte is bevestigd.
-
-
-
Nu kun je de printplaat naar buiten klappen.
-
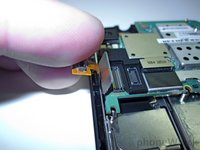
Verwijder de flexkabel van de onderkant van de printplaat om deze los te maken.
-
-
-
Wrik tot slot de zwarte omlijsting rondom het toetsenbord van het apparaat los. Hierdoor wordt het schuifmechanisme zichtbaar.
-
-
-
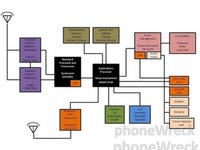
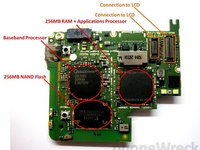
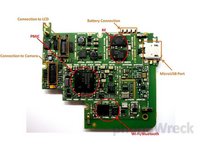
We hebben de metalen afschermingen verwijderd (geen aanbevolen stap!!!) om te zien welke IC's er op het moederbord zitten.
-
Bekijk het blokdiagram voor alle details!
-
-
-
DAT WAS HET! WAT HEBBEN WE GEDAAN!?
-
Blijf http://www.phonewreck.com volgen voor een volledige analyse van de demontage!
-
-






3Gids Commentaar
Headphones were tugging or yanked enough to wear out the connection, and I found these instructions invaluable. It was enough for me to get the back panel off.
The back panel has the headphone jack (visible in your last image). I stretched the spring connectors out to give more pressure, but the real problem were the pads on the flex connector -- a couple of them had holes worn in them. I applied a light coat (a dab, followed by a touch from the desoldering braid) of solder to the pads, reassembled the unit, and it works like a charm. I hope this helps anybody who has a flaky headphone connection.
Another good note would be to mark what "Droid" your making a manual for. You did fairly well but please remember Droid is only the brand and there are literally tons of models for example there is the Droid X2, X3, Droid Razr, etc. and when I was looking at this I thought it would help but this guide is absolutely useless when trying to open or fix my Droid Maxx HD since they are completely different.
I am attempting a digitizer replacement on my a855. The phone is disassebled (screws all accounted for luckily) and just got the glass piece re-taped into the bezel. Having trouble finding where the connector for the digitizer reconnects? The phone came apart and I could not see the connection point for the digitizer ribbon connector.
Thanks
