Ga door naar hoofdinhoud
Word lid van de reparatiegemeenschap - Account aanmaken

Motorola Defy XT Screen Replacement

Wat je nodig hebt

  1. Motorola Defy XT Screen Replacement, Battery: stap 1, afbeelding 1 van 1
    • Wedge the plastic opening tool in between the back cover and the body of the phone in the opening denoted by the arrow.

    Vraag FixBot

    Voeg opmerking toe

  2. Motorola Defy XT Screen Replacement: stap 2, afbeelding 1 van 1
    • Once wedged in the opening, slide the opening tool sideways around the sides of the phone.

    • Remove the back cover and set it aside.

    Vraag FixBot

    Voeg opmerking toe

  3. Motorola Defy XT Screen Replacement: stap 3, afbeelding 1 van 1
    • Insert the opening tool between the battery and the battery holder and wedge the battery out.

    Vraag FixBot

    Voeg opmerking toe

  4. Motorola Defy XT Screen Replacement, SD Card: stap 4, afbeelding 1 van 1
    • Open the plastic cover with your finger, exposing the SD card.

    • Use the opening tool to grab the edge of the SD card and pull it straight out.

    Vraag FixBot

    Voeg opmerking toe

  5. Motorola Defy XT Screen Replacement, Screen: stap 5, afbeelding 1 van 2 Motorola Defy XT Screen Replacement, Screen: stap 5, afbeelding 2 van 2
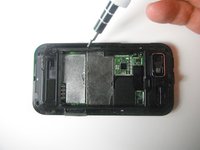
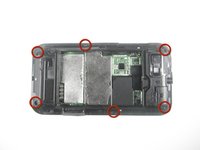
    • Use the Torx T4 screwdriver to remove the six 3 mm screws from the back case.

    Vraag FixBot

    Voeg opmerking toe

  6. Motorola Defy XT Screen Replacement: stap 6, afbeelding 1 van 1
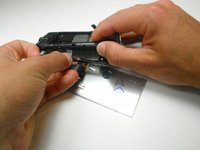
    • Use the plastic opening tool to pop the volume buttons off from the side of the phone.

    Vraag FixBot

    Voeg opmerking toe

  7. Motorola Defy XT Screen Replacement: stap 7, afbeelding 1 van 1
    • Wedge the plastic opening tool between the plastic layer and the shiny front cover.

    Vraag FixBot

    Voeg opmerking toe

  8. Motorola Defy XT Screen Replacement: stap 8, afbeelding 1 van 1
    • Slide the plastic opening tool along the edge, wedging the the two pieces apart.

    • Potential for device damage: Do not completely separate the two pieces; there are still internal components that need to be disconnected.

    Vraag FixBot

    Voeg opmerking toe

  9. Motorola Defy XT Screen Replacement: stap 9, afbeelding 1 van 2 Motorola Defy XT Screen Replacement: stap 9, afbeelding 2 van 2
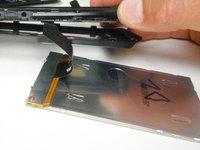
    • Slide the screen out and disconnect the ribbon cable connecting the display to the motherboard by pulling straight outward.

    • Potential for device damage: Be careful when sliding out the screen because the front case and the motherboard are still connected by two other ribbon cables.

    Vraag FixBot

    Voeg opmerking toe

  10. Motorola Defy XT Screen Replacement: stap 10, afbeelding 1 van 2 Motorola Defy XT Screen Replacement: stap 10, afbeelding 2 van 2
    • Set the old screen aside and replace it with your new screen.

    Vraag FixBot

    Voeg opmerking toe

Conclusie

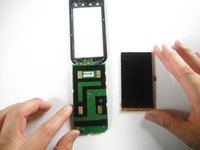
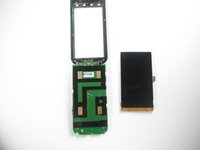
To reassemble your device, follow these instructions in reverse order.

Annuleren: ik heb deze handleiding niet afgemaakt.

2 andere personen hebben deze handleiding voltooid.

Oscar Camacho

Lid sinds: 04/19/13

89 Reputatie

1 Handleiding geschreven

Team

Cal Poly, Team 2-22, Maness Spring 2013 Lid van Cal Poly, Team 2-22, Maness Spring 2013

CPSU-MANESS-S13S2G22

3 Leden

8 handleidingen geschreven

0Gids Commentaar

Voeg opmerking toe

Weergavestatistieken:

Afgelopen 24 uren: 2

Afgelopen 7 dagen: 9

Afgelopen 30 dagen: 47

Altijd: 3,587