Inleiding
If your mouse is intermittently disconnecting, randomly missing movements and inputs - you might have a broken or damaged mouse cable. The mouse cable carries data from the mouse to your computer. A damaged cable can result in missed mouse movements and inputs. Before starting this guide try a different connector (most likely USB) port on your computer, and inspect the connector for dirt and debris.
This guide shows an easy, step-by-step process on how to replace the mouse cable in a Glorious Model O- mouse.
The mouse should be physically unplugged from your computer prior to beginning your repair.
Wat je nodig hebt
-
-
Gereedschap gebruikt in deze stap:Tweezers$4.99
-
Turn the mouse over so that the feet are facing you.
-
Remove the bottom two mouse feet using tweezers.
 Vraag FixBot
-
-
-
Using a Phillips #0 screwdriver, remove the two screws that are under the mouse feet.
-
-
-
Slide the base away from the top housing to avoid the front clips.
-
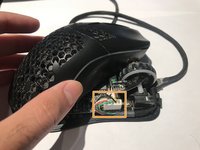
Lift the top and place it down diagonal over the base, exposing the 5-pin connector.
-
-
-
-
Use two fingers to grasp the top of the 5-pin connector under the edges and slowly lift the connector. If it is difficult, wiggle the plug slightly.
-
Remove the cable from around the circuit board and from the hole on the front of the mouse.
-
-
-
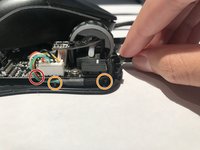
Insert the new cable's 5-pin connector plug (red) into the 5-pin connector socket (orange).
-
-
-
Route the new cable through the slit in the circuit board.
-
Route the new cable behind the pillars.
-
Route the cable through the hole at the front of the mouse. Some cables have a fitted square plastic piece that positions the cable, some have thermoplastic which requires the user to position it themselves.
-
-
-
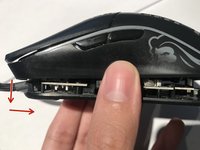
Join the top and bottom housing together with the top around 1cm ahead of the bottom, then pull the top housing back as illustrated.
-
Once the two sides of the shell are together apply pressure until at least one screw is securely fastening them together.
-
-








Annuleren: ik heb deze handleiding niet afgemaakt.
4 andere personen hebben deze handleiding voltooid.

Team

York University, Team S2-G24, O'Regan Winter 2021 Lid van York University, Team S2-G24, O'Regan Winter 2021
YORK-O'REGAN-W21S2G24
1 Lid
3 handleidingen geschreven
