Inleiding
Let op: verwijder altijd eerst de stekker uit het stopcontact voordat je gaat demonteren.
Deze gebruiksaanwijzing kan ook gebruikt worden voor andere Melitta modellen en volautomatische koffiemachines van Nivona, Siemens en Miele machines - de machines van deze merken lijken qua ontwerp op elkaar en sommige onderdelen zijn in veel gevallen identiek.
Wat je nodig hebt
-
-
-
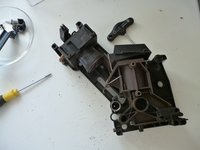
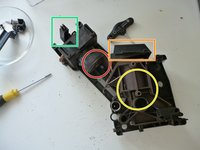
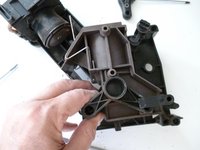
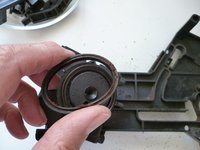
De brouwunit ligt open voor je. Je kunt de volgende onderdelen herkennen:
-
De bovenste zuiger met de afdichtring.
-
De vultrechter.
-
De onderste zuiger.
-
De klem.
Hi, Thank you for your howto. It is very detailed and helpful.
There is another seal in the lower piston. it seems to be a lip seal.
I searched and couldn't find a remplacement for that. do you know where I can buy it?
Many thanks
-
-
-
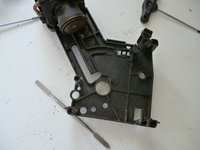
Verwijder de vultrechter.
-
Draai de onderste zuiger iets naar links en til hem eruit.
-
Til de bovenste zuiger eruit. Deze is nog met een slang verbonden met de koffie-uitloop. Daarboven zit ook de klem van de brouwunit.
Anyone seen the repairkit somewhere?
we have taken the piston out to replace the gasket, and noticed that 2 of the 3 return springs within the housing surrounding the piston are broken and offset. can we buy these springs as spare parts anywhere? many thanks
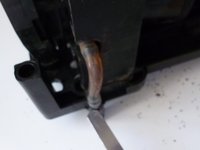
Was ist dieser Niederhalter? Wo kann dieses Teil reißen, kannst du mir kurz einen Hinweis geben. Bin mir unsicher auf welches Teil zu verweist. Evtl. könnte man es im Bild farblich markieren. Danke!
Habs jetzt in Bild 5 grün markiert. Es ist wie eine Brücke über dem oberen Kolben. Er trägt auf der Unterseite eine kleine Gummidichtung (kann auch kaputt gehen), die verhindert, dass der Kaffee oben über dem Kolben rausfließt (sondern zum Kaffeeauslauf nach vorne), wenn der Kolben ganz oben ist. Der Riss kommt recht häufig vor; er ist ziemlich unauffällig, du erkennst ihn, wenn du versuchst den Niederhalter zu verbiegen. Eine mögliche Quelle habe ich ja oben am 3.Okt.2020 angegeben.
VauWeh -
-
-
-
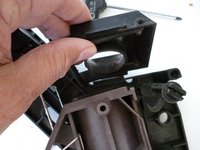
Maak de slang tussen de bovenste zuiger en de koffie-uitloop los.
-
Verwijder de bovenste zuiger.
-
Draai de Torx T20 schroef uit de zeef van de bovenste zuiger.
-
Verwijder de afdichtingshouder en de afdichting.
-
Vervang de afdichtingen op de bovenste zuiger, de koffie-uitloop en de watertoevoer.
-
Maak alle onderdelen goed schoon. Breng een beetje voedselveilige siliconen aan op de afdichtingsvlakken.
I have no coffee/water coming tru the outlet of the upper piston, i can see water runs into the piston chamber but nothing goes tru. I have changed the drain valve without luck - Any clue of what my problem could be?
Check for a tiny crack in the downholder .
VauWeh -
Well, are you sure that the issue is really with the brewing unit? I would ask someone if they could borrow a brewing unit for testing. As many machines are produced by the same factory and are equally designed (Eugster in Portugal) brewing units from Nivona, Bosch and Melitta will also fit.
VauWeh -
-
-
-
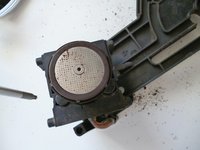
Draai de twee schroeven los. Til het ventiel eraf. Controleer en reinig het.
-
Let op: er zit ook een afdichting op de as van de onderste zuiger, maar deze is iets moeilijker te vervangen.
-
Vet alle schuivende onderdelen licht in met voor voedsel geschikte siliconenvet en zet alles weer in elkaar. Controleer of de klep soepel beweegt.
Nice article, I’ve renewed the lip seal in the brewing unit but I still don’t get even a drop of coffee in the cup, it all goes in the drip tray.
I have dismantled the brewing unit complete and suspect the lower piston seal to be the problem as it doesn’t provide any “resistance” or tight fit.
You say; “replacing is difficult”, but no instructions. Could you please provide a link?
Many thanks in advance.
And: Did you have a look to the drainage valve?
VauWeh -
Hi,
Thanks for the instructions.
There was a round spring that fell of when I dismantle, do you know where this should be?
I think it is the gray circle in step 6 picture, down to the left (8th o´clock) from the yellow circle?
Yes, there is a helix spring. Just put it in.
VauWeh -
Hello. I managed to replace the o-ring for the piston, I mean taking out and installing the new one, using a tool from this kit: YT-08429 .
-


Voer de stappen in omgekeerde volgorde uit om het apparaat weer in elkaar te zetten.
Voer de stappen in omgekeerde volgorde uit om het apparaat weer in elkaar te zetten.
Annuleren: ik heb deze handleiding niet afgemaakt.
12 andere personen hebben deze handleiding voltooid.
Met dank aan deze vertalers:
100%
Martin helpt ons de wereld te herstellen! Wil je bijdragen?
Begin met vertalen ›
Team

Repair is War on Entropy Lid van Repair is War on Entropy
Community
29 Leden
1.752 handleidingen geschreven
4 opmerkingen
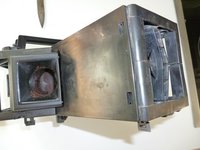
The brewing unit in my Melitta Avanza Series 600 (which is apparently identical) was completely stuck inside the machine, and the only way I could get it out was to follow this guide. Unscrewing the accessible side of the brewing unit gave me the necessary access to finally get the brewing unit unstuck and out of the machine. The cap mentioned in step 2 was a bit hard to get out with the brewing unit still inside the machine, but by first unscrewing all the other screws to loosen the side a bit and then using some force, I finally got it off without breaking it.
Note that I also had to reset the main gear position to get the brewing unit back into the machine, which on my machine was performed by pressing the single + double espresso front panel buttons for 2 seconds.
The reason why it was stuck? 100% my fault. I turned the machine off in the middle of a cleaning cycle when I realised I forgot to insert a cleaning tablet, and then tried to get the brewing unit out and ... yeah ... don't be an idiot like I was, do NOT attempt to take the brewing unit out while it's in "engaged" mode, unless you too wish to follow this guide for that reason. 😉
There is also a more bloodless way: open the left side, find the cables to the motor. Connect 12 V DC, et voila....
VauWeh -
Hello. Congratulations for the info. Can you tell me what is the service interval or when is necesarry to replace the gaskets inside the brewing unit, is there a simptom that appears in time ? I have a Melitta Caffeo Solo&Milk that I bought(new) two years ago. Thank you .
Depends on the number of prepared coffees. After two years it might be necessary, especially when the used coffee grounds is too moist. The procedure is simple and the parts are cheap, so it's better to have one more than too few.
VauWeh -