Deze versie kan foutieve bewerkingen bevatten. Schakel over naar de recentste gecontroleerde momentopname.
Wat je nodig hebt
-
-
Verwijder de volgende tien schroeven die de onderste behuizing aan de bovenste behuizing bevestigen:
-
Drie 13.5 mm (14.1 mm) lange Phillips schroeven.
-
Zeven 3 mm lange Phillips schroeven.
-
-
-
Verwijder de twee 7.4 mm lange Tri-point schroeven die de batterij aan de bovenste behuizing bevestigen.
-
Let op: voor sommige reparaties (eg. harde schijf) is het niet noodzakelijk de batterij te verwijderen. Toch wordt het altijd aangeraden aangezien je hiermee voorkomt dat je apparaat per ongeluk kortsluiting maakt op het moederbord. Wees, als je de batterij niet verwijdert, voorzichtig aangezien sommige delen van het moederbord geladen kunnen zijn.
-
-
-
Kantel de batterij ver genoeg van het logic board weg om zo toegang te krijgen tot de kabelaansluiting van de batterij.
-
Trek de kabelaansluiting van de batterij weg van het contact op het logic board en verwijder de batterij uit de bovenste behuizing.
-
Laad deze op tot 100% en laat 'm nog minstens twee uur doorladen. Gebruik je apparaat vervolgens totdat deze uitvalt vanwege een lege batterij. Wacht minstens 5 uur en laad je batterij tot slot nog een keer ononderbroken op tot 100%.
-
Als je vreemd gedrag of problemen tegenkomt na het installeren van je nieuwe batterij kan het handig zijn om de SMC van je MacBook te resetten.
-
-
Deze stap is niet vertaald. Help het te vertalen
-
Use the flat end of a spudger to carefully pry the AirPort/Bluetooth ribbon cable up off its socket on the logic board.
-
-
Deze stap is niet vertaald. Help het te vertalen
-
Pull the camera cable connector straight out of its socket on the logic board.
-
-
Deze stap is niet vertaald. Help het te vertalen
-
Use the tip of a spudger to pry the three antenna connectors up off the AirPort/Bluetooth board.
-
-
Deze stap is niet vertaald. Help het te vertalen
-
De-route all three antenna cables from their channels in the AirPort/Bluetooth housing.
-
De-route the camera cable from its channel in the AirPort/Bluetooth housing.
-
-
-
Deze stap is niet vertaald. Help het te vertalen
-
Remove the following two screws securing the AirPort/Bluetooth housing to the upper case:
-
One 3.8 mm Phillips
-
One 8.6 mm Phillips
-
-
Deze stap is niet vertaald. Help het te vertalen
-
Remove the AirPort/Bluetooth assembly from the upper case, minding any cables that may get caught.
-
-
Deze stap is niet vertaald. Help het te vertalen
-
Remove the 8.6 mm Phillips screw securing the antenna/camera cable retainer to the upper case.
-
Remove the antenna/camera cable retainer from the upper case.
-
-
Deze stap is niet vertaald. Help het te vertalen
-
Remove two of the three 6 mm T6 Torx screws securing the right side of the display to the upper case.
-
-
Deze stap is niet vertaald. Help het te vertalen
-
Grab the plastic pull tab secured to the display data cable lock and rotate it toward the DC-In side of the computer.
-
Pull the display data cable straight out of its socket on the logic board.
-
-
Deze stap is niet vertaald. Help het te vertalen
-
Remove the 8.6 mm Phillips screw securing the display data cable retainer to the upper case.
-
Remove the display data cable retainer from the upper case.
-
-
Deze stap is niet vertaald. Help het te vertalen
-
Remove two of the three 6 mm T6 Torx screws securing the left side of the display to the upper case.
-
-
Deze stap is niet vertaald. Help het te vertalen
-
Open your MacBook Pro so the display is perpendicular to the upper case.
-
Place your opened MacBook Pro on a table as pictured.
-
While holding the display and upper case together with your left hand, remove the remaining T6 Torx screw from the upper display bracket.
-
-
Deze stap is niet vertaald. Help het te vertalen
-
Remove the last remaining T6 Torx screw securing the display to the upper case.
-
-
Deze stap is niet vertaald. Help het te vertalen
-
Grab the upper case with your right hand and rotate it slightly toward the top of the display so the upper display bracket clears the edge of the upper case.
-
Rotate the display slightly away from the upper case.
-
Lift the display up and away from the upper case, minding any brackets or cables that may get caught.
-
-
Deze stap is niet vertaald. Help het te vertalen
-
Before starting, be sure to clean the display glass with lint-free cloth moistened with a mild solution; it will make the suction cup adhere better, and will make checking for dust on reassembly easier
-
With the heat gun set to low, start by heating the outer black border near the upper right corner of the glass panel.
-
-
Deze stap is niet vertaald. Help het te vertalen
-
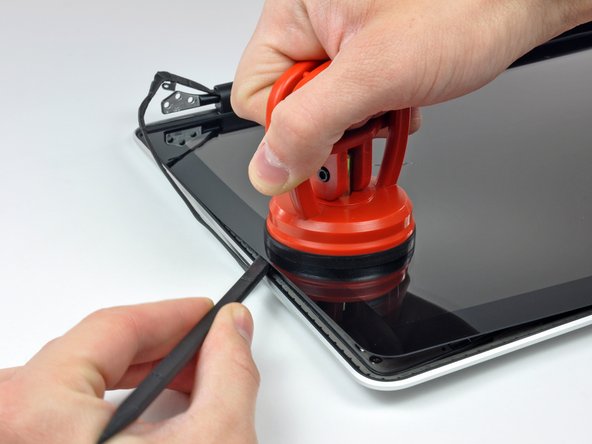
With the panel sufficiently heated, fasten a heavy-duty suction cup near the upper right corner of the display glass.
-
Slowly and gently pull the corner of the display glass up off the display assembly.
-
-
Deze stap is niet vertaald. Help het te vertalen
-
Gently lift the corner of the display glass enough to insert a spudger between it and the display assembly.
-
Use the flat end of a spudger to gently pry up the adhesive securing the front glass to the display.
-
Pry up the glass panel a few inches away from the upper right corner along the top and right edges of the display.
-
-
Deze stap is niet vertaald. Help het te vertalen
-
Use a heat gun to soften the adhesive under the black strip along the right side of the front glass panel.
-
Attach a suction cup along the right side of the front glass panel.
-
Pull up on the glass panel while you use the flat end of a spudger to separate it from the rest of the display assembly.
-
Continue working along the right edge of the front display glass until it is separated from the display.
-
-
Deze stap is niet vertaald. Help het te vertalen
-
Use your heat gun to soften the adhesive under the black strip along the top edge of the glass display panel.
-
Attach a suction cup near the top edge of the glass display panel and use it to pull the glass panel up off the display.
-
Work along the top edge of the glass panel, carefully using the flat end of a spudger to separate the adhesive if necessary.
-
-
Deze stap is niet vertaald. Help het te vertalen
-
Use a heat gun to soften the adhesive under the black strip near the upper left corner of the glass display panel.
-
Attach a suction cup near the upper left corner of the glass display panel.
-
Pull up on the suction cup and use the flat end of a spudger to carefully pry the glass display panel out of the display assembly.
-
-
Deze stap is niet vertaald. Help het te vertalen
-
Use a heat gun to soften the adhesive under the black strip along the left side of the front glass panel.
-
Attach a suction cup along the left side of the front glass panel.
-
Pull up on the glass panel while you use the flat end of a spudger to separate it from the rest of the display assembly.
-
Continue working along the left edge of the front display glass until it is separated from the display.
-
-
Deze stap is niet vertaald. Help het te vertalen
-
Now that the top, left, and right edges of the glass are free from the display, slowly lift the top edge of the glass panel and gently rotate it out of the display.
-
-
Deze stap is niet vertaald. Help het te vertalen
-
Insert the edge of a plastic opening tool between the display glass and the camera bracket, and run it around the camera bracket to separate it from the display glass.
-
-
Deze stap is niet vertaald. Help het te vertalen
-
To reconnect the cable, first use the tip of a spudger to remove the piece of foam tape over the camera cable ZIF socket.
-
Use the tip of a spudger to flip up the ZIF cable retainer on the camera cable socket.
-
Insert the camera cable into its socket on the camera board and use the tip of a spudger to snap down the ZIF cable retainer, locking the cable in place.
-


Annuleren: ik heb deze handleiding niet afgemaakt.
21 andere personen hebben deze handleiding voltooid.

6 opmerkingen
It is easier to start in one of the lower corners. The glass is not held by the rubber bushing.
Is it really necessary to remove the display from the uppercase? Why can't you just start from step 21?
I was wondering the same, is absolutely necessary to disassemble the screen to change the glass? Can I jump to step 21?
No you don't need to remove the Top or Display to replace the glass.
I'm under the presumption that this method would be similar for other unibody versions such as the early / late 2011?