Deze versie kan foutieve bewerkingen bevatten. Schakel over naar de recentste gecontroleerde momentopname.
Wat je nodig hebt
-
-
Verwijder de volgende tien schroeven die de onderste behuizing aan de bovenste behuizing bevestigen:
-
Zeven 3 mm lange Phillips schroeven.
-
Drie 13.5 mm lange Phillips schroeven.
-
-
-
Verwijder de twee 5-punts Pentalobe schroeven langs de bovenkant van de batterij.
-
-
Deze stap is niet vertaald. Help het te vertalen
-
Hold the end of the cable retainer down with one finger while you use the tip of a spudger to slightly lift the other end and rotate it away from the camera cable connector.
-
-
-
Deze stap is niet vertaald. Help het te vertalen
-
Disconnect the camera cable by pulling the male end straight away from its socket.
-
-
Deze stap is niet vertaald. Help het te vertalen
-
Peel the camera cable off the adhesive securing it to the optical drive.
-
-
Deze stap is niet vertaald. Help het te vertalen
-
Disconnect the Bluetooth cable by pulling the male end straight away from its socket.
-
Use the flat end of a spudger to pry the Bluetooth antenna cable from its socket on the board.
-
-
Deze stap is niet vertaald. Help het te vertalen
-
Remove the two 8 mm Phillips screws securing the Bluetooth/camera cable retainer to the upper case.
-
Lift the Bluetooth board/cable retainer assembly out of the upper case.
-
-
Deze stap is niet vertaald. Help het te vertalen
-
Use a spudger to pry the optical drive connector straight up off the logic board.
-
-
Deze stap is niet vertaald. Help het te vertalen
-
Remove the single 3.5 mm Phillips screw securing the inner side of the optical drive to the upper case.
-
-
Deze stap is niet vertaald. Help het te vertalen
-
Remove the two 3.5 mm Phillips screws securing the outer side of the optical drive to the upper case.
-
-
Deze stap is niet vertaald. Help het te vertalen
-
Lift the optical drive from its left edge and pull it out of the upper case.
-
-
Deze stap is niet vertaald. Help het te vertalen
-
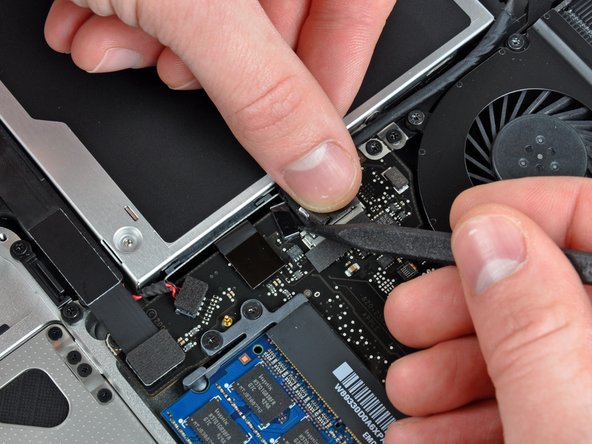
Use the flat end of a spudger to pry the hard drive/IR sensor cable connector up off the logic board.
-
Peel the hard drive cable up from the channel within the subwoofer and right speaker.
-
-
Deze stap is niet vertaald. Help het te vertalen
-
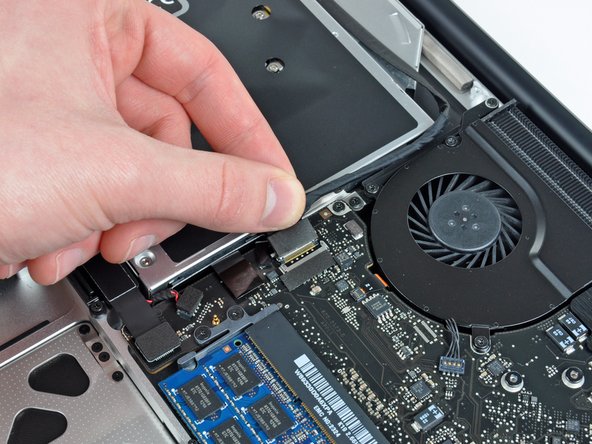
Using the flat end of a spudger, pry the subwoofer/right speaker connector straight up off the logic board.
-
-
Deze stap is niet vertaald. Help het te vertalen
-
Remove the following four screws securing the subwoofer and right speaker to the upper case:
-
Two 3.2 mm Phillips screws.
-
One 2.6 mm Phillips screw.
-
One 5 mm Phillips screw.
-
-
Deze stap is niet vertaald. Help het te vertalen
-
Lift the subwoofer and right speaker assembly out of the upper case.
-


Annuleren: ik heb deze handleiding niet afgemaakt.
12 andere personen hebben deze handleiding voltooid.

2 opmerkingen
Excellent tutorial : be careful when removing the woofer connection : do it exactly as it is pictured otherwise you may harm the motherboard.
I followed these steps in order to inspect the cracked subwoofer of my MBP. After disassembly, the membrane was unglued and instead of replacing, finnally I glued it again with Neopren. It works perfectly again !