Inleiding
This guide will show you how to replace the SuperDrive from your laptop (requires a SATA SuperDrive).
Gereedschap
-
Remove the following ten screws securing the lower case to the upper case:
-
Seven 3 mm Phillips screws.
-
Three 13.5 mm Phillips screws.
-
-
Using both hands, lift the lower case near the vent to pop it off two clips securing it to the upper case.
-
Remove the lower case and set it aside.
-
Three Pentalobe screws secure the battery to the upper case. They can be removed with this special driver.
Unfortunately, when I added a second hard drive via these instructions, all went well but Bluetooth is now MIA. Can anyone help?
I agree...
I have bought a used MacBook Pro, when problems arise, opening Corps was trying to turn the screw, but with poor quality could not turn a screwdriver, only to ruin the screw. Try to buy ifixit Screwdriver set. Good luck to all and thank you ifixit team for such assistance as ifixit.com. Thank you.
-
Remove the two exposed five-point Pentalobe screws along the top edge of the battery.
I have a problem with these screw. They a completly warn and I need some new ones to fix the new Battery.
Does anyone know which thread it is and which length?
-
Use the tip of a spudger to bend back the finger of the "Warning: Do not remove the battery" sticker while you remove the five-point Pentalobe screw hidden underneath.
-
Lift the battery by its plastic pull tab and slide it away from the long edge of the upper case.
-
Tilt the battery back enough to access the battery cable connector.
-
Pull the battery cable connector away from its socket on the logic board and remove the battery from the upper case.
-
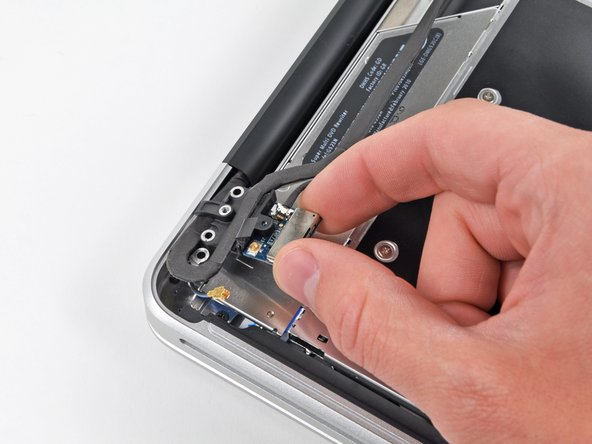
Hold the end of the cable retainer down with one finger while you use the tip of a spudger to slightly lift the other end and rotate it away from the camera cable connector.
I tried to move the plastic piece, but it seemed risky for someone with no experience like me. It was not hard at all to just peel off the camera cable without messing with the connector, and then, carefully take the optical drive out.
-
Disconnect the camera cable by pulling the male end straight away from its socket.
-
Peel the camera cable off the adhesive securing it to the optical drive.
-
Disconnect the Bluetooth cable by pulling the male end straight away from its socket.
-
Use the flat end of a spudger to pry the Bluetooth antenna cable from its socket on the board.
-
Remove the two 8 mm Phillips screws securing the Bluetooth/camera cable retainer to the upper case.
-
Lift the Bluetooth board/cable retainer assembly out of the upper case.
-
Use a spudger to pry the optical drive connector straight up off the logic board.
-
Remove three 3.5 mm Phillips screws securing the optical drive to the upper case.
-
Lift the optical drive from its left edge and pull it out of the computer.
-
Débranchez le connecteur du câble du lecteur optique de celui-ci.
-
Remove the optical drive cable by pulling it straight away from the optical drive.
-
Remove the two black Phillips #0 screws securing the small metal mounting bracket. Transfer this bracket to your new optical drive or hard drive enclosure.
To reassemble your device, follow these instructions in reverse order.
Annuleren: ik heb deze handleiding niet afgemaakt.
23 andere personen hebben deze handleiding voltooid.