Inleiding
Geburik deze handleiding voor het vervangen van een kapotte harde schijf.
Als je nieuwe harde schijf langzaam of niet juist lijkt te werken, probeer dan de kabel van de harde schijf te vervangen. Een beschadiging van de kabel is een veelvoorkomend probleem dat resulteert is een afname in snelheid waarmee data van en naar je harde schijf wordt getransporteerd. Dit komt vaak voor bij SSD-schijven aangezien deze een hoge lees- en schrijfsnelheid hebben.
Wat je nodig hebt
Video overzicht
-
-
Verwijder de volgende tien schroeven:
-
Drie 14.4 mm lange Phillips #00 schroeven
-
Drie 3.5 mm lange Phillips #00 schroeven
-
Vier 3.5 mm lange geschouderde Phillips #00 schroeven
-
-
-
Gebruik de voor- of achterkant van een spudger om de batterijaansluiting uit het contact op het moederbord omhoog te wrikken.
-
-
-
-
Verwijder de twee Phillips schroeven die de beugel van de harde schijf aan de bovenste behuizing bevestigen.
-
-
-
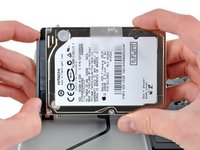
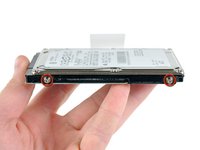
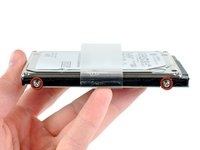
Verwijder de vier 6.0 mm lange T6 Torx bevestigingspinnen aan de zijkant van de harde schijf.
-
Verplaats de bevestigingspinnen naar je nieuwe harde schijf.
-


Om je toestel weer in elkaar te zetten, volg je deze instructies in omgekeerde volgorde.
Annuleren: ik heb deze handleiding niet afgemaakt.
853 andere personen hebben deze handleiding voltooid.
Met dank aan deze vertalers:
100%

Thomas Keulemans helpt ons de wereld te repareren! Doe je mee?
Begin met vertalen ›

47Gids Commentaar
In case you need to install/reinstall your OS, the new MBPs no longer come with an install disc. To install your OS you will need to hold down CMD + R while booting up until it chimes. It will then walk you through the process.
After holding command + R during start up I ran into a problem using Time Machine trying to restore all the files in my system. Apparently the Samsung solid state SSD 859 EVO drive I put in first needs to be formatted before Time Machine can even recognize it! No error message appeared, but no destination disk could be located. Apparently that's what happens with an unformatted hard drive. The solution is to select Disk Utilities in the first window seen after pressing command +R. Then In the left sidebar I could see all the drives including the external hard drive with my Time Machine back up and also the Samsung solid state hard drive I installed. With the newly installed hard drive selected, use the default erase and re-formating options and click on ERASE (this will also format the erased drive). This operation was very quick. I then returned to Time Machine and voila, the hard drive was locatable as a destination disk.
To the people that this still doesn’t work, try pressing cmd+alt+R, after connecting to WiFi go to Disk Utilities, format the new hard drive, and then you can proceed to restore or clean install iOS.
I needed to install the OS X in the new HD using a USB (manual in applesfera), then I was surprised when after do all this guide I see a message "Can't verified the copy...." I fixed reinstalling my old HD, and run the old OS, changed the date and time, I change again the HD, but (this is the important) don't pull off the battery connector. If you disconnect the battery, the system lost the date and time and yo can't install the OS X with and USB. I don't test the cmd + R option.