Deze vertaling is door een computer gegenereerd en is nog niet door iemand nagekeken. Spreek je deze taal? Bekijk het hier.
Inleiding
Gebruik deze handleiding om een luidruchtige of doorgebrande ventilator te vervangen.
Wat je nodig hebt
-
-
-
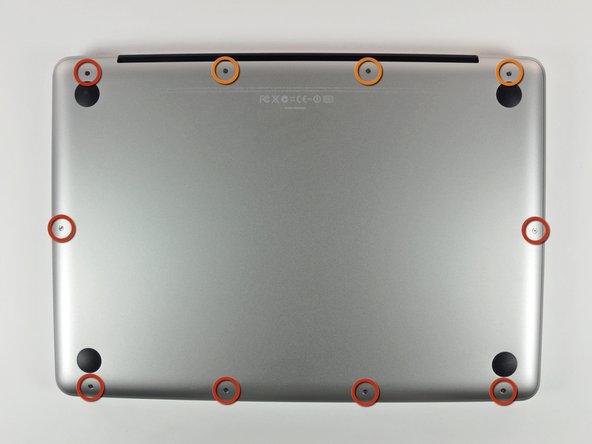
Verwijder de volgende 10 schroeven uit de onderste behuizing van de MacBook Pro 13" Unibody:
-
Zeven 3 mm lange kruiskopschroeven.
-
Drie 13.5 mm lange kruiskopschroeven.
 Vraag FixBot
-
-
-
Til de voorkant onderste behuizing iets omhoog en duw de behuizing richting de achterkant van de laptop om de behuizing volledig los te krijgen.
-
-
-
-
-
-
Gebruik de platte kant van een spudger om de accu-aansluiting uit het stopcontact op het logic board te tillen.
-
-
-
-
-
Gebruik een spudger om de (kabel)aansluiting van de ventilator uit het stopcontact op het logic board te wippen.
-
-
-
Verwijder de volgende drie schroeven:
-
Eén 7 mm T6 Torx-schroef
-
Twee 5,4 mm T6 Torx-schroeven
-
-


Volg deze instructies in omgekeerde volgorde om je apparaat weer in elkaar te zetten.
Annuleren: ik heb deze handleiding niet afgemaakt.
133 andere personen hebben deze handleiding voltooid.

4Gids Commentaar
Thanks Walter Galan for this guide its my first repair using fixit.
So I noticed MacBook Pro’s Fan is not working leaving the equipment very hot.
I bought a new part in Ifixit and repair my laptop.
The trickiest part is removing the motherboard connector. I did this using spudger tool with success but spend some time with careful.
Just I noticed again before install new part that is noising when spinning. So I force a little the the metal case to put away propellers that was contacting with her.
Another suggestion is clean fan before with a hair dryer for example, same to the place where will put the new fan.
So repair made with sucess!!!
The repair was quick and simple with the use of an iFixit toolkit that I conveniently already had. The fan works well. Thank you to Walter Galan for this easy-to-follow guide and thank you to the guys at the iFixit store for the speedy shipment.
