Inleiding
What is Dust-Gate?
2016+ (all the way to 2022 M1 models) 13" MBPs all suffers from dust-gate. The video and backlight flex cable rolls around the clamshell hinge cylinder and if something grainy like salt or breadcrumb gets in between. It will pinch the flex cable and damage the video and/or backlight signaling.
Flex cable is impossible to replace as its sandwiched in the glued together LCD/lid. Aftermarket screens are expensive and as usual much lower quality than Apple OEM.
Even basic task of cleaning the screen may drop debris into this hinge area. Best with the LCD on its back and keyboard+body pointing up vertically to clean the screen wiping away from the clamshell hinge.
If in a high debris environment such as frequent eating while working on the laptop, pet that sheds, or dropping ample debris into the hinge. Its probably best to consider cleaning it every couple of years. It does require great deal of skill and care to do this and unlikely any professional shop sees a business charging customer $400 for 2+ hour required to do a thorough cleaning and carefully pick out the debris instead of pushing them in deeper into the rolled flex cable + clamshell hinge cylinder.
What Models are Affected
- 2016-2022 13.3" MBP. Fan cooled design might also contributes to the dust as the fan exhaust port is adjacent to where these flex roll around the clamshell hinge cylinder.
- 2018-2022 13.3" MBA hinge and LCD flex design is the same so likely similar dust-gate issue is present. The 2020+ M1 MBAs with fanless design might do better due to less debris blowing around.
Skill Level
Difficulty of this job is relative to the repairer skill as usual. It does require good laptop disassembly experience. Dexterity. And good magnifying eyewear to carefully remove/clean the debris. Can't just push a pointy Q-tip, brush, or blow air in there as debris will lodge deeper into the flex seem against its rolled hinge cylinder eventually unable to reach and remove.
More novice should consider this very challenging. One misstep while cleaning and causing damage to the cable is the end of the display.
What if Already Dusk-Gate Damaged?
Some repair shops are able to attempt to fix this. They do this under high magnification and carefully expose the broken trace on the flex and touch up with soldering iron. The above eyewear used for this cleaning is insufficient magnification as are most soldering irons. These shops might not be in most locales so shipped in repair is likely required. Google/youtube to find potential repair shops.
Wat je nodig hebt
-
-
Start by studying the directions on removing the screen.
-
Need to use magnifying eye wear and tweezers to pick out the larger debris and in generally wipe/pull debris away from getting in deeper. Must be careful with tweezers to not to pinch/puncture flex), pointy Q-Tip, and small soft/thin fiber brush are all useful tools.
-
-
-
The floppy display connection can potentially scratch the screen while manipulating the screen to clean the flex. It maybe good idea to lay micro fiber across the screen and tape it against the back of the lid for protection.
-
-
-
-
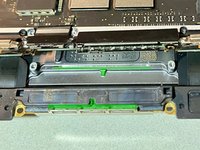
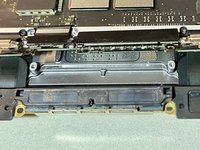
The antenna bar must be keyed in properly during reinstall. If not, then rotating screen hinge will result in squeezing on this part of the bar and make rubbing/clicking sound
-
-
-
Easy to get the spring tensioned strap caught between screen and keyboard where it doesn't belong. If the clam shell is closed all the way, I'd imagine it will certainly scratch if not crack the screen. Thus take great care to inspect inside hinge of the clamshell after just mounting the screen's 6 screws to confirm didn't get caught in between.
-


To reassemble your device, follow these instructions in reverse order.
Annuleren: ik heb deze handleiding niet afgemaakt.
3 andere personen hebben deze handleiding voltooid.