Deze versie kan foutieve bewerkingen bevatten. Schakel over naar de recentste gecontroleerde momentopname.
Wat je nodig hebt
-
-
Gebruik P5-schroevendraaier om de volgende schroeven te verwijderen:
-
Twee 7.9 mm lange schroeven
-
Twee 7.1 mm lange schroeven
-
Zes 2.6 mm lange schroeven
-
-
-
Duw je vingers tussen het scherm en de onderste behuizing en trek deze omhoog om de onderste behuizing van de MacBook Air los te maken.
-
Verwijder de onderste behuizing.
-
-
-
Trek de tape die over de batterijaansluiting heen zit ver genoeg los om de batterijaansluiting bloot te leggen.
-
-
Deze stap is niet vertaald. Help het te vertalen
-
Slide the tip of a spudger underneath the speaker cable and pry straight up to disconnect the speaker.
-
-
Deze stap is niet vertaald. Help het te vertalen
-
Use a T3 Torx driver to remove the three 1.4 mm screws securing the audio board cable bracket.
-
Remove the cable bracket.
-
-
-
Deze stap is niet vertaald. Help het te vertalen
-
Use the flat end of a spudger to pry the audio board connector straight up and disconnect it.
-
-
Deze stap is niet vertaald. Help het te vertalen
-
Use the flat end of a spudger to pry the Touch ID sensor connector straight up and disconnect it.
-
-
Deze stap is niet vertaald. Help het te vertalen
-
Remove the following screws:
-
Two 4.3 mm, T5 Torx screws
-
One 2.4 mm, T3 Torx screw
-
-
Deze stap is niet vertaald. Help het te vertalen
-
Slide the flat end of a spudger underneath the Touch ID sensor cable to slice through the adhesive securing it to the audio board.
-
-
Deze stap is niet vertaald. Help het te vertalen
-
Peel back the black tape covering the fan cable connector.
-
-
Deze stap is niet vertaald. Help het te vertalen
-
Use the tip of a spudger to lift up the locking flap on the fan cable's ZIF connector.
-
Slide the fan cable out of the ZIF connector.
-
-
Deze stap is niet vertaald. Help het te vertalen
-
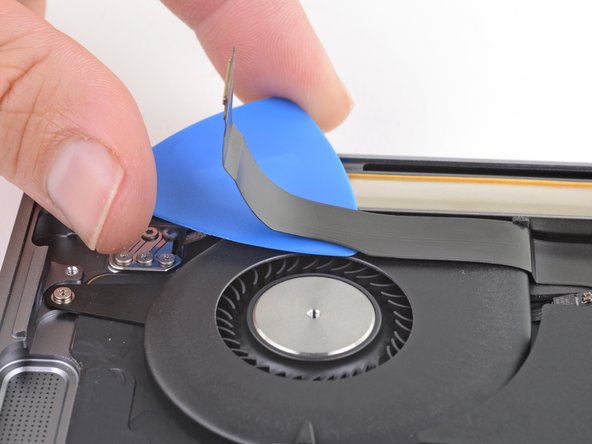
Slide an opening pick under the audio board cable to slice through the adhesive securing it to the fan.
-
-
Deze stap is niet vertaald. Help het te vertalen
-
Use a T5 Torx driver to remove the three 2.7 mm screws securing the fan.
-


Annuleren: ik heb deze handleiding niet afgemaakt.
7 andere personen hebben deze handleiding voltooid.
